|
|
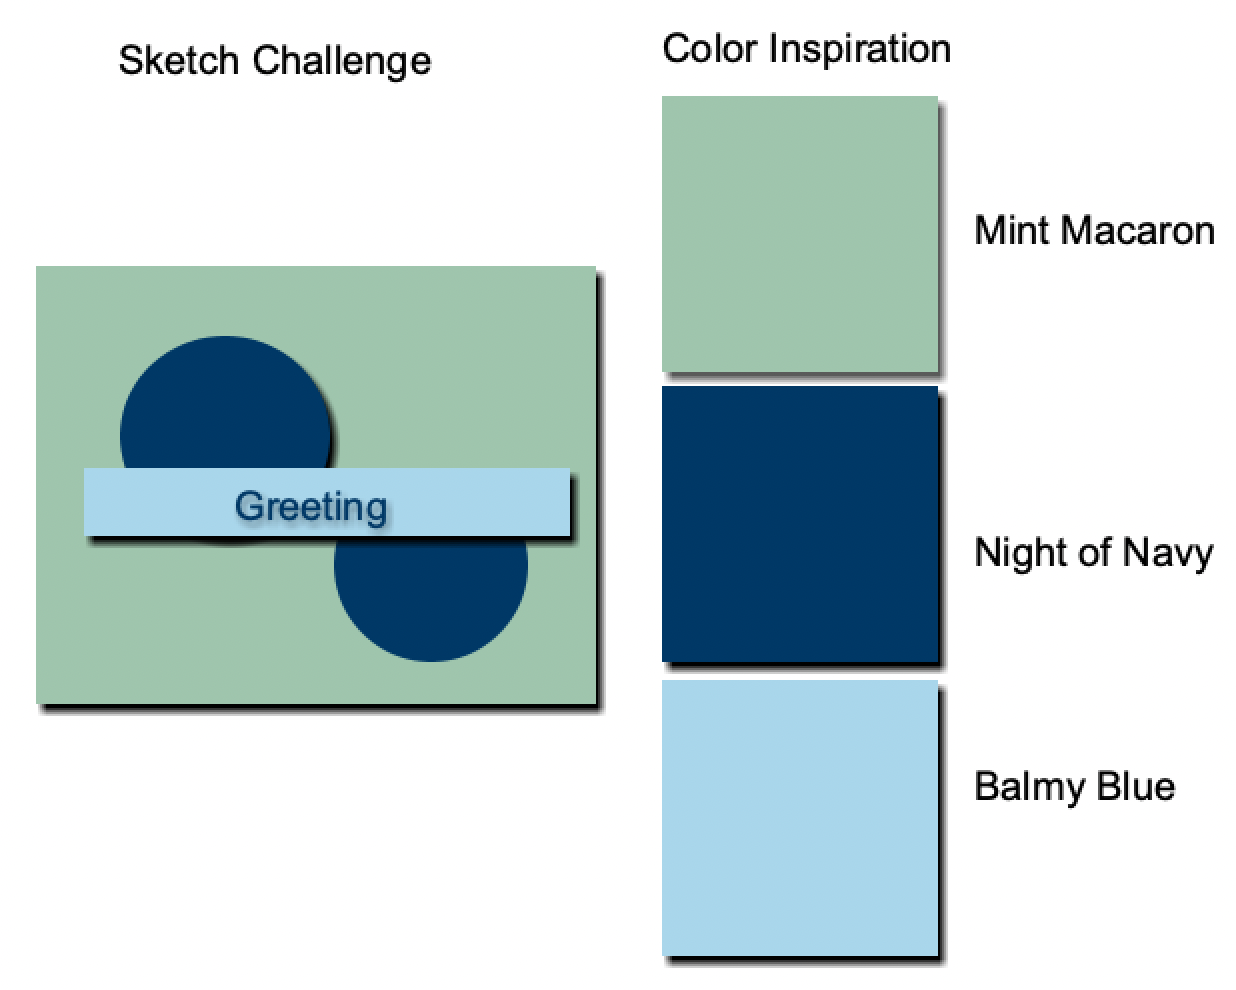
In this issue: April Challenge and Color
Inspiration April Promotion: Going, Going, Gone-Retired List and Color Refresh April Hostess Code April Featured
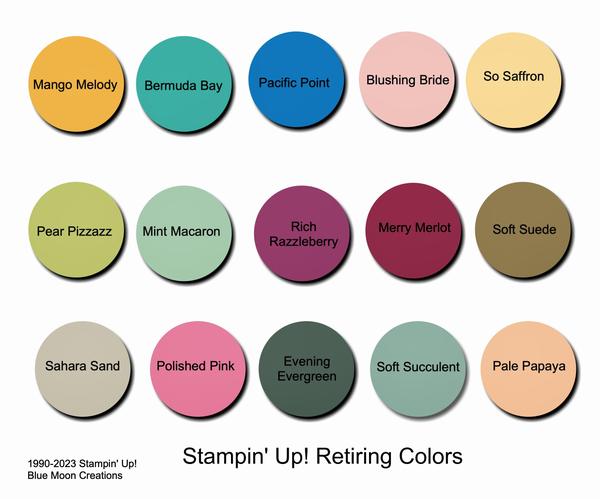
Product: Fish & A Wish Bundle April Featured Projects: Faux Tile, Split Circle, Give It a Whirl April Sketch Challenge and Color Inspiration Stampin' Up! is doing a color refresh (the last one was in 2018). Some of the basic colors will be retiring and be replaced with new colors. Retiring colors are: Mango Melody, Bermuda Bay, Pacific Point, Blushing Bride, So Saffron, Pear Pizzazz, Mint Macaron, Rich Razzleberry, Merry Merlot, Soft Suede, and Sahara
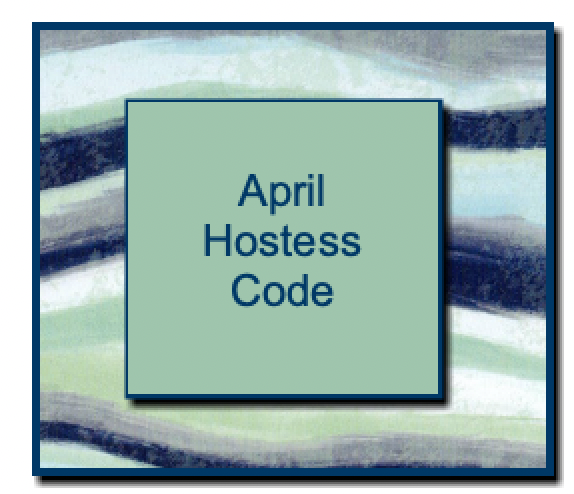
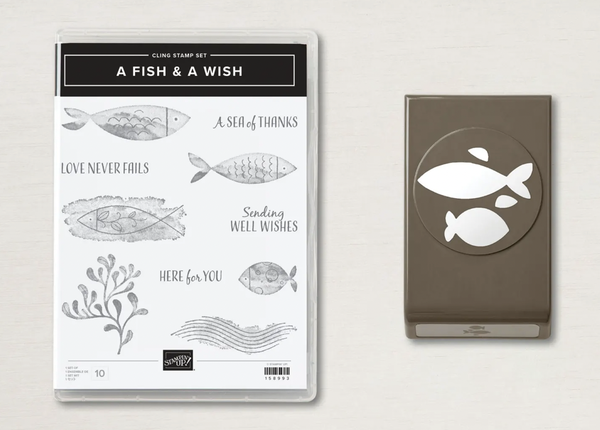
Sand. Retiring 2021-2023 In Colors are Polished Pink, Evening Evergreen, Soft Succulent, and Pale Papaya. Ink pads, refills, paper, etc. will be available until May 1 or while supplies last. If you want to stock up on your favorite retiring colors, I would suggest you do so soon. Past experience tells me they will go fast! You can view a Color Refresh Video from Stampin' Up! HERE Returning In Colors and new colors will be part of the basic color families! 4GGTQ72M Orders using this hostess code will be combined. As always, if we have enough in sales to make the order a workshop ($150), those placing an order using the hostess code will share the hostess rewards. Hostess rewards will be based on a percentage of each order placed. Please place your order online by April 25. I will notify our hostesses by email on April 26. The workshop will need to close on April 28. If your individual order happens to total $150.00 or more, please do not use the Hostess Code above. Instead, you can be your own hostess and redeem the rewards for yourself! Place an online order or contact me, and I'll place the order for you. Thank you. Anne A Fish & A Wish Bundle-Retiring Soon! A Fish & A Wish Bundle includes the A Fish & A Wish Stamp Set
and the Fish Builder Punch. Help them “sea” just how much love and support you’re sending with the
A Fish & A Wish Bundle. Stamp, then easily punch out the fish images for your next handmade card or other papercrafting project. Whether you’re wanting to send a playful underwater scene or a message of hope and inspiration, this bundle has you covered—get yours now!
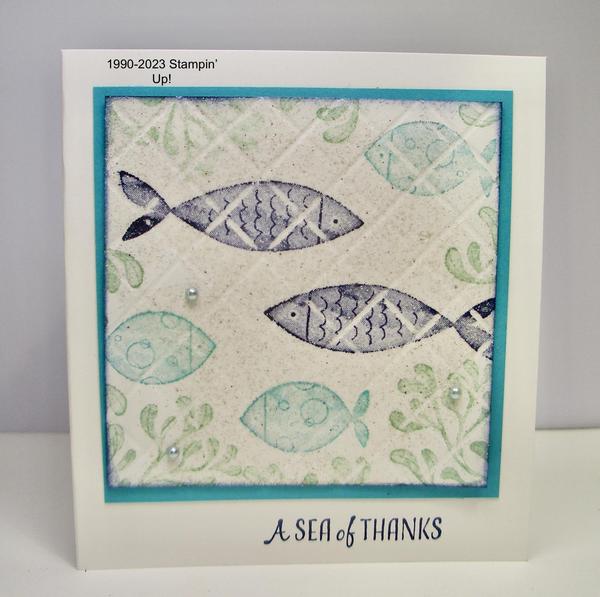
Watch my Faux Tile How-to Video Here Instructions: 1.Cut card front out of Basic White card stock measuring 3 1/2" x 3 1/2".
2.Place on Simply Scored Scoring Tool on the diagonal at the 6" mark. Make sure the top and bottom points are lined up with the
6" groove.
3.With the large end of the stylus, score every 1/2".
4.Turn the card front 90 degrees, line up the top and bottom points at the 6" mark, and score every 1/2".
5.You will now have raised score lines on the back and indented score lines on
the front. You will stamp on the side with the indented score lines, making it look like tile with grout.
Stamp images from A Fish & A Wish using Night of Navy, Coastal Cabana, and Mint Macaron ink.
6.Sponge Night of Navy ink along the edges.
7.Option: To get the glossy tile look, tap Versmark ink on the card front. Heat emboss using clear embossing powder.
8.Attach to Bermuda Bay mat. Stamp greeting on Basic White card base using Night of Navy ink. Attach card front. Add pearls to complete.
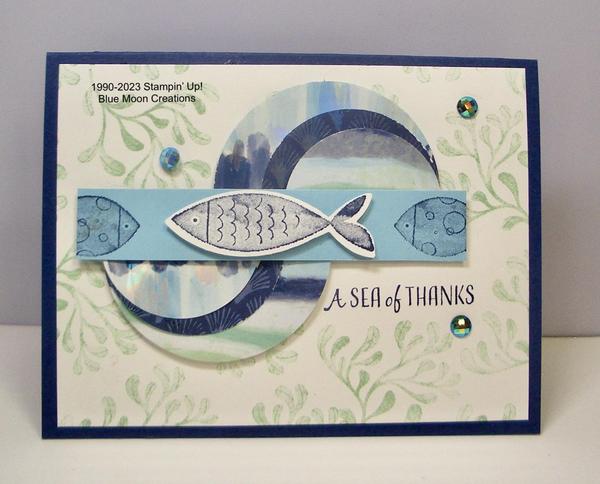
Supplies Used: Stamp Set: A Fish & A Wish Ink: Night of Navy, Coastal Cabana, Mint Macaron (retiring), Versamark Paper: Basic White, Bermuda Bay (retiring) Accessories: Simply Scored Scoring Tool and stylus, heat tool, clear embossing powder, pearls, sponge Split Circle Card-Sketch Challenge Watch my Split Circle How-to Video HERE Instructions: Pattern #1 punch using 2 1/2” and 1 3/8” circle punches
Pattern #2 punch using 2” and 1
3/4” circle punches
Pattern #3 punch using 2 1/2” and 1 3/8” circles punches 1.Die-cut or punch circles out of By the Bay 6"x6" DSP pattern #1 using 2 1/2” circle punch. Cut in half. Set one of the cut pieces aside for another project. Die-cut or punch another piece using 1 3/8” circle punch. Cut in half, and set one of the cut pieces aside for another project.
2.Die-cut or punch pattern #2 using 2” circle punch. Cut in half, and set one of the cut pieces aside for another project. Die-cut or punch another piece using 1 3/4" circle punch. Cut in half, and set one of the cut pieces aside.
3.Die cut or punch pattern #3 using 2 1/2” circle punch. Cut in half, and set one of the cut pieces
aside. Die-cut or punch another piece using 1 3/8” circle punch. Cut in half, and set one of the cut pieces aside.
4.Layer 2 sets of circles one on top of the other, largest to smallest, lining up the right and left edges. Alternate the designer series paper and line up, so the patterns match.
5.Stamp card front using the
"seaweed" image from A Fish & A Wish stamp set using Mint Macaron ink.
6.Attach circles to card front. I left a small space between the 2 circles, and I covered it with the stamped fish strip.
7.Stamp small fish on 3/4” x 4 1/4” strip of Balmy Blue card stock using Night of Navy ink.
8.Stamp larger fish on Basic White card stock using Night of Navy ink. Punch using the coordinating Fish Builder Punch.
9.Attach to card front using Mini Dimensionals to pop it up.
10.Stamp greeting using Night of Navy ink. Attach to Night of Navy card base. Add
embellishments to complete. Supplies Used: Stamp Set: A Wish & A Fish Ink: Night of Navy, Mint Macaron (retiring) Paper: Night of Navy, Basic White, Balmy Blue, By the Bay 6"x6" Designer Series Paper Accessories: 2 1/2", 2", 1 3/4", and 1 3/8" circle punches, Fish Builder punch, Mini Dimensionals, Waves Rhinestone Basic Jewels
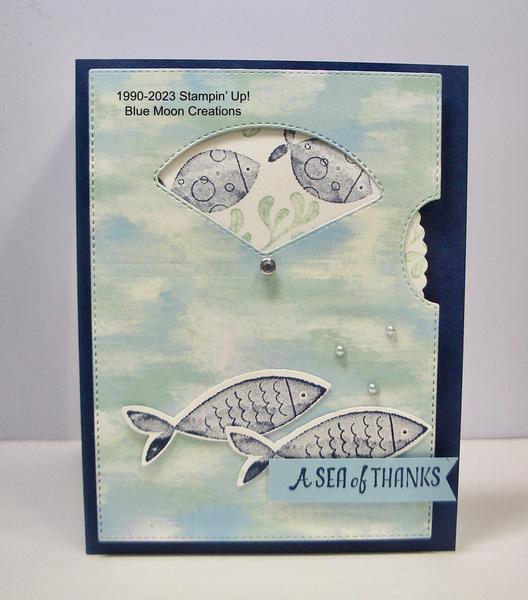
A Fish & A Wish Give It a Whirl Card See Give It a Whirl Card in action Here View a past Give It a Whirl
How-to Video Here Instructions: 1.Cut pieces for card using Stampin' Cut & Emboss Machine and Give It a Whirl Dies:
-card front out of By the Bay DSP
- circle piece out of Basic White card stock
2.Stamp fish and seaweed on circle piece using Night of Navy and Mint Macaron inks.
3.Place circle behind card front, matching up the holes. Insert brad in hole. Piece should now spin.
4.Attach card front to Night of Navy card base using Foam Adhesive Strips along back edges.
5. Stamp fish on scrap Basic White card stock using Night of Navy ink. Punch using coordinating Fish Builder Punch.
6.Stamp greeting on scrap Balmy Blue card stock using Night of Navy ink.
7. Attach fish to card front. Attach greeting using Mini Dimensionals to
pop it up. Add pearls to complete. Supplies Used: Stamp Set: A Wish & A Fish Ink: Night of Navy, Mint Macaron (retiring) Paper: Night of Navy, Basic White, By the Bay 6"x6" Designer Series
Paper Accessories: Stampin' Cut & Emboss Machine, Give It a Whirl Die, Fish Builder Punch, Foam Adhesive Strips, Mini Dimensionals, brad, pearls
You are receiving this email from Anne Hayward because you have subscribed to my mailing list. Thank
you! I am a Stampin' Up! Demonstrator, and most, if not all, of the product I use is Stampin' Up! Usually, substitutions can easily be made with other products. If this is not for you, that is ok. To unsubscribe, please see the instructions at the bottom of this email. But please do not file a complaint or tag my emails as SPAM. To ensure that you continue to receive emails from me, please add the following to your address book: |
|
|
|
|