|
|
In this issue: November Sketch Challenge and Color
Inspiration November Promotions: Online Exclusives November Featured Product:Handcrafted Elements Dies November
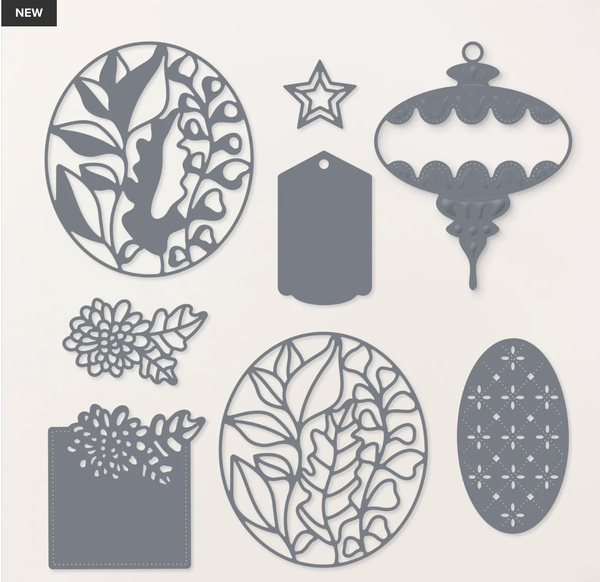
Featured Projects: Handcrafted Elements Dies November Sketch Challenge and Color Inspiration November Online Exclusives Handcrafted Elements Dies Need an ornamental layering feature? Look no further than the Handcrafted Elements Dies! These dies are a wonderful and easy way
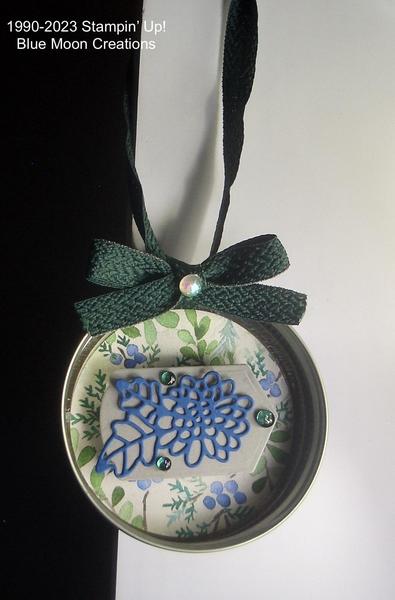
to add texture and design to your cards or gift tags! Included are round dies, a floral die, and square dies, each with their own unique elaborate and delicate design. Place them onto your holiday cards for a festive feature or turn them into ornate and detailed gift tags. You can even add your favorite ribbon and turn them into ornaments for your Christmas tree! Handcrafted Elements Mason Jar Ring Ornament Use the band of a 2 3/4" diameter mason jar lid to create this easy ornament. Instructions: 1.Die-cut or punch a 2 1/2" circle out of Winter Meadow DSP.
2.Thread ribbon for the hanger through the mason jar band. Tie a knot at the base and
leave enough ribbon for tying another knot at the top.
3.Insert and attach the circle to the inside of the band using Liquid or Fine Tip Glue.
4.Die-cut tag out of Smoky Slate and flower out of Blueberry Bushel card stock. Attach the flower to the tag using Liquid or Fine Tip glue.
5.Attach the tag to the center of the circle. To make the tag pop up more, layer two pieces of Foam Adhesive strips, one on top of the other.
6.Attach Tinsel Gems to the tag and flower.
7.Tie a knot at the top of the ribbon, cutting off any excess. Tie a bow out of another
piece of ribbon and attach it to the top of the ornament using a Glue Dot to secure it. Supplies Used: Paper: Smoky Slate, Blueberry Bushel, Winter Meadow Designer Series Paper Accessories: mason jar ring, Stampin' Cut & Emboss Machine, Handcrafted Elements Dies, Tombow Liquid Glue, Foam Adhesive Strips, Tinsel Gems, ribbon from my
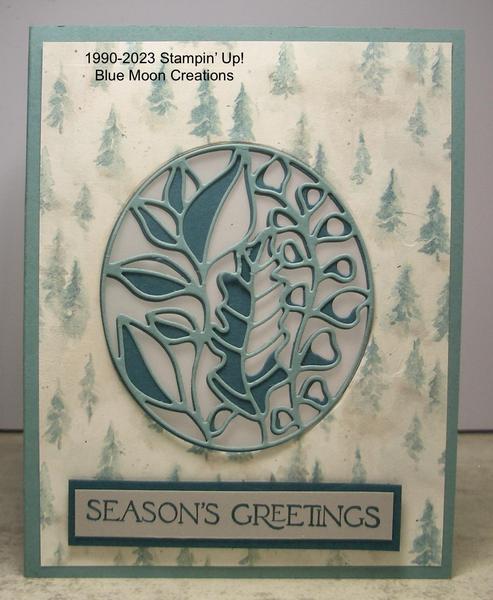
stash Handcrafted Elements Vellum Window Card Instructions: 1.Attach a piece of Winter Meadow Designer Series Paper measuring 5 1/4" x 4" to a Lost Lagoon card base.
2.Die-cut an oval out of the front of the card base using one of the oval dies from Handcrafted Elements. It doesn't matter which one. You just want the oval opening.
Die-cut the oval leaves out of Pretty Peacock card stock using the solid oval die. Die-cut the oval leaves out of Lost Lagoon card stock using the outline oval die. Layer the two pieces using a small amount of Liquid or Fine Tip Glue. Set aside to dry.
3.For the inside of the cut-out oval, punch or die-cut a larger oval out of Vellum card stock. Attach to the back
side of the oval opening using a small amount of Liquid or Fine Tip Glue. You'll be able to see the glue through the vellum, so use it sparingly.
4.ttach the leaf die-cut to the front oval opening using a small amount of Liquid or Fine Tip Glue.
5.Stamp greeting from Brightest Glow on scrap Smoky Slate card stock using
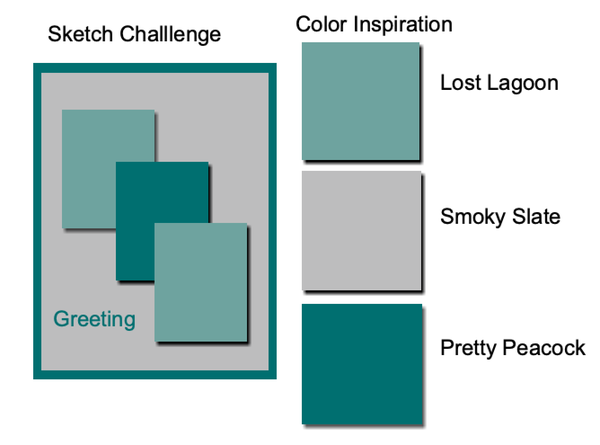
Perfect Peacock ink. Attach to Perfect Peacock mat. Attach to card front using Mini Dimensionals to pop it up. Supplies Used: Stamp Set: Brightest Glow Ink: Pretty Peacock Paper: Lost Lagoon, Perfect Peacock, Smoky Slate, Vellum card stock, Winter Meadow Designer Series Paper Accessories: Stampin' Cut & Emboss Machine, Handcrafted Elements Dies, Tombow Liquid Glue, Mini Dimensionals Handcrafted Elements Ornaments-Sketch Challenge Instructions: 1.Die-cut ornaments out of Pretty Peacock, Lost Lagoon, and Smoky Slate card stock using the Handcrafted Elements ornament die.
2.Die-cut the center ovals for the ornaments using Gold Foil and Basic White card stock.
3.To add a solid piece of
card stock behind the design of the center oval:
-Simply trace ovals onto gold foil and vellum card stock using a pencil and cut with scissors.
-Layer the backgrounds and center oval using a small amount of Liquid or Fine Tip Glue.
4.Attach the centers to
the ornaments using Liquid or Fine Tip Glue.
5.Stamp greeting from Brightest Glow onto Winter Meadow card front using Pretty Peacock ink. Attach card front to Lost Lagoon card base.
6.Attach the ornaments to the card front using Mini Dimensionals to pop them up.
7.Add Tinsel Gems to complete. Supplies Used: Stamp Set: Brightest Glow Ink: Pretty Peacock Paper: Lost Lagoon, Pretty Peacock, Smoky
Slate, Basic White, Vellum Card Stock, Gold Foil, Winter Meadow Designer Series Paper Accessories: Stampin' Cut & Emboss Machine, Handcrafted Elements Dies, Tombow Liquid Glue, Mini Dimensionals, Tinsel Gems
You are receiving this email from Anne Hayward because you have subscribed to my mailing list. Thank you! I am a Stampin' Up! Demonstrator, and most, if not all,
of the product I use is Stampin' Up! Usually, substitutions can easily be made with other products. If this is not for you, that is ok. To unsubscribe, please see the instructions at the bottom of this email. But please do not file a complaint or tag my emails as SPAM. To ensure that you continue to receive emails from me, please add the following to your address book: |
|
|
|
|