|
|
In this issue:
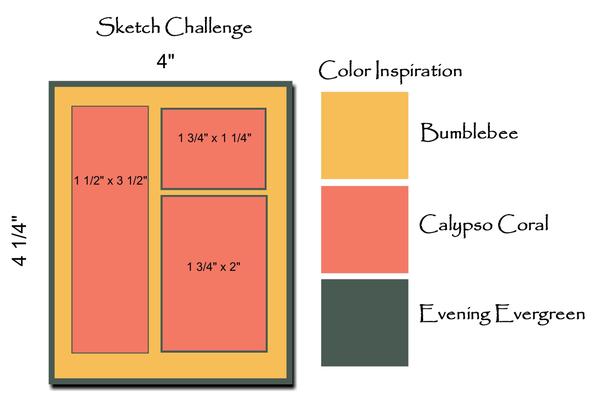
March Sketch Challenge and Color Inspiration
March Promotion: Mini but Mighty, Waves of Ocean Early Release
March Hostess Code
March Featured Product: Grassy Grove Bundle
March Featured Projects: Grassy Grove Bundle: 3 Panel Sunrise, Reflection & Diorama Cards with companion how-to videos
March Sketch Challenge and Color Inspiration
Happy March!
Happy Spring!
Mini but Mighty-Discount Mini Stampin' Cut & Emboss Machine and Select Bundles
If you haven't already, it's time to meet your mini crafting companion: the Mini Stampin' Cut & Emboss Machine! If this is your first encounter, allow me to introduce you.
This mini-but mighty machine is durable, portable, and easy to use. Perfect for beginners or pros who want to craft on the go or for those short on storage space!
During the month of March, you can snag the Mini Stampin' Cut & Emboss Machine at a 20% discount!
Build your craft collection and combine the Mini Stampin’ Cut & Emboss Machine with any (or all!) of the select stamp-and-die bundles that are also available for 20% off during the month of March!
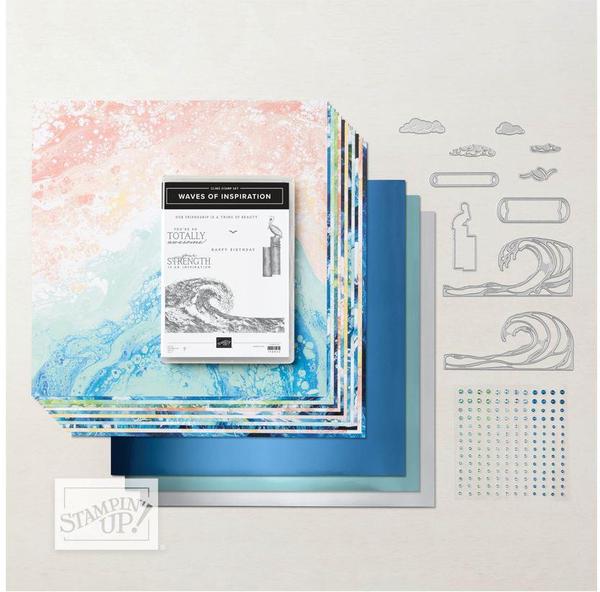
Waves of Inspiration-Early Release
Each of the world's wide and open oceans are brimming with beauty and wonder. Discover the depths of the ocean-and your artistic abilities-with the Waves of the Ocean Collection!
This coastal collection includes an inspiring set of stamps and detailed dies, both early-release products from the upcoming 2022-2023 Annual Catalog. Plus, a pack of paper made from images of hand-poured paint, blue-hued foil sheets and radiant rhinestones for a splash of sparkle-each an exclusive product you can only purchase during the promotion period March 1-May 2,
2022.
Please be sure to let me know if you have any questions.
9MDSFQTG
Hostess Schedule:
April Hostess-Betty
May Hostess-Sandy
June Hostess-Lynn
July-break
August Hostess-Audrie
September Hostess-Renee'
Please place your order by March 25.
Class Dates (2nd Tuesday of the month, weather permitting)
March 8
April 12
May 10
June 14
Thanks!
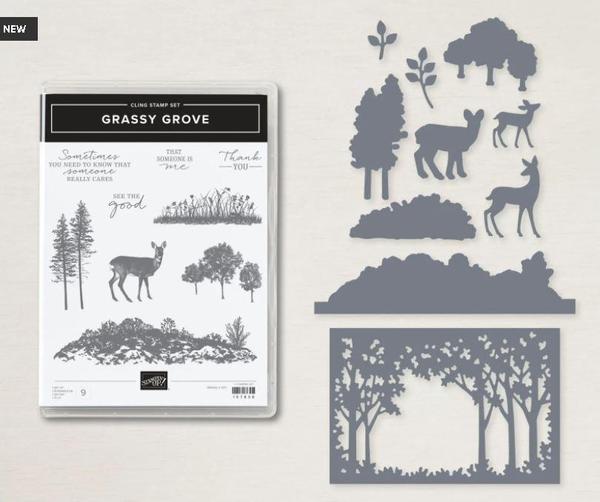
Product Spotlight-Grassy Grove Bundle
Create a forest grove with the Grassy Grove Bundle. Mix and match the stamp images and die-cut elements to create a layered natural setting.
GRASSY GROVE CLING STAMP SET
The stamp images include hills, grasses, and trees to create a natural setting, or the images can be stamped to create a single-color silhouette. The set also includes a sweet doe to use as a focal point on your projects and a variety of card greetings that will appeal to everyone. The rubber on the stamp includes a subtle texture so when it’s stamped there is natural-looking shading and highlighting.
GROVE DIES
Dies include trees, bushes, and deer that can be layered to create a forest diorama. The die set also includes a framed tree piece that is sized perfectly to create a large layer on a card front. Tuck additional die-cut elements behind or in front for different looks.
* 10 dies
* Largest die: 4-3/4" x 3-1/8" (12.1 x 7.9 cm)
* Use with a Stampin' Cut & Emboss Machine
* Compatible with the Mini Stampin’ Cut & Emboss Machine
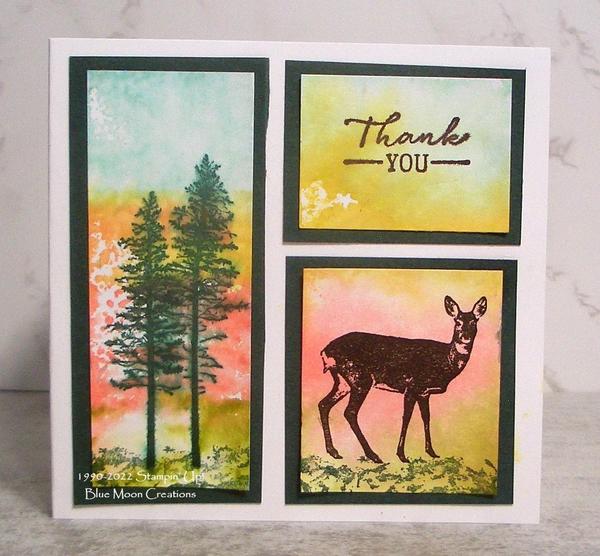
Three Panel Grassy Grove-Sketch Challenge
My projects this month all feature a Grassy Grove Sunrise!
The sunrise on this card was created using the Clear or Acrylic Block Watercolor Background Technique.
1. Cut panels out of Basic White card stock using the sketch measurements. You could also use watercolor paper.
2. Each of the panels will have an Acrylic Block Watercolor Background:
-Ink up an acrylic block by tapping ink on the block. I used Balmy Blue, Bumblebee, Calypso Coral, and Old Olive inks.
-Lightly spritz the block with water and stamp on card stock. Let it sit for a few seconds, then lift. Set aside to dry completely.
3. Stamp trees from Grassy Grove using Evening Evergreen ink on the first panel
4. Stamp greeting using Early Espresso ink on the second panel.
5. Stamp deer using Early Espresso ink on the final panel.
6. Stamp landscape using Evening Evergreen ink on the first and third panels.
7. Attach to Evening Evergreen mats. Attach to Basic White card base to complete.
Stamp Set: Grassy Grove
Ink: Balmy Blue, Bumblebee, Calypso Coral, Old Olive, Evening Evergreen, Early Espresso
Paper: Basic White, Evening Evergreen
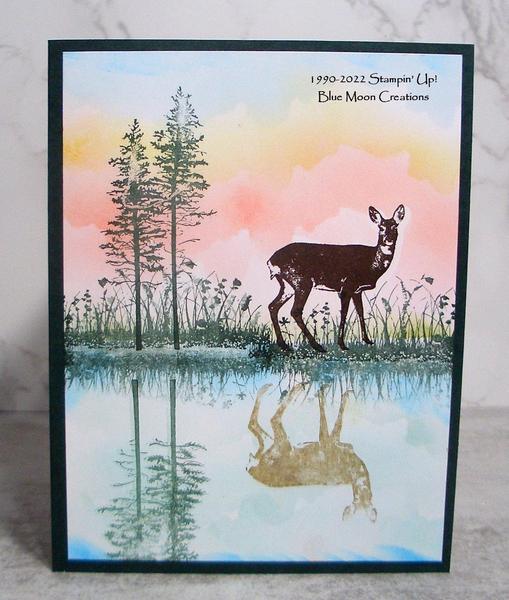
Grassy Grove Sunrise Reflection Technique
I used Blending Brushes and a stencil to create the sunrise for the Reflection Technique card.
1. Cut a stencil out of scrap card stock using the Stampin' Cut & Emboss Machine and Grove Die.
2. Determine the center of the card stock. The top half will be the sky and landscape, and the bottom half will be the water and reflection. Stamp the deer using Early Espresso ink, then cover with a Post-It Note mask.
3. For the sunrise, lay the stencil on a Basic White card front. Using a Blending Brush, Sponge Dauber, or sponge, add Balmy Blue ink.
4. Move the stencil, and add Bumblebee ink. Move the stencil again, and add Calypso Coral ink. Move the stencil one more time and add Old Olive ink. You'll be adding color over the deer mask.
5. Using a straight edge of a piece of card stock, add a line of Old Olive ink separating the land from the water. Remove the mask from the deer.
6. Stamp the flowers and grass from Grassy Grove using Evening Evergreen ink along this line.
7. Stamp pine trees using Evening Evergreen ink.
8. Use the stencil to add Pool Party ink below the landscape to create the water.
9. To create the reflection of the deer, stamp the image onto a silicone craft mat using the Stamparatus. You may want to ink and stamp twice to get a good inked image. I only stamped it once using Crumb Cake ink because I did not want the deer to be dark.
10. Remove the silicone craft sheet, turn it upside down, line it up with the stamped deer in the landscape. Stamp the image in the water using your fingertips to transfer the ink. You could also use a piece of window sheet or transparency.
11. To create the reflection of the trees, ink the stamp, turn it upside down, and stamp in the water, lining up the trunks. You could also use the silicone craft mat as in the previous step. I didn't because I didn't think it was as important to line up the trees as it was for the deer.
12. To create the reflection for the flowers and grass, ink the stamp, turn it upside down, stamp off, then stamp along the water's edge. Repeat to fill in the area.
13. I blended Pacific Point ink to the top of the sky and the bottom of the water to complete.
14. Attach card front to Evening Evergreen card base.
Supplies Used:
Stamp Set: Grassy Grove
Ink: Balmy Blue, Bumblebee, Calypso Coral, Old Olive, Evening Evergreen, Pool Party, Early Espresso, Crumb Cake, Pacific Point
Paper: Basic White, Evening Evergreen
Reflection Technique How-To Video
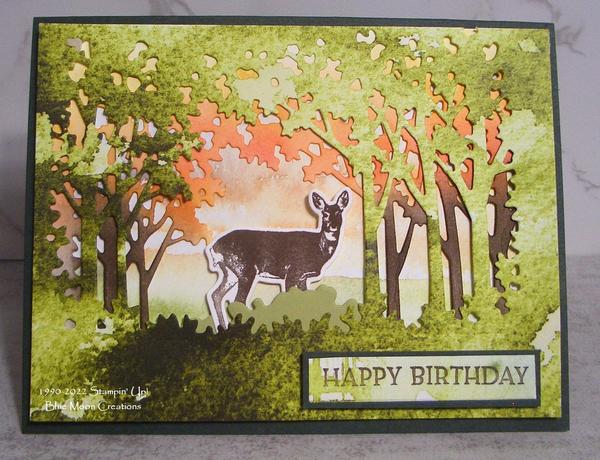
I used a design from the On the Horizon 6"x6" designer series paper pack for an easy sunrise background on this diorama card.
1. Cut two pieces using the framed tree die. Cut one piece out of Basic White card stock and the other out of New Horizons 6"x6" Designer Series Paper. I started with paper measuring 5 1/2" x 4 1/4" for both pieces. To fit the completed project, trim them down as needed.
2. With Blending Brushes, add the sunrise colors to the white card stock frame. I used Bumblebee and Calypso Coral inks.
3. With a Blending Brush, add color to the tree trunks using Early Espresso ink.
4. Cut a piece of landscape out of Old Olive card stock using the Grove Die, and add it to the inside of the New Horizons frame.
5. Attach the two frames, offsetting the tree trunks, using Mini Dimensionals on the corners to pop them up in between.
Trim as needed so edges line up on all sides.
6. Cut another piece of New Horizons Designer Series Paper which will be the background in the diorama. I decided which part of the design I wanted to use by placing the frame over the DSP. Then, I drew cutting lines using a pencil.
7. Attach the frames to the New Horizons DSP background using Mini Dimensionals on the corners to pop them up.
8. Stamp and cut out deer. Insert inside the frame using Mini Dimensionals to pop it up.
9. Attach to Evening Evergreen card base.
10. Stamp greeting from Blossoms in Bloom on a scrap piece of New Horizons DSP using Early Espresso ink. Attach to Evening Evergreen mat. Attach to card front using Mini Dimensionals to pop it up.
Initially, I used Foam Adhesive Strips in between the layers. The layers have more dimension, but the added bulk might make it more difficult to mail the card.
Supplies Used:
Stamp Sets: Grassy Grove, Blossoms in Bloom
Ink: Bumblebee, Calypso Coral, Early Espresso
Accessories: Stampin' Cut & Emboss Machine, Grove Dies, Blending Brushes, Mini Dimensionals
Grassy Grove Diorama How-To Video
|
|
|
|
|