|
|
In this issue: January Sketch Challenge and Color Inspiration January Promotions: Jan-April Mini Catalog, Sale-A-Bration January Hostess Code, Class Schedule, Birthdays January Featured Product: Sending Love
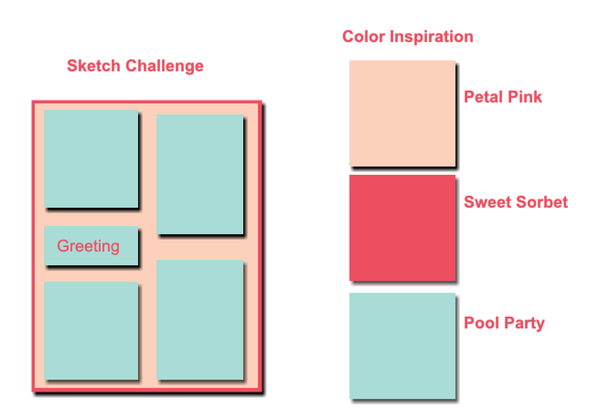
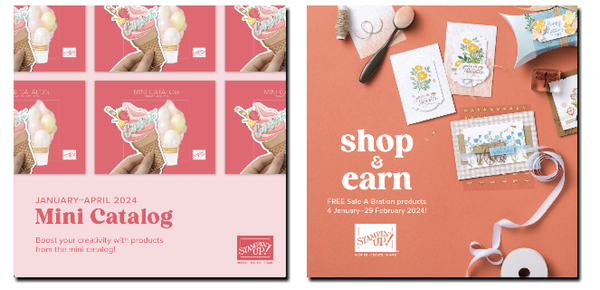
Bundle January Featured Projects: Faux Postage, Envelope of Hearts, Postcard January Sketch Challenge and Color Inspiration Jan-April Mini Catalog and Sale-A-Bration Let's celebrate Spring! The January-April Spring Mini Catalog is Here! This catalog is filled with spring and summer-themed stamp sets, papers and accessories! And, it is Sale-A-Bration time! During Sale-A-Bration (January 4-February 29), you'll earn FREE product found in the Sale-A-Bration Catalog for every $50.00 spent (before shipping and tax). Now's a great time to stock up on essential stamping supplies and earn free product! Plus, if you join the
Stampin' Up! family during Sale-A-Bration, you'll be able to choose the Stampin' Glass Mat Suite as part of your Starter Kit! 2CHW72EX 2024 Class and Hostess Schedule (4th Tuesday of the month) January 23-Renee' Monday, February 26-Betty March 26-Lynn April 23-Sandy May 28-Vivienne June 25-Renee' August 27-Betty September 24-Lynn October 22-Sandy November 26-Vivienne Birthdays: Renee'-January 25 Anne-February 20 Vivienne-February 26 Betty-March 10 Sandy-June 12 Lynn-August
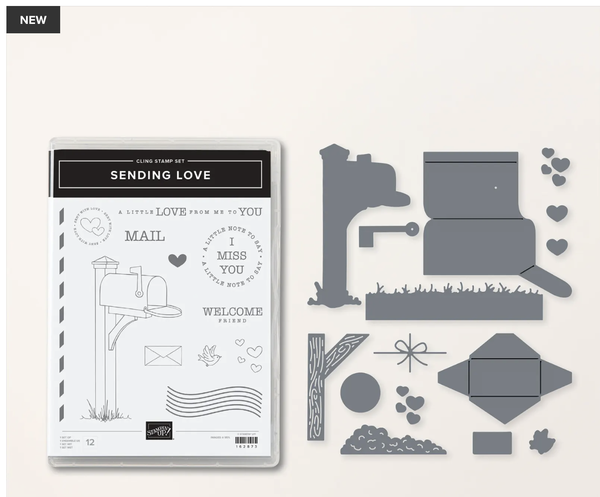
28 The Sending Love Bundle is just what you need to create mail-themed cards, packages, and paper crafts to send to all your friends and family. Use the treat packaging die to create a fun parcel and decorate it with cute hearts, birds, and envelopes. Or stamp and die cut the
adorable mailbox to create a fun card centerpiece or gift tags. Sending
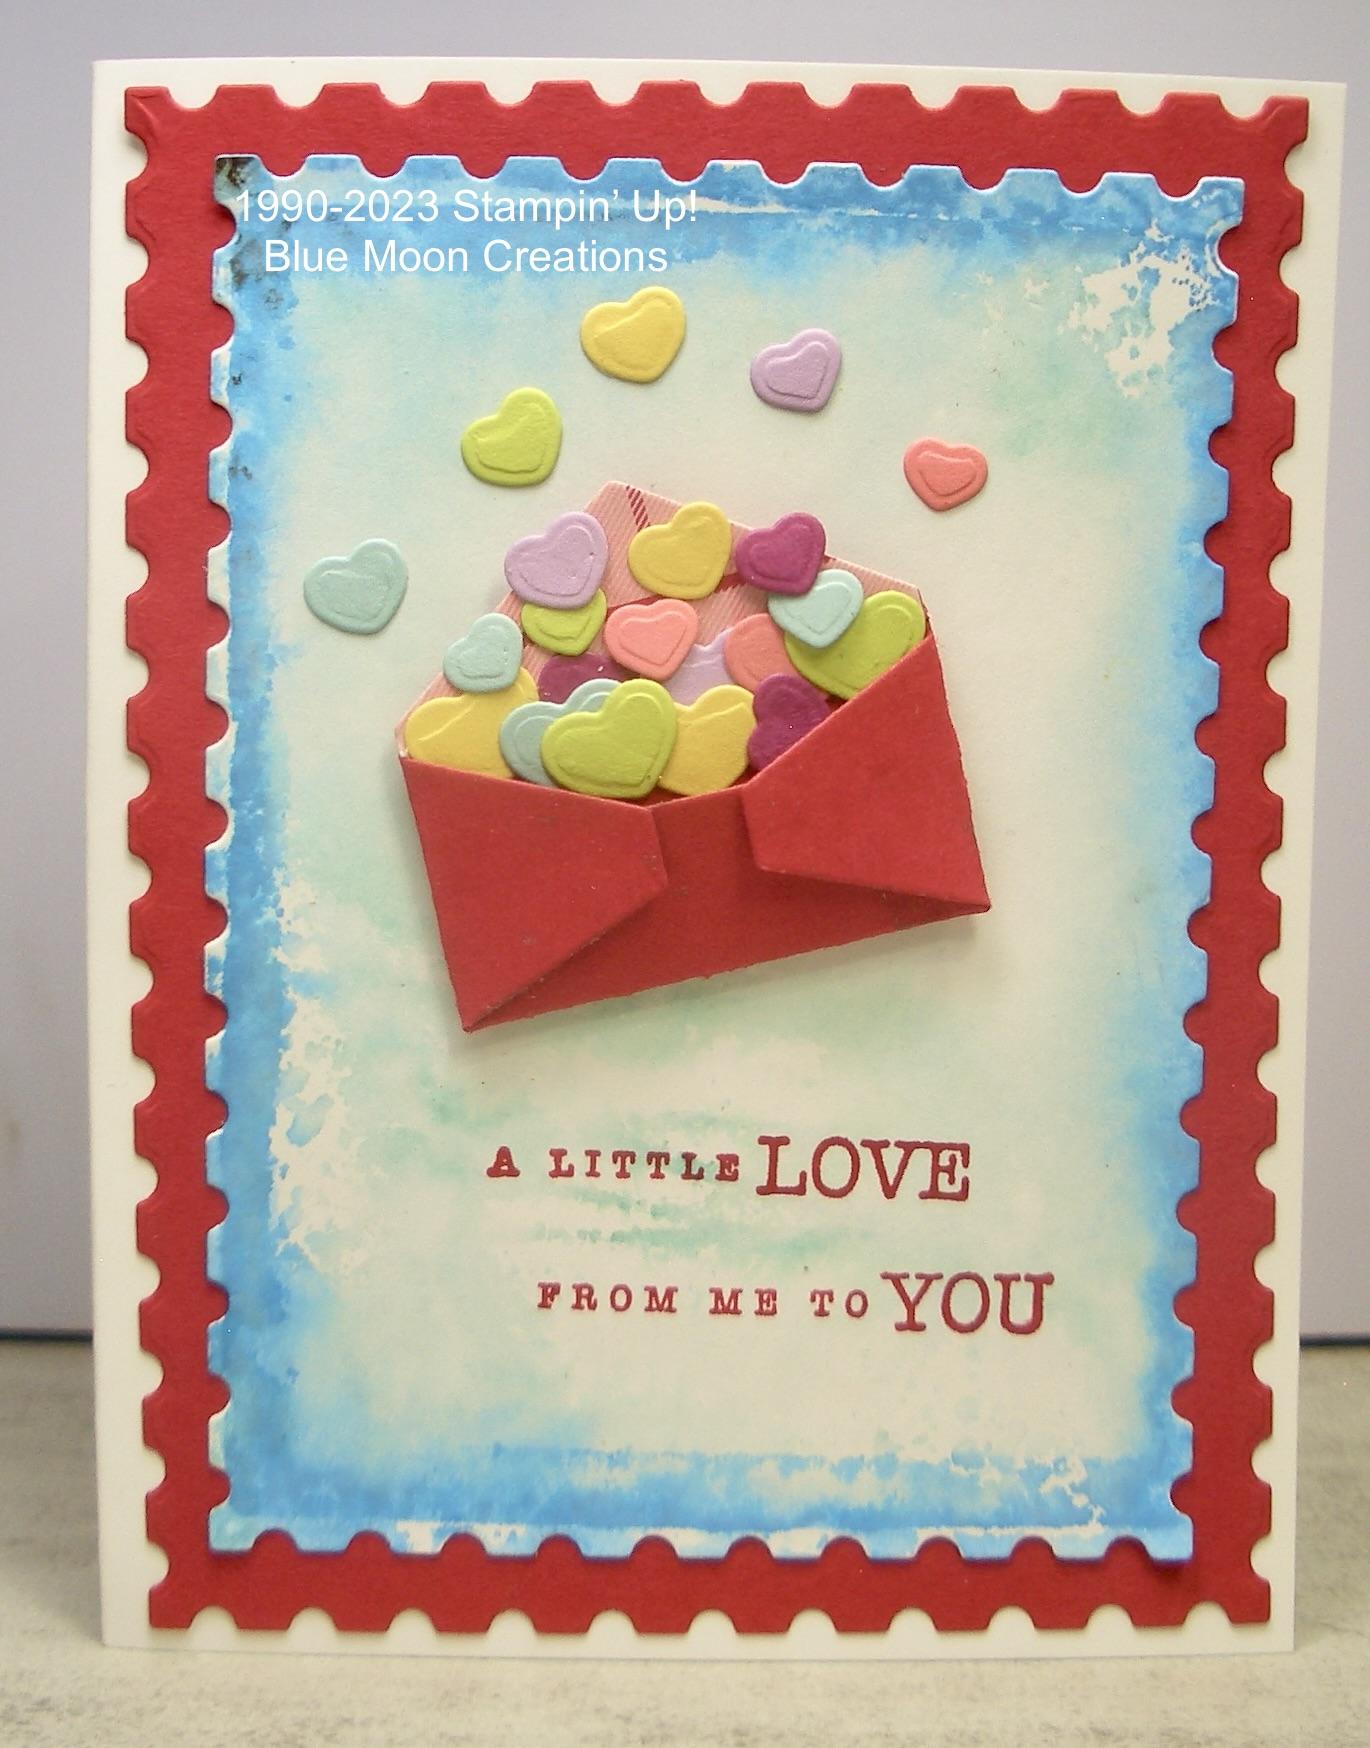
Love Envelope of Hearts Instructions: 1.Acrylic Watercolor
Background: Die-cut a piece of Basic White card stock using Perennial Postage die.
Tap Azure Afternoon and Pool Party inks directly onto a clear block "F." Spritz the ink with water, letting the ink pool and run. Turn over and stamp on the die-cut card front. Let it set for a few minutes, then lift the block. Set aside to dry.
2.Die-cut the envelope out of Real Red card stock using the Sending Love Dies. Die-cut hearts out of various colors of scrap card stock.
3.Assemble the envelope using Glue Dots to secure the flaps.
4.Stamp the greeting onto the Acrylic Watercolor background.
The greeting is actually one long image. I wanted to separate "A Little Love" from "From Me to You," so I placed a piece of Scotch Tape over the "From Me to You." I inked up the stamp, removed the tape, and stamped. Then, I repeated the process, covering up "A Little Love" with tape, inked, removed the tape, and stamped.
5.Attach the
envelope to card front. Attach the hearts using small dabs of liquid glue.
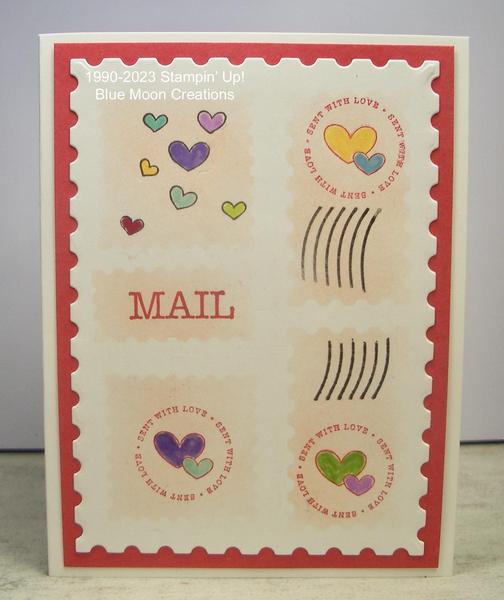
6.Die-cut a Perennial Postage mat out of Real Red card stock. Attach to Basic White card base. Attach card front to complete. Supplies Used: Stamp Set: Sending Love Ink: Azure Afternoon, Pool Party, Real Red Paper: Basic White, Real Red, scraps of various card stock Accessories: Stampin' Cut & Emboss Machine, Sending Love and Perennial Postage Dies, clear block "F," spritzer bottle with water, Scotch Tape, Tombow Liquid Glue, Glue Dots Sending Love Faux Postage-Sketch Challenge 1.Create postage stencil: -die-cut a piece of paper using the Perennial Postage die. I used a piece of Grid Sheet paper so I could use the grid lines to help line up the dies in the next step. You could use copy paper or card stock. -Lay smaller Perennial Postage dies on the stencil and die-cut creating open stencil spaces. 2.Lay the stencil on Basic White card front using washi or painter's tape to hold the card front and stencil in place. 3.With a sponge, sponge dauber, or Blending Brush, add Petal Pink ink to the cut spaces of the stencil. 4.Stamp images from Sending Love in each of the spaces. Color hearts using a variety of Stampin' Blends or Stampin' Write Markers. Remove stencil when satisfied. 5. Using a Perennial Postage die, die-cut the card front. Attach to Sweet Sorbet mat. Attach to Basic White card base to complete. Supplies Used: Stamp Set: Sending Love Ink: Petal Pink, Sweet Sorbet, Memento Black, various Stampin' Blends and Stampin' Write
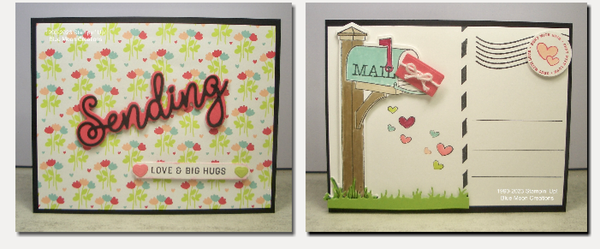
Markers Paper: Basic White, Sweet Sorbet Accessories: Grid Sheet, Stampin' Cut & Emboss Machine, Sending Love and Perennial Postage Dies, Blender Brush, washi tape Sending Love Postcard, front and back Instructions: Postcard front:
1.Attach Bee Mine Designer Series Paper to Basic Black card front.
2.Die-cut background and greeting from Sweet Sorbet and Basic Black card stock using Sending Dies. Attach greeting to background using a
small amount of liquid glue. Attach to DSP card front using Mini Dimensionals to pop it up.
3.Stamp greeting from Sending Smiles on Basic White card stock using Memento Black ink. Die cut using coordinating Sending banner die. Attach to card front using Mini Dimensionals to pop it up.
4.Die-cut hearts out of Flirty Flamingo and Lemon Lime Twist card stock using Sending Love die. Attach to banner to complete.
Postcard back:
1.Stamp mailbox and post image from Sending Love on Basic White card stock using Memento
Black ink. Die-cut using coordinating Sending Love Dies. Color using Stampin' Blends or Stampin' Write Markers.
2.Die-cut grass out of Granny Apple Green card stock.
3.Die-cut envelope out of Sweet Sorbet card stock. Wrap a piece of Baker's Twine
and tie a bow.
4.Stamp postage lines, postmark, and heart images on Basic White card front using Memento Black ink. Color hearts using Stampin' Blends or Stampin' Write Markers.
5.Stamp postage stamp using Sweet Sorbet ink and punch using 1" circle punch.
Color the hearts Stampin' Blends or Stampin' Write Markers.
6.Attach card front to Basic Black base. Attach mailbox and post using Dimensionals to pop it up. Attach stamp, grass, and envelope using Dimensionals to pop them up. Supplies Used: Stamp Sets: Sending Smiles, Sending Love Ink: Memento Black, various Stampin' Blends and Stampin' Write Markers Paper: Basic Black, Basic White, Sweet Sorbet, Granny Apple Green, Bee Mine
DSP Accessories: Stampin' Cut & Emboss Machine, Sending and Sending Love Dies, 1" circle punch, Baker's Twine, Tombow Liquid Glue, Glue Dot, Mini Dimensionals
You are receiving this email from Anne Hayward because you have subscribed to my mailing list. Thank you! I am a Stampin' Up! Demonstrator, and most, if not all, of the product I use is Stampin' Up! Usually, substitutions can easily be
made with other products. If this is not for you, that is ok. To unsubscribe, please see the instructions at the bottom of this email. But please do not file a complaint or tag my emails as SPAM. To ensure that you continue to receive emails from me, please add the following to your address book: |
|
|
|
|