|
|
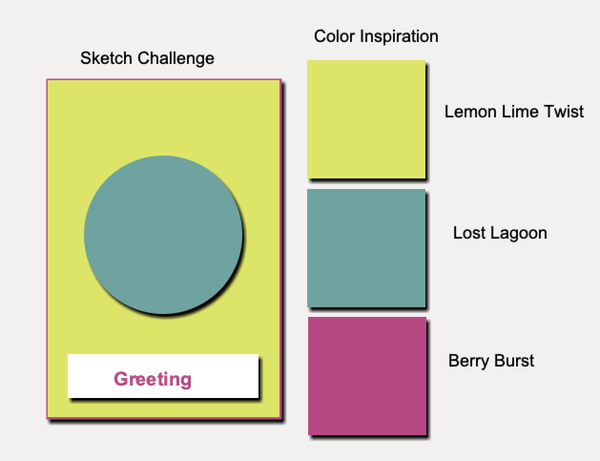
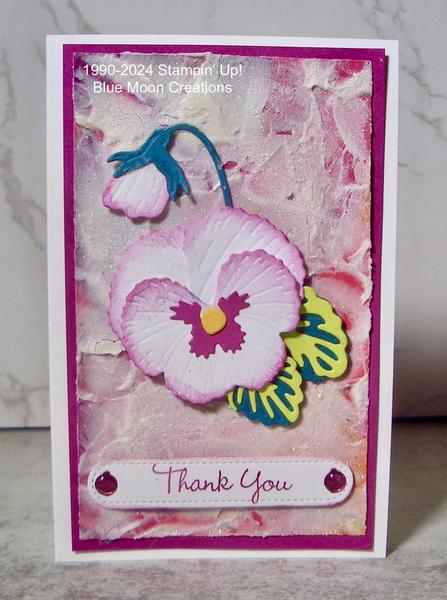
In this issue: April Sketch Challenge and Color Inspiration April Promotions: Last Chance Items April Hostess Code, Class Schedule, Birthdays April Featured Product: My Last Chance Favorites April Featured Projects: Easy Backgrounds April Sketch Challenge and Color Inspiration NRM4FCKV 2024 Class and Hostess Schedule (4th Tuesday of the month) April 23-Sandy May 28-Vivienne June 25-Renee' August 27-Betty September 24-Lynn October 22-Sandy November 26-Vivienne Birthdays: Renee'-January 25 Anne-February 20 Vivienne-February 26 Betty-March 10 Sandy-June 12 Lynn-August 28 Don't forget to save your paper scraps for our fold-out birthday candle project that we'll be making in May if everyone is still interested in doing this project. 1/8-1/2"wide paper scraps at various lengths. If you have the retired Bird Builder punch in your stash, please bring it. We'll use the wing to punch the "candles". Also, if you have candle flame stamp in your stash, bring it, and we can stamp the flames. DSP and Embossing Paste Background Add Embossing Paste to a brightly colored piece of Designer Series Paper for a bit of color, texture, and sparkles. I used retiring Pansy Patch stamp set and coordinating dies. Instructions: 1.Apply Shimmery White Embossing Paste using a Palette Knife on piece of Masterfully Made (or other brightly-colored DSP).
Set aside to dry. 2.Die-cut pansy, stem, bud, and leaves out of Basic White, Berry Burst, Lost Lagoon, Lemon Lime Twist, and Crushed Curry card stock using the Pansy Dies. Sponge Berry Burst ink along edges of pansy and bud. Assemble pansy and layer leaves using a small amount of Liquid Glue. 3. Attach pansy, leaves, and bud to card front using Mini Dimensionals to pop them up. Attach to Berry Burst mat, then to Basic White card base. 4. Stamp greeting on Basic White card stock using Berry Burst ink. Die-cut using label from Waves Die. Attach using Mini Dimensionals to pop it up. Add Tinsel Gems to
complete. Supplies Used: Stamp Set: Pansy Patch-sold out Ink: Berry Burst Paper: Basic White, Berry
Burst, Lost Lagoon, Lemon Lime Twist, Crushed Curry, Masterfully Made Designer Series Paper-retiring soon Accessories: Shimmery White Embossing Paste, Palette Knife, Stampin' Cut & Emboss Machine, Pansy-retiring soon and Waves Dies, Liquid Glue, Mini Dimensionals, Tinsel Gems Faux Snakeskin Background Here's an easy background technique using a paper towel and clear embossing powder. Perfect for masculine-themed cards. I used the retiring He's All That for this card. Instructions: 1.Add Pebbled Path ink to 2-ply paper towel using a brayer. Or, you can swipe it on direct from the ink pad. 2. Sprinkle clear embossing powder on the paper towel and heat emboss using a heat tool. 3. Tie ribbon around the piece and attach to Pecan Pie mat, then to Crumb Cake card base. 4. Stamp greeting from He's All That on scrap Basic White card stock using Early Espresso ink. Die-cut using Stampin' Cut & Emboss Machine and Rectangles Die. Attach to ribbon using Mini Dimensionals to pop it up. Supplies Used: Stamp Set: He's All That-retiring soon Ink: Pebbled Path, Early Espresso Paper: Crumb Cake, Pecan Pie, Basic White Accessories: 2-ply paper towel, Stampin' Brayer, Clear Embossing Powder, Heat Tool, Stampin' Cut & Emboss Machine, Rectangle Die, ribbon from my stash, Mini Dimensionals Stampin' Spots Background Create a multi-colored background using Stampin' Spots. Are you a Paper Pumpkin subscriber? If so, you probably have a collection of Stampin' Spots. If not, the
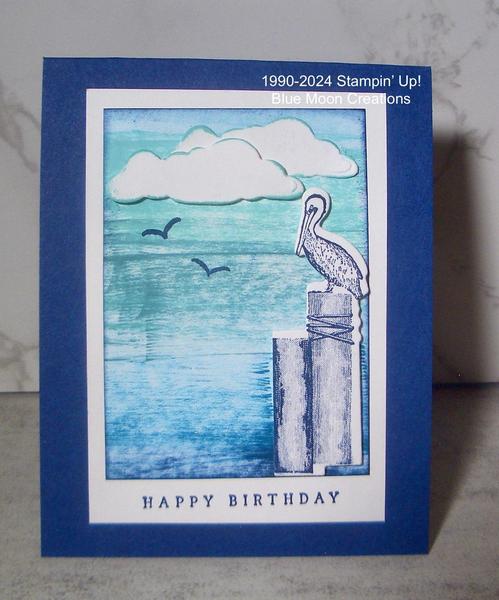
uninked 1" square Spots can be purchased. Just add colors of your choice using reinkers. I used the retiring Waves of Inspiration and coordinating Dies for this card. Instructions: 1.Swipe different colors of Stampin' Spots on neutral-colored card stock. I used Balmy Blue, Pool Party, Coastal Cabana, Lost Lagoon, and Night of Navy Stampin' Spots. You can
also use the full-sized ink pads. Just use the edge of the pad to add the color. Swipe Night of Navy ink along the edges. 2.Stamp pelican from Waves of Inspiration on a scrap piece of Basic White card stock using Night of Navy ink. Die-cut using the coordinating Waves Die. Die-cut clouds out of Basic White card stock. Sponge Coastal Cabana ink along the edges. 3. Stamp birds on card front using Night of Navy ink. Attach pelican and clouds using Mini Dimensionals to pop them up. 4.Stamp greeting on Basic White mat using Night of Navy ink. Attach card front to mat, then to Night of Navy card base. Supplies
Used: Stamp Set: Waves of Inspiration-retiring soon Ink: Balmy Blue, Pool Party, Coast Cabana, Lost Lagoon, and Night of Navy Stampin' Spots Paper: Night of Navy, Basic White Accessories: Stampin' Cut & Emboss Machine, Waves Dies-retiring soon, sponge, Mini Dimensionals
You are receiving this email from Anne Hayward because you have subscribed to my mailing list. Thank you! I am a Stampin' Up! Demonstrator, and most, if not all, of the product I use is Stampin' Up! Usually, substitutions can easily be
made with other products. If this is not for you, that is ok. To unsubscribe, please see the instructions at the bottom of this email. But please do not file a complaint or tag my emails as SPAM. To ensure that you continue to receive emails from me, please add the following to your address book: |
|
|
|
|