| |
Happy November! Happy Thanksgiving! Let it snow with the Snowflake Showcase! Or at least create a snowy wonderland using a selection of incredible products available for a limited time only. With 2 stamps, velvet paper, accessories, and dies, the only limit is your
creativity! Hurry, don't miss out. These products are only available November 1-30 or while supplies last.
Please be sure to let me know if you have any questions: |
|
Shop Snowflake Showcase HERE |
| |
ACNAA7THOrders using this hostess code will be combined.As always, if we have enough in sales to make the order a workshop ($150), we will have a Mystery Hostess.Please place your order
online by November 26.I will notify our hostess by email on November 27.The workshop will need to close on November 30.Happy Shopping!
|
|
Shop Online 24/7 |
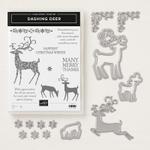
Product Spotlight-Dashing Deer Bundle |
Stylized deer images with coordinating dies. Perfect for winter or Christmas-themed projects!
|
|
Shop Dashing Deer Bundle HERE |
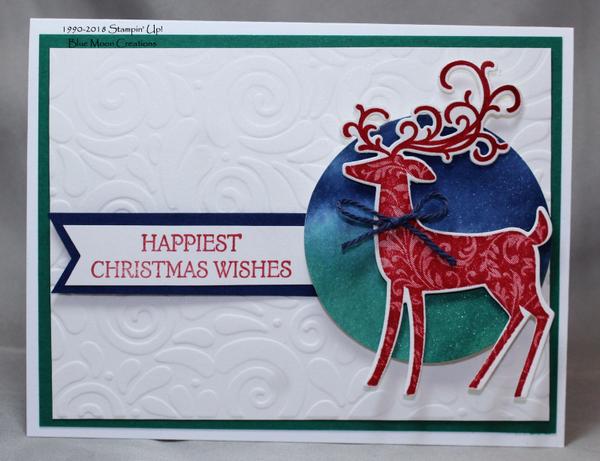
Happiest Christmas Wishes
|
1. Cut deer out of Whisper White card stock using the Big Shot and Detailed Deer Thinlits Die. 2. Punch Night of Navy circle using 2 1/2" circle punch or framelits die. Emboss using the Big Shot and
Swirls & Curls Embossing Folder. 3. Attach Under the Mistletoe Designer Series Paper to Night of Navy mat. Attach to Whisper White card base. Attach 3 1/8" x 3 1/8" square of Under the Mistletoe Designer Series Paper to card front. 4. Attach embossed circle. Attach deer using Dimensionals to pop it up. 5. Stamp greeting using Real Red ink on a scrap piece of Whisper White card stock. Attach to Night of Navy mat. Attach to card front
using Dimensionals to pop it up. Tie and attach a bow to the deer using a Glue Dot to complete.
Supplies Used: Stamp Set: Dashing Deer Ink: Real Red Paper: Whisper White, Night of Navy, Under the Mistletoe Designer Series Paper Accessories:
Big Shot, Detailed Deer Thinlits Dies, Swirls & Curls Embossing Folder, 2 1/2" circle punch, Real Red Baker's Twine from my stash, Dimensionals, Glue Dots |
|
|
Shimmery Acrylic Block Background
|
1. Tap Night of Navy and Shaded Spruce ink onto clear-block "F". Spritz with water, so the ink begins to run
and pool. Stamp on piece of Shimmery White card stock. Let it sit for a few seconds, then lift. Set aside to dry. Once dry, punch a circle using 2 1/2" circle punch or framelits die.
2. Stamp deer on scrap piece of Shimmery White card stock using Real Red ink. Cut out using the Big Shot and coordinating Detailed Deer Framelit die. 3. Emboss Shimmery White card front using the Big Shot and Swirls & Curls Embossing Folder. Attach to Shaded Spruce mat. Attach to Whisper White card base. 4.Attach circle to card front using Dimensionals to pop it up. Attach deer using Dimensionals to pop it up. 5.
Stamp greeting on a scrap of Whisper White card stock using Real Red ink. Banner cut one end. Attach to Night of Navy mat. Banner cut one end. Attach to card front by slipping it under the circle, using Dimensionals to pop it up.
6. Tie and attach a bow to the deer using a Glue Dot to complete. Supplies
Used: Stamp Set: Dashing Deer Ink: Night of Navy, Shaded Spruce, Real Red Paper: Whisper White, Shaded Spruce, Shimmery White, Night of Navy Accessories: Big Shot, Detailed Deer Framelits Die, Swirls & Curls Embossing Folder, 2 1/2" circle punch, clear-block "F", spritzer bottle with water, Night of Navy Baker's Twine out of my stash, Dimensionals, Glue Dots |
|
|
Dashing Deer on a Full Moon Night
|
1. Cut the "landscape" piece out of Shimmery White card stock using the Big Shot and In
the Woods Framelit Die. Stamp greeting from Dashing Deer using Night of Navy ink. 2. For the background, cut a mask out of a post-it-note using 2 1/2" circle punch or framelits die. Place cut out on Shimmery White card front. Sponge Balmy Blue ink from the bottom up so the color is just above where the landscape piece will be. (If it helps, place the landscape piece on the card front, and lightly trace the edge with a pencil.)
Sponge Night of Navy ink from the top down, to the middle around the mask and down to the Balmy Blue ink. You can make it as light or dark as you want.
3. Remove the mask and stamp the trees from Winter Woods using Shaded Spruce ink. Use the Stamparatus to repeatedly stamp the image until you get the darkness of the image you want. 4. Stamp deer on a scrap of Crumb Cake card stock
using Early Espresso ink. Cut out using the coordinating Detailed Deer framelits dies
5. Attach background to Shaded Spruce card base. Attach landscape piece using Dimensionals to pop it up. Attach deer using Dimensionals to pop them up. Supplies Used: Stamp Sets: Dashing Deer, Winter
Woods Ink: Balmy Blue, Night of Navy, Shaded Spruce, Early Espresso Paper: Shaded Spruce, Shimmery White, Crumb Cake Accessories: Big Shot, Detailed Deer and In the Woods Framelits Dies, Stamparatus, 2 1/2" circle punch, post-it-note, sponge, Dimensionals
|
|
|
|
|
|