2019 Occasions and Sale-A-Bration!
|
Happy February!
Happy Valentine's Day!
We're starting month 2 of Sale-A-Bration!
Now through March 31, you'll earn a free item out of the Sale-A-Bration Catalogs for every $50.00 you spend (before shipping and tax).
Sale-A-Bration will get even bigger and better with the 2nd release of of Sale-A-Bration offerings on February 15.
More fun choices!
Now's a great time to stock up on stamping supplies and receive some fun goodies while you're at it!
| |
TJBKHQ4H
Orders using this hostess code will be combined.
As always, if we have enough in sales to make the order a workshop ($150), we will have a Mystery Hostess.
Please place your order online by February 25.
I will notify our hostess by email on February 26.
The workshop will need to close on February 28.
Happy Shopping!
|
|
Shop Online 24/7 |
Product Spotlight-Stampin' Up! Background Stamps
|
Stampin' Up! has a great selection of big background stamps, perfect for adding detailed backgrounds to your projects.
They are designed to cover a traditional A2 sized greeting card. You can also trim the images to use as accent pieces.
Which one is your favorite?
|
|
Shop Online 24/7 |
Buffalo Check Background stamp gives your projects a rustic, homey feel. The color combos possibilities are endless. This stamp is also great for creating masculine or winter holiday cards. Just
change up the colors!
TIP: Use the Stamparatus with these big background stamps. It is likely you won't get a good stamped image the first time around. The Stamparatus will allow you to add more layers of ink, getting a good stamped image that is perfectly lined up with each stamping. I use my Stamparatus for 90% of my stamping these days. It has become my number 1 go-to tool.
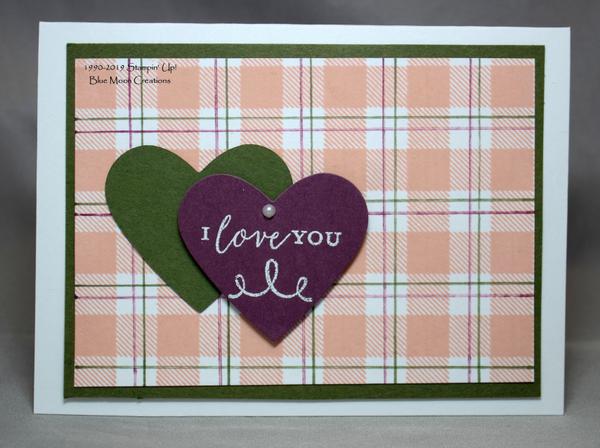
1. Place Whisper White card front in the Stamparatus, securing with a magnet. Lay Buffalo Check rubber side down on the card front where you want it. Close the hinged plate, then open, picking up Buffalo Check with it. Ink with Petal Pink and stamp. Repeat as needed to get a good stamped image.
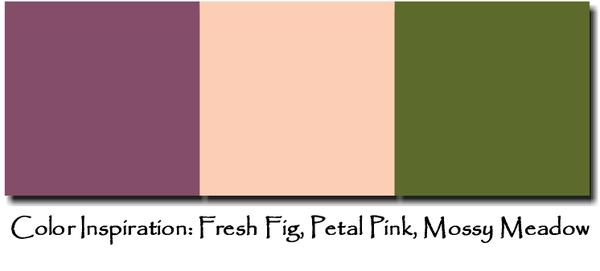
2. Remove the card front from the Stamparatus. To add more interest, add vertical and horizontal lines on the stamped image using a ruler and Stampin' Write Markers. For this card, I used Mossy Meadow and Fresh Fig markers.
3. Swipe Embossing Buddy over scrap piece of Fresh Fig card stock. Stamp greeting and swirl from Detailed with Love using Versamark. Heat emboss using heat tool and white embossing powder. Cut a heart around the stamped embossed greeting using a heart punch or the Big Shot and Hearts Framelits Dies.
4. Attach card front to Mossy Meadow Mat. Attach to Whisper White card base.
5. Attach Mossy Meadow heart to card base. Attach embossed heart using a Dimensional to pop it up. Add a pearl embellishment to complete.
Supplies Used:
Ink: Petal Pink, Versamark, Mossy Meadow and Fresh Fig Stampin' Write Markers
Paper: Whisper White, Mossy Meadow, Fresh Fig
Accessories: Stamparatus, Embossing Buddy, heat tool, white embossing powder, ruler, pearl, Dimensional
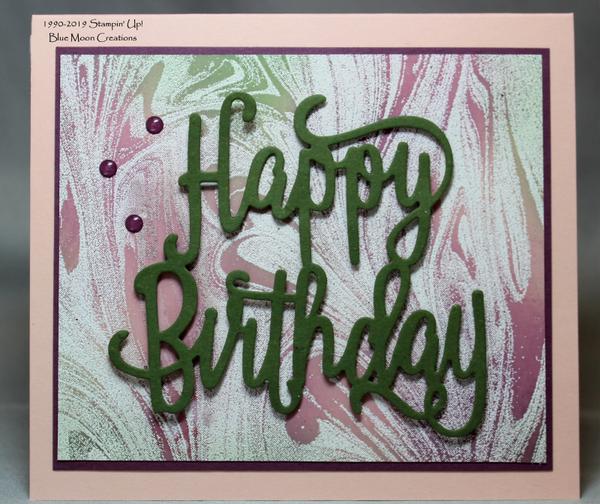
Emboss Resist Marbled Happy Birthday
|
Love the swirls in the Marbled background stamp. This stamp is so versatile. Paired with the Happy Birthday or Thank You Thinlits Dies, the color possibilities are endless.
1. Place glossy white card front in the Stamparatus, securing with a magnet. Lay Marbled rubber side down on the card front where you want it. Close the hinged plate, then open, picking up Marbled with it. Ink with Versamark and stamp. Repeat as needed to get a good stamped image. It'll be hard to tell if you have a good stamped image because you are stamping with Versamark on white card stock. Repeat the stamping at least 2 times, and you'll
probably be okay.
2. Remove the card front from the Stamparatus. Heat emboss image using a heat tool and clear embossing powder. With sponges, add color to the embossed image. The embossed areas will resist the ink. Keep adding colors until you get the darkness you like. When satisfied with the color, buff with a tissue. For this card, I sponged on Mossy Meadow, Petal Pink, and Fresh Fig inks.
4. Cut Happy Birthday out of Mossy Meadow card stock using the Big Shot and Happy Birthday Thinlits Die. Cut Mini Dimensionals in half and carefully place in areas on the back side of the cut-out. Place them in the widest parts of the cut-out, so they don't peek through to the front. Remove the backing and attach the cut-out to the card front.
4. Attach card front to Fresh Fig mat. Attach to Petal Pink card base. Attach enamel or faceted dots to complete.
Supplies Used:
Ink: Mossy Meadow, Petal Pink, Fresh Fig, Versamark
Paper: Petal Pink, Fresh Fig, Mossy Meadow, glossy white
Accessories: Stamparatus, heat tool, clear embossing powder, sponges, Big Shot, Happy Birthday Thinlits Die, Mini Dimensionals, enamel dots out of my stash
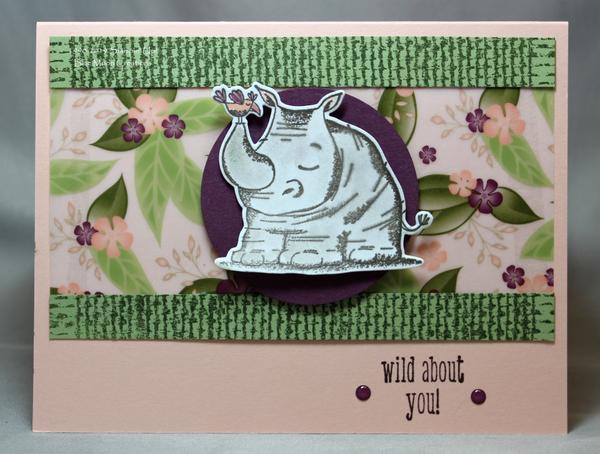
Burlap, another great stamp to add a rustic or masculine feel to your project. For this card, I used smaller pieces to add a little bit of texture.
1. Place Pear Pizzazz card stock in the Stamparatus, securing with a magnet. Lay Burlap rubber side down on the card stock. Close the hinged plate, then open, picking Burlap up with it. Ink with Mossy Meadow and stamp. Repeat as needed to get a good stamped image
2. Remove from Stamparatus and cut 2 strips. My pieces measure 1/2" wide by 5 3/8" long.
3. Place scrap piece of Whisper White card stock in the Stamparatus, securing with a magnet. Place the rhino from Animal Outing rubber side down on the card stock. Close the hinged plate, then open, picking the rhino up with it. Ink with Gray Granite ink and stamp. Repeat as needed to get a good stamped image.
4. Leave the rhino in the Stamparatus. Color using an Aqua Painter and Gray Granite, Petal Pink, and Fresh Fig inks. Let the piece dry for a few minutes. Ink up the rhino again using Gray Granite and stamp a couple more times to bring more color to the outlines.
5. Remove from the Stamparatus and cut out using the Big Shot and coordinating Animal Friends Thinlits Die. Punch a Fresh Fig circle using 2 1/4" circle punch. Attach rhino to circle using Dimensionals to pop it up.
6. Attach Burlap strips to Floral Romance Vellum. Attach to Petal Pink card base. Place card base in Stamparatus. Lay greeting from A Little Wild rubber side down on the card stock where you want it. Close, then open, picking the greeting up with it. Ink with Fresh Fig and stamp. Repeat as needed to get a good stamped image. Remove from Stamparatus. Attach rhino using Dimensionals to pop it up. Add enamel or faceted dots to complete.
Supplies Used:
Stamp Sets: Burlap, Animal Outing, A Little Wild
Ink: Mossy Meadow, Gray Granite, Petal Pink, Fresh Fig
Paper: Petal Pink, Pear Pizzazz, Fresh Fig, Whisper White, Floral Romance Specialty Designer Series Paper
Accessories: Stamparatus, Aqua Painter, Big Shot, Animal Friends Thinlits Die, 2 1/4" circle punch, Dimensionals, enamel dots from my stash
Hardwood I Made a Wish...
|
Get the look of wood with Hardwood. This is another great stamp to use for creating masculine projects.
1. Create a stencil by cutting a circle out of thin computer paper using a circle punch or Big Shot, and circle framelits dies. Attach stencil to a slightly larger piece of Whisper White card stock, securing it with washi or painter's tape.
2. Place card front with attached stencil in the Stamparatus, securing with a magnet. Lay Hardwood rubber side down on the card stock. Close the hinged plate, then open, picking Hardwood up with it. Ink with Gray Granite and stamp. Since I didn't want the image to be too dark, I wasn't too picky about the inking, and I only stamped it once.
3. Remove the stencil and Hardwood. Place image from Dandelion Wishes rubber side down on the card front, placing it where you want it. Close the hinged plate, then open, picking the image up with it. Try to ink the dandelion only and not the stem. If you get ink on the stem, simply clean off with a paper towel. Stamp and repeat to get a good inked image. Color the stem only using Mossy Meadow Stampin' Write Marker and stamp. Repeat as needed to get good
color. Remove the dandelion image from the Stamparatus. Place the greeting rubber side down on the card front, placing it where you want it. Close the hinged plate, then open, picking the image up with it. Ink with Fresh Fig and stamp. Repeat as needed to get a good stamped image.
4. Attach to Fresh Fig mat. Attach to Petal Pink card base. Add an enamel or faceted dot to complete.
Supplies Used:
Ink: Gray Granite, Fresh Fig, Mossy Meadow Stampin' Write Marker
Paper: Petal Pink, Fresh Fig, Whisper White
Accessories: Stamparatus, copy paper, Big Shot, Circles Framelits, washi tape, enamel dot out of my stash
|
|
|