November News from Stampin' Up!
|
Happy November!
Happy Thanksgiving!
Christmastime Suite
We hope you're ready to make this holiday season magical, because the Christmastime Is Here Suite is, well...here! This exclusive, limited-time collection of festive, floral coordinating products has everything you need to share love, joy, and creativity this holiday season.
Products from the Christmastime Is Here Suite will be available while supplies last only.
AND
Paper Trimmer, #152392, $25.00
-15-3/8 x 8 x 1/2"
-Includes 1 cutting blade and 1 scoring blade
(Cutting Blades Multipack will be available to purchase in January 2020. Cost will be $12.00)
Be sure to let me know if you have any questions.
BQMMRPER
Orders using this hostess code will be combined.
As always, if we have enough in sales to make the order a workshop ($150), we will have a Mystery Hostess.
Please place your order online by November 25.
I will notify our hostess by email on November 26.
The workshop will need to close on November 28.
Happy Shopping!
Shop Online 24/7
|
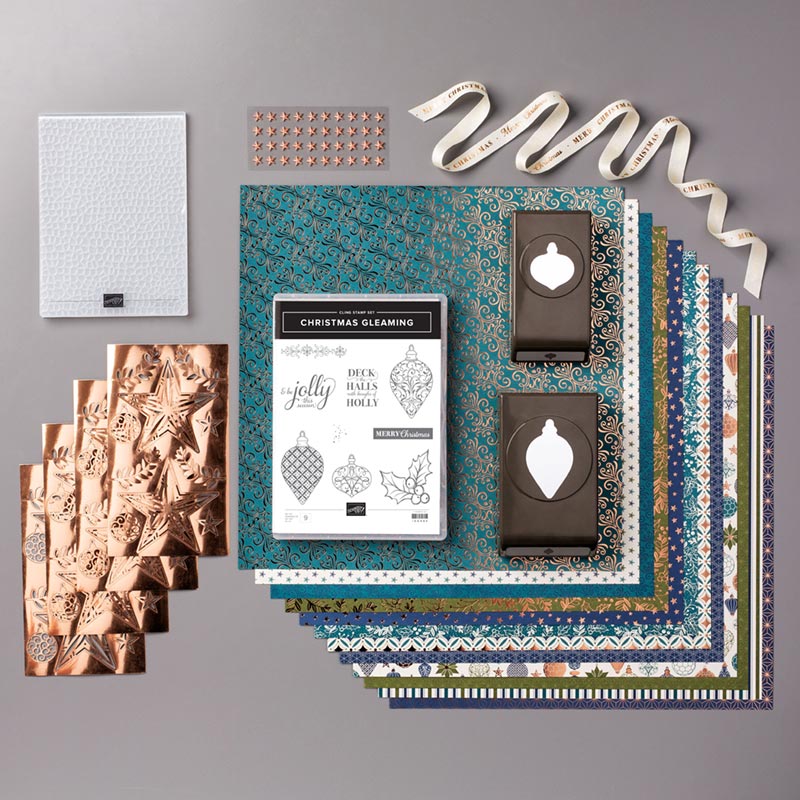
Products Spotlight-Brightly Gleaming Bundle
The Brightly Gleaming Suite Bundle gives you a coordinating selection of products with one simple purchase.
It includes the stamp set and tool bundle at 10% off plus one each of the other items listed.
The Brightly Gleaming Suite Bundle includes
* Christmas Gleaming Cling Stamp Set (10% off)
* Gleaming Ornaments Punch Pack (10% off)
* Hammered Metal 3D Embossing Folder
* Brightly Gleaming Specialty Designer Series Paper
* 1/2" (1.3 cm) Classic Weave Ribbon
* Star Designer Elements
* Brightly Gleaming Foil Elements
Items can be purchased separately.
Brightly Gleaming Suite Bundle, #153467, $97.00
Christmas Gleaming Bundle (stamp set and punches), #153006, $49.50
Brightly Gleaming Specialty Designer Series Paper, #150429, $14.50
Very Vanilla/Copper 1/2" Classic Weave Ribbon, #150394, $8.00
Brightly Gleaming Foil Elements, #150431, $7.00
Noble Peacock Foil Sheets, #149495, $10.00 (not part of the Suite)
Shop Online 24/7
|
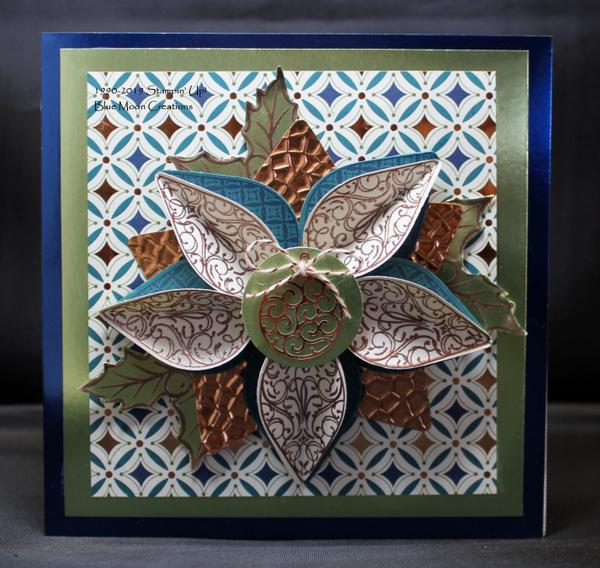
Canvas Brightly Gleaming Ornament
|
I made this ornament to fit on a 6" x 6" canvas that I purchased at a local arts and crafts store. It could be made into a card but would be difficult to mail with the popped up ornaments. Keep the ornaments flat for mailing.
What you'll need:
5 Copper Foil large ornaments embossed with a die-cut machine and the Hammered Metal 3D Embossing Folder. Punch out using coordinating Gleaming Ornaments punch.
5 Pretty Peacock large ornaments stamped with the large mosaic-designed ornament stamp in Pretty Peacock ink. Punch out using coordinating Gleaming Ornaments punch.
5 Very Vanilla large ornaments stamped with the large filigree-designed ornament stamp in Versmark ink. Heat emboss using Copper Embossing Powder. Punch out using coordinating Brightly Gleaming punch. Score down the middle with a scoring tool.
3 Old Olive leaves and berries stamped in Versamark ink on Old Olive Noble Peacock Foil Paper. Heat emboss using copper embossing powder. Fussy cut using a pair of scissors.
1 1 1/4" circle punched out of the Old Olive Noble Peacock Foil Paper.
1 Brightly Gleaming Foil Element for the center of the punched circle.
Ribbon or baker's twine for a bow.
1. Build ornament on 5" x 5" Brightly Gleaming Designer Series Paper. Secure 5 Embossed Copper Foil ornaments on Brightly Gleaming Designer Series Paper base using SNAIL Adhesive.
2. Layer stamped Pretty Peacock ornaments off-center using Mini Dimensionals to pop them up.
3. Place scored Very Vanilla embossed ornaments on top of the Pretty Peacock ornaments. I used a thin line of Tombow Multi-purpose glue on the backside of the scoreline. Set aside to let the glue dry completely.
4. Tuck cut leaves and berries behind the copper embossed ornaments using SNAIL Adhesive.
5. Attach 6" x 6" Blueberry Bushel Noble Peacock Foil Paper to 6" x 6" canvas using Tombow Multi-purpose glue. Set aside to dry completely. Layer 5 1/2" x 5 1/2" piece of Old Olive Noble Peacock to the Blueberry Bushel base. Layer DSP with ornament to the Old Olive Noble Peacock mat.
7. Attach the Gleaming Foil Element to the punched 1 1/4" circle using a small amount of Tombow Multi-purpose glue. Attach to the top of the ornament using Tombow Multi-purpose glue. Set aside to dry completely. Attach ribbon to circle using a Glue Dot.
Supplies Used:
Ink: Pretty Peacock, Versamark
Paper: Brightly Gleaming Specialty Designer Series Paper, Copper Foil Paper, Noble Peacock Foil Paper, Very Vanilla
Accessories: Gleaming Ornaments Punch Pack, Big Shot, Hammered Metal 3D Embossing Folder, heat tool, copper embossing powder, 1 1/4" circle punch, Brightly Gleaming Foil Elements, retired copper baker's twine from my stash, Mini Dimensionals, Tombow Multi-purpose glue, Glue Dot, 6" x 6" canvas (not Stampin' Up!)
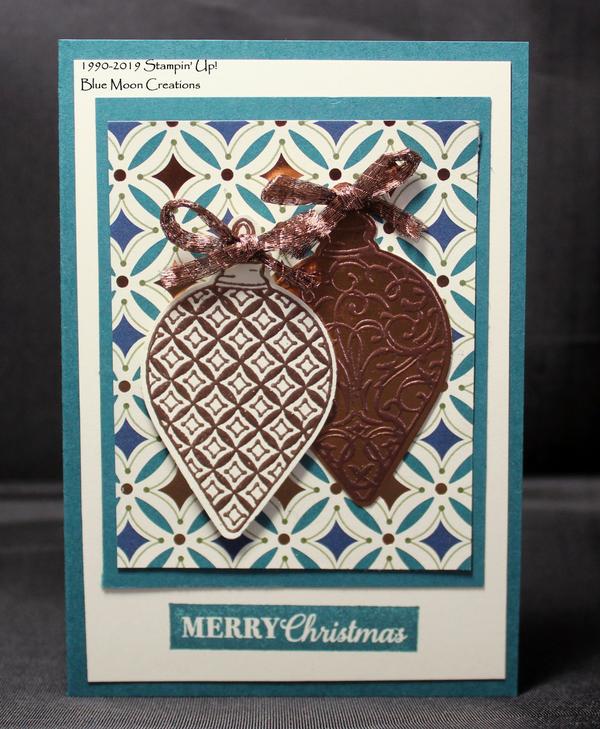
Brightly Gleaming Ornaments
|
1. Stamp mosaic-designed stamp onto piece of Very Vanilla card stock using Versamark ink. Heat emboss using copper embossing powder.
2. Stamp filigree-designed stamp onto piece of Copper Foil using Versamark ink. Heat emboss using copper embossing powder.
3. Punch ornaments out using coordinating Gleaming Ornaments Punch.
4. Stamp greeting from Christmas Ornaments on 4 1/2" x 3" Very Vanilla card front in Pretty Peacock ink using the Stamparatus. Attach to 4 3/4" x 3 1/4" Pretty Peacock card base.
5. Attach 3 1/4" x 2 1/2" piece of Brightly Gleaming Designer Series Paper to 3 1/2" x 2 3/4" Pretty Peacock mat. Attach to Very Vanilla card front.
6. Attach ornaments. The bottom ornament is attached using SNAIL Adhesive. The top ornament is attached using a Mini Dimensional to pop it up. Tie 1/4" Copper Trim that has been tied into bows using Glue Dots to complete.
Card measures 4 3/4" x 3 1/4"
Supplies Used:
Stamp Set: Christmas Gleaming
Ink: Pretty Peacock, Versamark
Paper: Pretty Peacock, Very Vanilla, Copper Foil, Brightly Gleaming Designer Series Paper
Accessories: Gleaming Ornaments Punch Pack, heat tool, copper embossing powder, 1/4" Copper Trim, Mini Dimensionals, Glue Dots, Stamparatus
Brightly Gleaming Fun Fold
|
1. Cut ornaments out of Brightly Gleaming Designer Series Paper using the 2 ornament punches found in the Brightly Gleaming Punch Pack.
2. Stamp greeting from Brightly Gleaming on Very Vanilla card front using Pretty Peacock ink. I used the Stamparatus. Attach to Pretty Peacock mat.
3. Attach Brightly Gleaming Designer Series Paper to Copper Foil mat. Attach to Old Olive card base.
4. Attach stamped card front to card. Attach ornaments. I attached the larger ornament using SNAIL Adhesive. The smaller ornament was popped up using a Mini Dimensional.
5. Cut pieces of ribbon. Tie cording or baker's twine around the middle, bringing the ribbon in slightly in the middle. For this project, I used some retired copper cording from my stash. Attach to the top of the ornaments using Glue Dots.
6. Add Metallic Pearl to complete.
Paper Measurements:
Base: 8 1/2" x 4", scored at 4"
Copper mat: 3 3/4" x 4"
Brightly Gleaming Designer Series Paper: 3 1/2" x 3 3/4"
Pretty Peacock mat: 3" x 3 1/2"
Very Vanilla card front" 2 3/4" x 3 1/4"
Supplies Used:
Stamp Set: Brightly Gleaming
Ink: Pretty Peacock
Paper: Old Olive, Very Vanilla, Pretty Peacock, Copper Foil, Brightly Gleaming Designer Series Paper
Accessories: Brightly Gleaming Punch Pack, 1/2" Classic Weave Ribbon, retired copper cording from my stash, Metallic Pearls, Mini Dimensional, Glue Dots. Stamparatus
|
|
|