The Holiday Catalog is Here!
|
Happy October!
Happy Halloween!
We have changing leaves as Fall has arrived here in the mountains of southern Colorado.
The arrival of Fall means winter holidays are right around the corner!
Have you started thinking about your holiday and Christmas projects?
It's not too early to start!
The Stampin' Up! Holiday Catalog is here to help with fun, new products and lots of holiday inspiration.
I hope you'll check it out. Be sure to let me know if you have any questions.
MYAPHFHK
Orders using this hostess code will be combined.
As always, if we have enough in sales to make the order a workshop ($150), we will have a Mystery Hostess.
Please place your order online by October 25.
I will notify our hostess by email on October 26.
The workshop will need to close on October 28.
Happy Shopping!
Shop Online 24/7
|
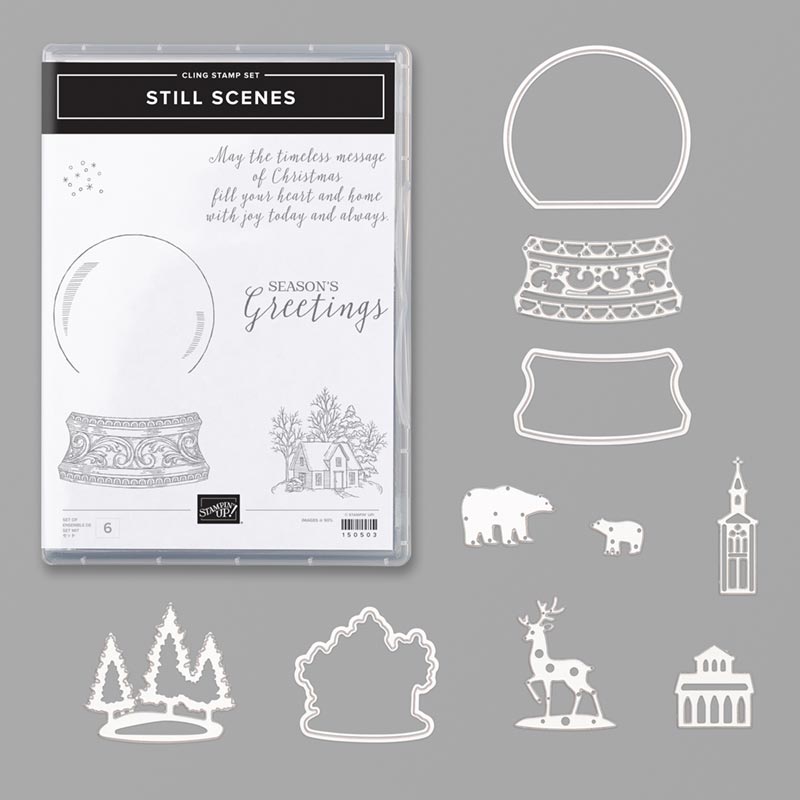
Products Spotlight-Still Scenes Bundle
|
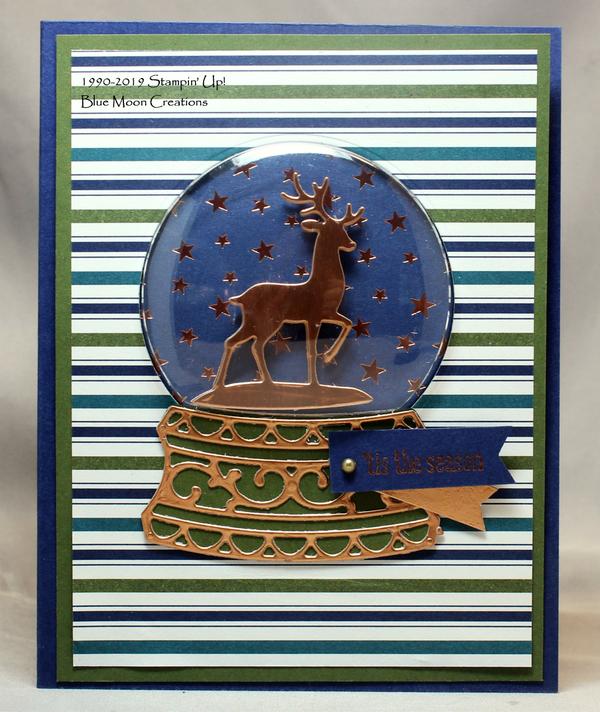
Still Scenes Reindeer Globe
|
1. Cut two reindeer out of Copper Foil Sheets using the Big Shot and Snow Globe Scenes Die. Layer one on top of the other, using a Mini Dimensional in between.
2. Cut globe base out of Mossy Meadow card stock using the Big Shot and Snow Globe Scenes Die. Cut detail overlay for the base out of Copper Foil Sheet using the Big Shot and Snow Globe Scenes Die. Attach to solid base using a small amount of Tombow Multi-purpose Glue. You don't want to use too much as it might seep beyond the details on the die-cut.
3. Mat 5" x 3 3/4" piece of Brightly Gleaming Specialty Designer Series Paper onto 5 1/4" x 4" piece of Mossy Meadow card stock. Cut the opening for the globe using the Big Shot and the globe circle die.
4. Cut a 3 1/4" x 3 1/4" square of Brightly Gleaming Designer Series Paper for the background stars in the globe. Lay the cut-out over the Designer Series Paper, and with a pencil, lightly trace around the inside of the cut-out, so you know where to build your scene.
5. Attach reindeer to DSP stars background using Mini Dimensionals to pop it up. Erase any pencil lines. Option: to make this a shaker card, carefully place Snowflake Sequins on top of your scene.
6. Remove the backing on the Snow Globe Shaker Dome. Apply SNAIL adhesive on the back of the Mossy Meadow mat. Insert the shaker dome through the opening of the card front, securing it over the background stars DSP and scene. Attach to the Mossy Meadow mat. Attach to Night of Navy card base.
7. Attach base underneath the globe using Mini Dimensionals to pop it up.
8.Stamp greeting from Itty Bitty Greetings on a scrap piece of Night of Navy card stock using Versamark. Heat emboss using heat tool and copper embossing powder. Banner cut one end. Banner cut one end of a scrap piece of Copper Foil Sheet.
Attach banners. Attach to globe base using a Mini Dimensional to pop them up. Attach a Metallic Pearl to complete.
Card Measures 5 1/2" x 4 1/4"
Supplies Used:
Stamp Set: Itty Bitty Greetings
Ink: Versamark
Paper: Night of Navy, Mossy Meadow, Copper Foil Sheet, Brightly Gleaming Specialty Designer Series Paper
Accessories: Big Shot, Snow Globe Scenes Die, Snow Globe Shaker Dome, heat tool, copper embossing powder, Tombow Multi-purpose Glue, Mini Dimensionals, Metallic Pearl
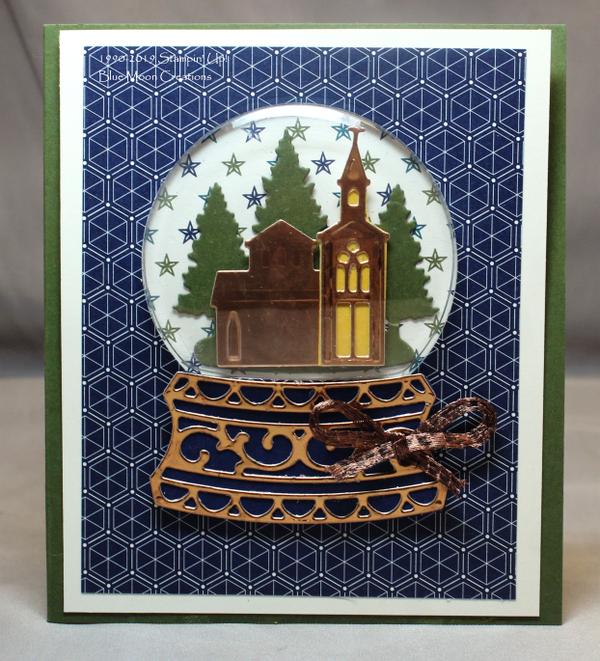
Still Scenes Church Globe
|
1. Cut trees out of Mossy Meadow card stock using the Big Shot and Snow Globe Scenes Die. Cut building and church out of Copper Foil Sheet using the Big Shot and Snow Globe Scenes Die. Cut a small piece of Crushed Curry card stock to fit and attach behind the church cut-out.
2. Cut globe base out of Night of Navy card stock using the Big Shot and Snow Globe Scenes Die. Cut detail overlay for the base out of Copper Foil Sheet using the Big Shot and Snow Globe Scenes Die. Attach to solid base using a small amount of Tombow Multi-purpose Glue. You don't want to use too much as it might seep beyond the details on the die-cut.
3. Mat 3 1/2" x 4 1/2" piece of Brightly Gleaming Specialty Designer Series Paper onto 3 3/4" x 4 3/4" piece of Very Vanilla card stock. Cut the opening for the globe using the Big Shot and the globe circle die.
4. Cut a 3 1/4" x 3 1/4" square of Brightly Gleaming Designer Series Paper for the background stars in the globe. Lay the cut-out over the Designer Series Paper, and with a pencil, lightly trace around the inside of the cut-out, so you know where to build your scene.
5. Attach trees to DSP stars background. Attach building using a Mini Dimensional to pop it up. Attach church using a Mini Dimensional to pop it up. Erase any pencil lines. Option: to make this a shaker card, carefully place Snowflake Sequins on top of your scene.
6. Remove the backing on the Snow Globe Shaker Dome. Apply SNAIL adhesive on the back of the Very Vanilla mat. Insert the shaker dome through the opening of the card front, securing it over the background stars DSP and scene. Attach to the Very Vanilla mat. Attach to Mossy Meadow card base.
7. Attach base underneath the globe using Mini Dimensionals to pop it up. Tie a bow out of 1/4" Copper Trim and attach to the base using a Mini Glue Dot to complete.
Card Measures 5" x 4"
Supplies Used:
Paper: Mossy Meadow, Very Vanilla, Night of Navy, Copper Foil Sheet, Crushed Curry, Brightly Gleaming Specialty Designer Series Paper
Accessories: Big Shot, Snow Globe Scenes Die, Snow Globe Shaker Dome, 1/4" Copper Trim, Tombow Multi-purpose Glue, Mini Dimensionals, Mini Glue Dot
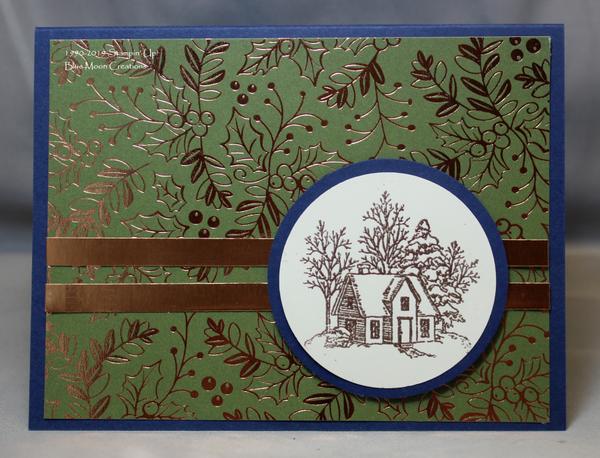
Brightly Gleaming Still Scenes
|
1. Stamp image from Still Scenes on Very Vanilla card stock using Versamark ink. Heat emboss using heat tool and copper embossing powder. Punch image out using 2 1/4" Circle Punch or die-cut machine and circle die. Punch Night of Navy mat using 2 1/2" Circle Punch or die-cut machine and circle die. Layer circles.
2. Attach piece of Brightly Gleaming Specialty Designer Series Paper to Night of Navy card base.
3. Cut two 1/4" wide strips of Copper Foil Sheet and attach to card front. Attach stamped image using Mini Dimensionals to pop it up to complete.
Card measures 5 1/2" x 4 1/4"
Supplies Used:
Stamp Set: Still Scenes
Ink: Versamark
Paper: Night of Navy, Very Vanilla, Brightly Gleaming Specialty Designer Series Paper, Copper Foil Sheets
Accessories: heat tool, copper embossing powder, 2 1/4" and 2 1/2" Circle Punches, Mini Dimensionals
|
|
|