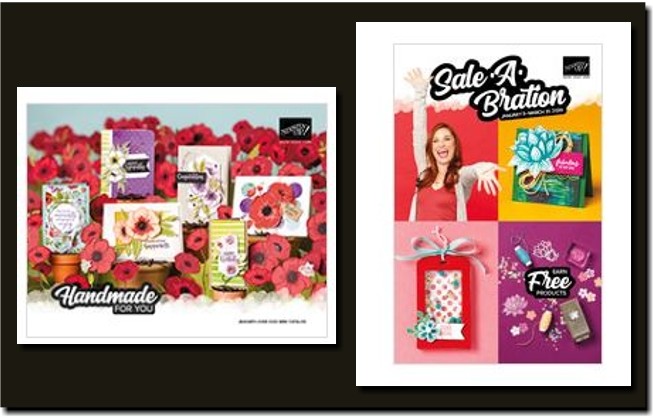
2020 Spring Mini and Sale-A-Bration Catalogs
|
Happy New Year!
I wish you happiness and good health in 2020!
It's an exciting time of the year for Stampin' Up!
The 2020 Mini Catalog is now live and is filled with spring and summer-themed stamp sets, papers, and accessories.
From January through March 31, you'll earn a free item out of the Sale-A-Bration Catalog for every $50.00 you spend (before shipping and tax).
Now's a great time to stock up on stamping supplies and receive some fun goodies while you're at it!
Please be sure to let me know if you have any questions:
Be sure to let me know if you have any questions.
3K2KPGCN
Orders using this hostess code will be combined.
As always, if we have enough in sales to make the order a workshop ($150), we will have a Mystery Hostess.
Please place your order online by January 25.
I will notify our hostess by email on January 26.
The workshop will need to close on January 28.
Happy Shopping!
Shop Online 24/7
|
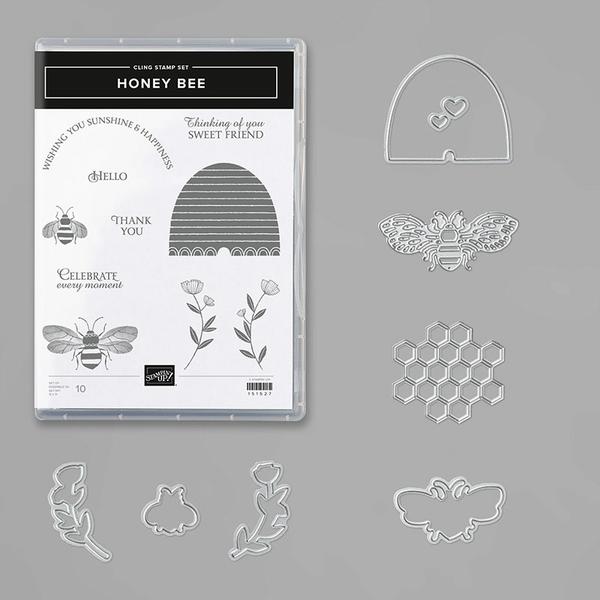
Product Spotlight-Honey Bee Bundle
|
Here's the Buzzzz!
HONEY BEE CLING STAMP SET
With the Honey Bee Stamp Set, you’ll make greeting cards that are oh, so sweet! Use the greetings in this set to convey your thoughts of friendship and support.
DETAILED BEE DIES
Create custom die-cut flowers, bees, a honeycomb, a beehive, and more using the Detailed Bee Dies. Use these dies with the Honey Bee Stamp Set to quickly cut out stamped images from the set. Create thank you cards, thinking of you cards, and other fun cards and paper crafts!
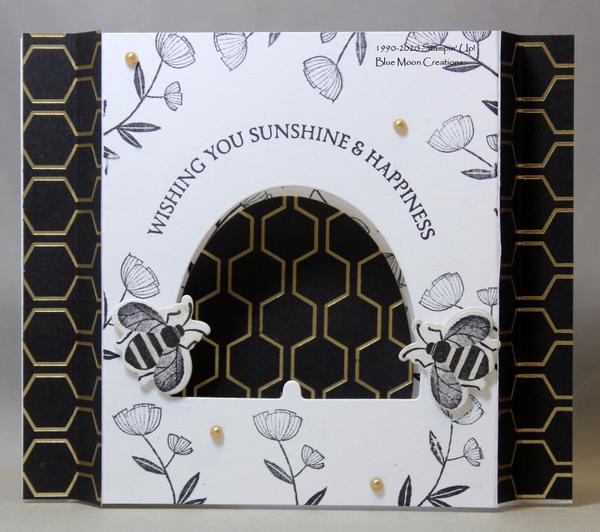
1. To create the diorama, start with an 8 1/2" x 11" sheet of card stock, and cut it in half at 5 1/2". Then, cut it in half at 4 1/4" so you have two 5 1/2" x 4 1/4" panels. You can make 2 diorama cards using 1 sheet of card stock.
Score each piece at 1/2" and 1" on the long sides.
2. Create an opening in one of the panels using a punch or a Big Shot and a die. This will be the front of your diorama. For this card, I cut out the hive shape using a die-cut machine and the Detailed Bee Die.
3. Stamp greeting from Honey Bee at the top of the hive cut-out using Memento Black ink. Stamp flowers from Honey Bee using Memento Black ink.
4. The second piece will be the inside of the diorama. Attach a piece of Golden Honey Designer Series Paper cut to measure 3 3/8" x 4 1/4". Attach to the middle of the inside piece, in between the score lines.
5. Cut a hive out of Golden Honey Designer Series Paper using a die-cut machine and Detailed Bee Die.
6. Fold along the score lines so the 2 pieces will meet when put together. For the top piece, the 1” score lines are “mountain” folds, and the ½” score lines are “valley” folds. For the bottom piece, the 1” score lines are “valley” folds, and the ½” score lines are “mountain” folds. Place the top piece on the inside piece so you get an idea where the hive cut-out should be placed on the inside to match up with the cut-out on the front. Attach the hive on the inside using Mini
Dimensionals to pop it up.
7. Attach strips of Tear and Tape Adhesive on the "up" sides of the bottom piece. Remove the backing and attach the top and bottom pieces of the diorama.
8. Optional: Cut 2 pieces of Golden Honey Designer Series Paper to measure 1" x 4 1/4". Score in the middle at 1/2" Attach to the scored sides of the diorama, matching up the edges and the score lines.
9. Stamp bees using Memento Black ink. Cut out using a die-cut machine and coordinating Detailed Bee Die. Color bodies using a dry Aqua Painter or paintbrush and metallic gold ink. Lightly dab metallic gold ink over the bees and along the edges using a sponge. Attach to the front of the diorama using Mini Dimenionals to pop them up.
10. Add Metallic Pearls to complete.
When popped open, the diorama measures 5" x 4 1/4" When folded flat, it measures 5 1/2" x 4 1/4" and will fit in a regular A2 envelope.
Supplies Used:
Stamp Set: Honey Bee
Ink: Black Memento, Delicata Golden Glitz
Paper: Whisper White, Golden Honey Designer Series Paper
Accessories: Big Shot, Detailed Bee Dies, Tear and Tape Adhesive, Aqua Painter, sponge, Mini Dimensionals, Metallic Pearls, Stamparatus
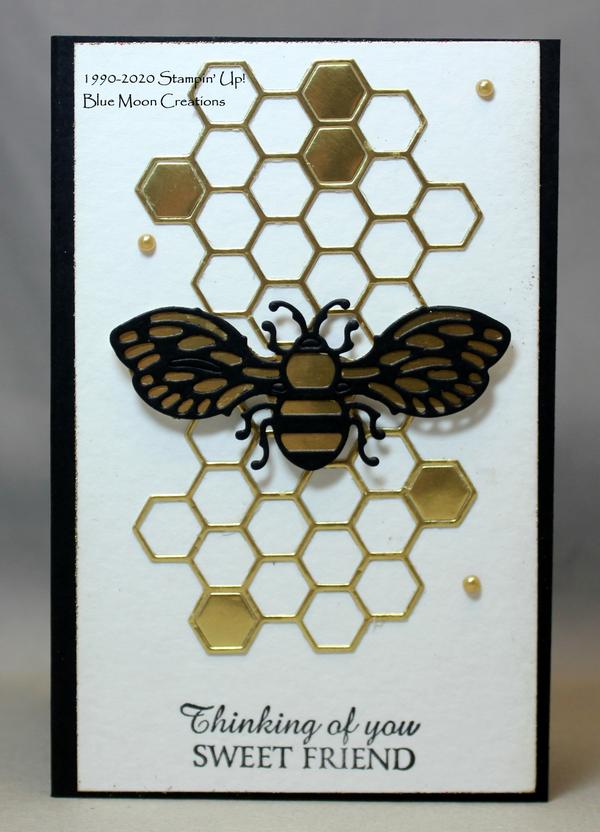
1. Cut two honeycombs out of Gold Foil using a die-cut machine and Detailed Bee Die. Keep some of the solid pieces to put back into honeycombs.
2. Stamp greeting on watercolor paper card front from Honey Bee using Memento Black ink.
3. Attach honeycomb using a small amount of Tombow Multi-purpose Glue. Fill in some of the honeycombs with the solid cut-out pieces using Tombow Multi-purpose Glue.
4. Cut bee out of Basic Black card stock using a die-cut machine and Detailed Bee Die. Place bee over a scrap piece of Gold Foil, and trace around the body and wings using a pencil. Cut out along the trace lines using a pair of scissors. Attach detailed cut-out over solid background using a small amount of Tombow Multi-purpose Glue. Attach bee to card front using a Mini Dimensional to pop it up.
5. Lightly touch edges of card front in Versamark. Heat emboss edges using a heat tool and gold embossing powder.
6. Attach card front to Basic Black card base.
7. Attach Metallic Pearls to complete.
Card measures: 3 1/4" x 5"
Supplies Used:
Stamp Set: Honey Bee
Ink: Memento Black, Versamark
Paper: Basic Black, watercolor, Gold Foil
Accessories: Big Shot, Detailed Bee Dies, heat tool, gold embossing powder, Tombow Multi-purpose Glue, Mini Dimensional, Metallic Pearls, Stamparatus
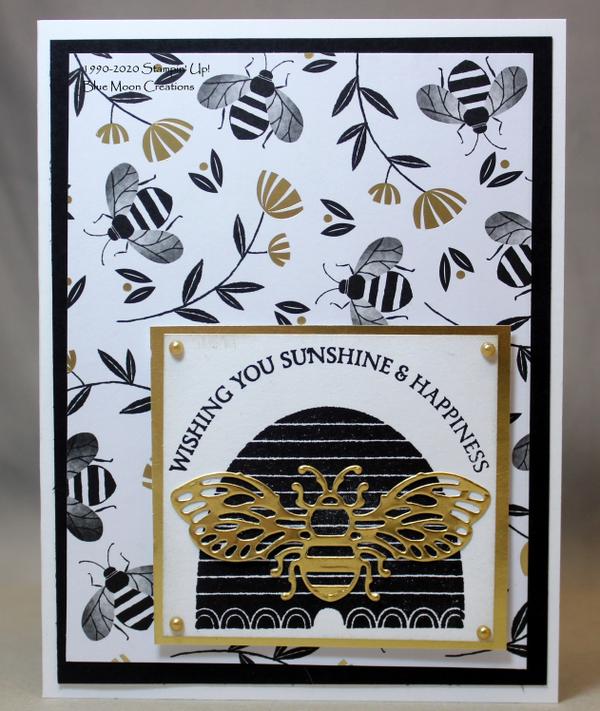
1. Stamp beehive and greeting on Whisper White card stock using Memento Black ink. Sponge edges using metallic gold ink. Attach to Gold Foil mat.
2. Cut bee out of Gold Foil paper using a die-cut machine and Detailed Bee Die. Attach to beehive using a small amount of Tombow-Multi Purpose Glue.
3. Attach Golden Honey Designer Series Paper to Basic Black mat. Attach to Whisper White card front.
4. Attach beehive to card front using Mini Dimensionals to pop it up.
5. Attach Metallic Pearls to complete.
Card measures: 4 1/4" x 5 1/2"
Supplies Used:
Ink: Memento Black, Delicata Golden Glitz
Paper: Whisper White, Basic Black, Gold Foil, Golden Honey Designer Series Paper
Accessories: Big Shot, Detailed Bee Die, sponge, Tombow Multi-purpose Glue, Mini Dimensionals, Metallic Pearls, Stamparatus
|
|
|