|
|
I wanted to take a moment to thank you for supporting my home-based business and all other small businesses.
Thank you for making a difference in my life and so many others!
I know in these unsettled times where we are bombarded with ever changing bad news, it is hard to work up the enthusiasm to get creative.
I received this advice from John Sanpietro, a business coach for stamping business owners.
I thought I'd share his words of wisdom:
"So, how do you motivate yourself to stay creative?
Here are three suggestions:
First, designate specific times, a few times per week, when you're just going to create. Even if it's only for a half-hour, having that time set aside gives you something to look forward to, and puts you in a great mood when you're doing it.
Second, go easy on yourself. Don't try to create anything super-complicated or grandiose. Don't worry about quantity or even quality. Just create! Have fun and enjoy the process. No pressure.
Finally, remember that this is for YOU! You may find yourself creating different types of projects or styles based on your mindset. That's OK. These projects aren't for anyone but you. Remember, artists go through periods based on what's happening in their lives. Even Picasso had his 'blue' period.
The bottom line is this: Creativity is important... especially for an artist like you. Don't ever forget that, and don't ever let anyone or anything take it away from you!"
If you need any stamping or paper crafting ideas during Coronavirus stay at home orders, please reach out.
Please stay healthy.
Anne
Please be sure to let me know if you have any questions:
Quick Links:
Sample Recipe Lists:
|
|
|
|
KXGDZ797
Orders using this hostess code will be combined.
As always, if we have enough in sales to make the order a workshop ($150), we will have a Mystery Hostess.
Please place your order online by April 25.
I will notify our hostess by email on April 26.
The workshop will need to close on April 28.
Happy Shopping!
|
|
|
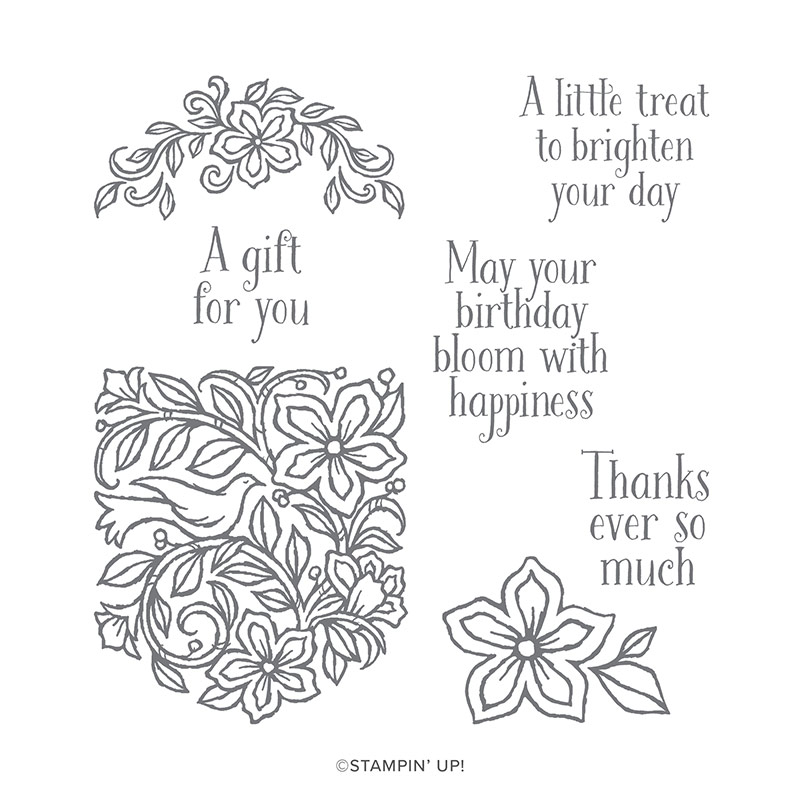
Product Spotlight-Pocketful of Happiness and Pocket Dies
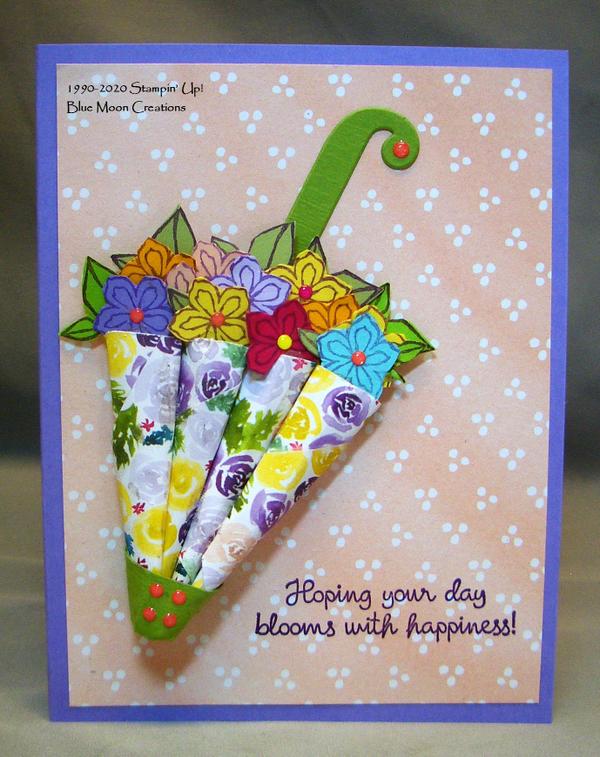
April Showers Bring May Flowers Umbrella Card
I CASED (copy and share with everyone) this card from Gloria Plunkett.
Thank you to Gloria for her inspiration.
The Pocketful of Happiness stamp set does not have a coordinating die for the flowers and leaves, so they will have to be cut out by hand. The card takes a little longer to put together because of that, but I created it while we are staying at home, social distancing ourselves from others, and it was nice to just sit and craft. So, I took my time, and enjoyed the process.
1. To make the umbrella, cut 4 pieces of Best Dressed Designer Series Paper measuring 2 1/2" x 2 1/2". Roll the squares into cones, securing them at the back using Tombow Multi-purpose Glue. Snip off the tops of the cones with a pair of scissors.
2. Attach the cones together, forming the umbrella, applying Tombow Multi-purpose Glue along the sides. Pinch the bottom of the cones together bringing them down to a point.
3. To finish off the bottom of the umbrella, cut a piece of Old Olive card stock measuring 1 3/4" x 1/2". Wrap it around the bottom of the umbrella, securing it in the back using Tombow Multi-purpose glue.
4. Stamp the banner image with the small flowers from Pocketful of Happiness on various colors of card stock using Gorgeous Grape ink. For the leaves, stamp the larger flower image on Old Olive and Pear Pizzazz card stock using Gorgeous Grape ink. Fussy cut flowers and leaves using a pair of scissors.
5. Layer the flowers and leaves along the top of the umbrella using Glue Dots.
6. Create the umbrella handle. For this card, I used the "J" from my retired Large Letters Dies using the Big Shot cut out of Old Olive card stock. You could also use the Umbrella Builder Punch, or hand draw it and cut out using a pair of scissors.
7. Stamp greeting from Varied Vases on Best Dressed DSP card front in Gorgeous Grape ink using the Stamparatus. Attach to Highland Heather card base.
8. Attach umbrella handle to card front. Attach umbrella to card front using Tombow Multi-purpose Glue.
9. Attach enamel dots to flower centers, umbrella bottom and stand to complete.
Supplies Used:
Stamp Set: Varied Vases
Ink: Gorgeous Grape
Paper: Highland Heather, Old Olive, Daffodil Delight, Petal Pink, Mango Melody, Lovely Lipstick, Coastal Cabana, Pear Pizzazz, Best Dressed 6" x 6" Designer Series Paper
Accessories: Big Shot, Large Letters Dies (retired), Tombow Multi-purpose Glue, Glue Dots, enamel dots, Stamparatus
To create the Faux Denim:
Note: After each step, set the piece aside, allowing the ink to dry so you don't get different colored ink onto your ink pads.
1. Swipe ink from a light-colored ink pad vertically onto a piece of neutral-colored card stock. For this card, I swiped on Highland Heather ink onto a piece of Whisper White card stock.
2. Swipe ink from a darker-colored ink pad in the same direction as the first step. For this card, I swiped on Gorgeous Grape ink.
3. Swipe ink from a light-colored ink pad in the same direction. For this card, I swiped on Seaside Spray ink.
4. Swipe ink from White Craft pad in the same direction as the first three steps. Set piece aside to dry before moving onto the next step.
5. Rotate the card stock 90 degrees. Swipe darker-colored ink pad (Gorgeous Grape) across the card stock. Repeat with the lighter Highland Heather, Seaside Spray, and White Craft as desired.
6. Cut pocket using the Big Shot and Pocket Die out of Best Dressed Designer Series Paper.
7. Add the stitching around the pocket using a ruler and Rich Razzleberry Stampin' Write Marker.
8. Attach a thin strip of Rich Razzleberry card stock to the top of the pocket.
9. Cut the small pocket tab using the Big Shot and tab out of Best Dressed Designer Series Paper. Cut heart out of Lovely Lipstick card stock using the heart die. Fold the edges of the pocket along the score lines and attach the tab to side of the pocket. Add the heart to the tab.
10. Add strips of Tear and Tape Adhesive to the folded edges of the pocket. Remove the backing from the adhesive, fold the edges in and attach the pocket to the Faux Denim card front.
11. Cut sun and rays using the Big Shot and dies out of Best Dressed Designer Series Paper. Attach the sun to the top of the pocket using Dimensionals to pop it up. Attach the rays using a small amount of Tombow Multi-purpose Glue.
12. Attach card front to Daffodil Delight card base to complete.
Supplies Used:
Stamp Set: Pocketful of Happiness, stamped on the inside of the card using Rich Razzleberry ink
Ink: Highland Heather, Gorgeous Grape, Seaside Spray, White Craft, Rich Razzleberry Stampin' Write Marker
Paper: Daffodil Delight, Whisper White, Rich Razzleberry, Lovely Lipstick, Best Dressed Designer Series Paper
Accessories: Big Shot, Pocket Dies, ruler, Tear and Tape Adhesive, Dimensionals, Tombow Multi-purpose Glue
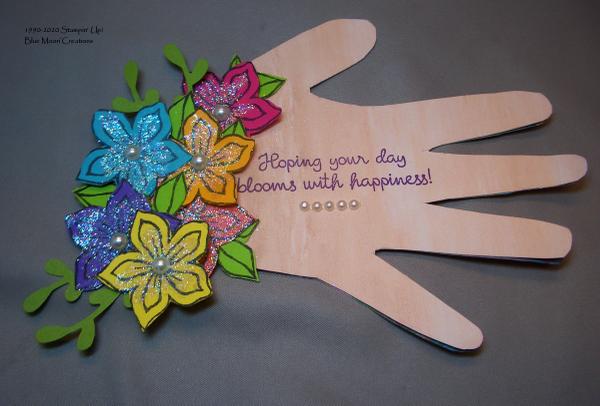
1. Print out the garden glove template found HERE from your computer. Cut the pattern out using a pair of scissors.
2. Fold a piece of card stock or designer series paper in half. Place the wrist part of the template along the score line. Trace around the glove using a pencil. Cut out using a pair of scissors. Be sure to not cut along the score line as this will be the hinge when the card is open.
3. Stamp flower and leaf image from Pocketful of Happiness using Memento Black ink on various colors of card stock. Fussy cut out using a pair of scissors.
4. Lightly brush Tombow Multi-purpose Glue on the flowers with a paint brush. Add Dazzling Diamonds. Brush off any excess and set aside to allow the glue to dry.
5. Punch leaves out of Old Olive card stock using the Sprig Punch.
6. Stamp greeting from Varied Vases on glove using Gorgeous Grape ink.
7. Attach and layer the flowers and leaves to the scored end of the glove using SNAIL Adhesive. Slip the Sprigs behind the flowers.
8. Attach pearls to card to complete.
Supplies Used:
Stamp Sets: Pocketful of Happiness, Varied Vases
Ink: Memento Black, Gorgeous Grape
Paper: Daffodil Delight, Gorgeous Grape, Bermuda Bay, Melon Mambo, Mango Melody, Flirty Flamingo, Granny Apple Green, Old Olive, Perennial Essence Designer Series Paper
Accessories: Glove Template from Templates by Chia, computer/printer, Tombow Multi-purpose Glue, paint brush, Dazzing Diamonds, Sprig Punch, pearls
|
|
|
|
|