|
|
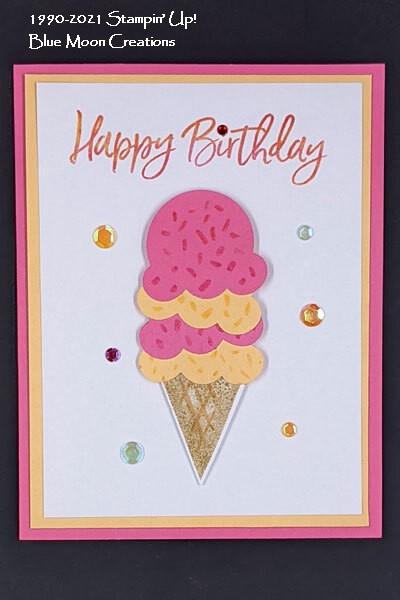
Using the new Pale Papaya and Polished Pink colors for this birthday card make it so playful and FUN! Both the stamp set and punch are in the new Annual Catalog, but the BUNDLE pricing (save 10%) expires on June 30th. Add the Bundle to your order this
month … then make lots of FUN birthday cards for all your friends!
I'm here to help with inspiration for summer-themed crafting!
If you have any questions, please send an e mail:
SUPPLIES
Stamps:
Sweet Ice Cream (photopolymer 158224 is the new number in Annual Catalog) *
* purchase this stamp set and the coordinating Ice Cream Cone Builder Punch as a BUNDLE (156244) and save 10%
Ink:
Crumb Cake Classic Stampin' Pad (147116)
Stampin' Write Marker Assortments - In Color 2021-23 (155639) Pale Papaya, Polished Pink
Paper (including Cutting Dimensions):
Basic White Cardstock [CS] (159276) 3-3/4” x 5”, scrap, 4” x 5-1/4” [Card Insert] optional
Pale Papaya Cardstock [CS] (155668) 4” x 5-1/4”, scrap
Polished Pink Cardstock [CS] (155710) 5-1/2” x 8-1/2”, scored and folded at 4-1/4” [Card Base], scrap
Accessories
Artistry Blooms Adhesive-Backed Sequins (152477),Red Rhinestone Basic Jewels (146924),Ice Cream Cone Builder Punch (154241) *,Take Your Pick (144107),Medium Envelopes - Basic White (159236),Stampin’ Pierce Mat (126199),Bone Folder (102300),Multipurpose Liquid Glue (110755)
Stampin’ Seal (152813),Stampin’ Dimensionals (104430),Paper Snips (103579)
Paper Trimmer (152392)
INSTRUCTIONS
1. Fold Card Base; burnish crease with Bone Folder. Set aside.
2. Cut out two scoops from Papaya CS scrap and two from Pink CS with Punch.
3. Using Papaya Marker for your ink, stamp sprinkles on Papaya cutouts. Use Pink Marker to stamp sprinkles on Pink cutouts.
4. Stamp Cone with Crumb ink on White CS scrap. Using Papaya Marker for your ink, add cross-hatch detail; cut out with Punch.
5. Cover HAPPY BIRTHDAY with ink from Papaya Marker. Thump* Pink Marker to add second color, then stamp near top edge of White CS.
6. Assemble Card as follows:
- Attach Papaya CS to Base with Seal;
- Add stamped White CS with Seal;
- Attach Papaya scoop to Cone with Liquid Glue; add other scoops, in layers, with Liquid Glue;
- Add completed Cone with Dimensionals;
- Place Sequins with Take Your Pick;
- Add Rhinestone over “i” with Take Your Pick; and,
- Decorate inside of Card/Card Insert with stamps as desired.
7. Decorate Envelope if you choose.
THUMPING* - to randomly add tiny bits of a darker color ink over an area already inked with a lighter color.
Lightly tap the side of the Brush Tip of your Pink Marker directly onto the already-inked message stamp. Repeat this ‘thumping’ motion several times until you’ve added enough Pink ink to create a marbled look. Stamp message onto your cardstock.
Our Card Display (153610) is the perfect way to show off your creations in your craft
room. Sit them on a table, on a shelf, or hang them on a wall. But did you know they’re perfect in your kitchen too?!
Here’s my TIP: Take one of the panels, hang it inside a cupboard, and use it as a Memo Board. Use the Library Clips to attach your grocery list, notes to the kids (or yourself) and other important information. Add a few stamped & cutout images too … the perfect solution to keep you and your family organized!
|
|
|
|
|