|
|
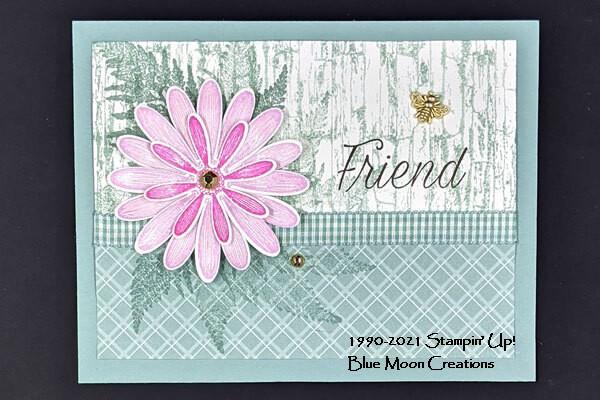
When you want to send a card to tell a friend you’re thinking of them, create one like this!
The monochromatic background makes the bright color of the daisy really POP.
Your friend will appreciate your creativity and your heartfelt message.
I'm here to help with inspiration for summer-themed crafting!
If you have any questions, please send an e mail:
SUPPLIES
Stamps:
Daisy Lane (cling 149325)
Stacked Stone (cling 152556)
Ink:
Early Espresso Classic Stampin' Pad (147114)
Fresh Freesia Classic Stampin' Pad (155611)
Magenta Madness Classic Stampin' Pad (153117)
Soft Succulent Classic Stampin' Pad (155778)
Paper (including Cutting Dimensions):
Basic White Cardstock [CS] (159276) 2-1/2” x 5”, 4” x 5-1/4” [Card Insert], scrap
Soft Succulent Cardstock [CS] (155776) 5-1/2” x 8-1/2”, scored and folded at 4-1/4” [Card Base]
6” x 6” Designer Series Paper [DSP] - In Color 2021-23 (155641) Soft Succulent 1-1/2” x 5”
Accessories: Flowers for Every Season Ribbon Combo Pack (153620) 6-1/2”, Bumblebee Trinkets (155568), Gilded Gems (152478), Shimmery Crystal Effects (150892), Daisy Punch (143713), Medium Daisy Punch (149517), Stamparatus (146276), Take Your Pick (144107), Medium Envelopes - Basic White (159236), Copy Paper, Repositionable Adhesive, Bone Folder (102300), Multipurpose Liquid Glue (110755), Stampin’ Seal (152813), Tear &
Tape Adhesive (138995), Mini Glue Dots (103683)
INSTRUCTIONS
1. Fold Card Base; burnish crease with Bone Folder. Set aside.
2. Place Stacked Stone stamp on Stamparatus Plate; cover with Succulent ink. Place Copy Paper on Stamparatus Base; close Plate and lightly press so only a little ink is transferred. Open Plate; remove Paper. Add Repositionable Adhesive to White CS; place on Stamparatus Base so image will be parallel to short edge of CS. Without reinking stamp, close Plate and press firmly.
NOTE: You can’t secure your cardstock with the Magnets because the area of the stamp is bigger than the cardstock. That’s why I used Repositionable Adhesive.
3. Stamp small Daisy with Magenta ink on White CS scrap; cut out with Medium Punch. Stamp two large Daisies with Freesia ink on White CS scrap; cut out with Daisy Punch. Lightly apply Shimmery Effects to each Daisy. When dry, gently bend petals of each.
4. Add DSP to White stamped strip with Seal, overlapping edges so total width is 3-3/4”.
5. Determine where you’ll place Daisy on DSP/White CS, then stamp Fern image with Succulent ink, repeating as necessary. ‘Stamp-off’ (stamp without reinking) too.
6. Assemble Card as follows:
- Place Tear & Tape over DSP/CS seam, add Ribbon securing ends on back with Glue Dots then add piece to Card Base with Seal;
- Add Freesia Daisy with Liquid Glue, then second Freesia Daisy placing so petals are not stacked on top of each other;
- Add Magenta Daisy with Liquid Glue;
- Stamp FRIEND with Espresso ink;
- Place Gems with Take Your Pick;
- Add Trinket with Glue Dot; and,
- Decorate inside of Card with stamps/printed paper as desired.
7. Decorate Envelope if you choose.
Tool Tip: Bumblebee Trinkets
The Bumblebee Trinkets (155568) are so cute! Like all of our Embellishments (pages 141-143), they add just the right ‘something’ to any project. But they can be a bit tedious to work with as they
don’t have any adhesive on them.
Here’s my TIP: Unroll a few inches of Mini Glue Dots (103683) and place a Trinket onto each Dot; repeat for all your bees. Fold the Glue Dot/Bees strip and slip into a Clear Envelope (102619). Now you’re ready to create with your collection of adhesive-backed Bumblebees!
|
|
|
|
|