|
|
Happy Fall!
Wow, this year is flying by.
I'm here to help with inspiration for fall-themed crafting!
If you have any questions, please send an e mail:
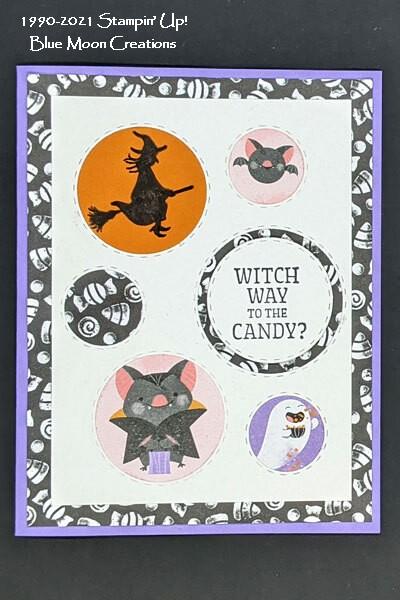
Picture This Halloween Card
The Picture This Dies (Annual Catalog p. 165) are fun to use. The Circles Die has six openings so you can feature lots of cute stamps and patterned papers. Let me show you how to create this whimsical Halloween card with this Die.
SUPPLIES
Stamps: Frightfully Cute (cling 156487)
Memento (132708)
Paper (including Cutting Dimensions):
Basic White Cardstock [CS] (159276) 3-1/2” x 4-1/4” [Die-cut Layer]
Highland Heather Cardstock [CS] (146986) 5-1/2” x 8-1/2”, scored and folded at 4-1/4” [Card Base]
Pumpkin Pie Cardstock [CS] (105117) 1-3/4” x 1-3/4”
Cute Halloween 6" x 6" Designer Series Paper [DSP] (156479)
- 4” x 5-1/4” [Background]
- Large Bat, Small Bat, Ghost prints scrap
Accessories:
Picture This Dies (155559) Circles, Medium Envelopes - Basic White (159236), Pencil, Artist’s Eraser, Multipurpose Liquid Glue (110755), Stampin’ Seal (152813), Stampin’ Dimensionals (104430),Simply Shammy (147042) or Stampin’ Scrub (126200), Stampin’ Mist Stamp Cleaner (153648), Grid Paper (130148) or Small Grid Paper
(149621), Paper Snips (103579),
Paper Trimmer (152392), Stampin’ Cut & Emboss Machine (149653)
INSTRUCTIONS
1. Fold Card Base; burnish crease with Bone Folder. Set aside.
2. Cut White CS rectangle with Picture This Circles Die (this becomes Die-cut Layer); keep 1-1/2” Circle cutout.
3. Cut out DSP prints as follows:
- Place 1-1 /4” opening of Die-Cut Layer over large Bat print, lightly draw circle around image, and cut out with Snips leaving 1/4" border outside Pencil Mark;
- Place 3/4” opening of Die-Cut Layer over small Bat and Ghost prints, lightly draw circle around image, and cut out with Snips leaving 1/4" border outside Pencil Mark; and,
- Erase Pencil marks.
4. Stamp CANDY sentiment with Memento ink on 1-1/2” White CS Circle cutout from Step 2.
5. Stamp Witch image with Memento ink on Pumpkin CS.
6. Assemble Card as follows:
- Attach DSP Background to Base with Seal;
- Attach Witch-stamped CS, small and large Bats, and Ghost cutouts to back of Die-cut Layer with Liquid Glue, referring to Project Photo for placement;
- Attach Die-cut Layer to Base with Seal;
- Attach sentiment circle with Dimensionals, placing over large circle cutout so DSP can be seen; and,
- Decorate inside of Card with stamps/DSP as desired.
7. Decorate Envelope if you choose.
Q&A: Rescue a Ruined Sentiment
Q: I ruined two cards this week because when I stamped a sentiment inside my finished card, it was crooked. Do I always have to start over … can they be rescued somehow?
A: Don’t throw them away - try this instead. When a message is crooked or even a little messy, leave it be, take a deep breath and forgive yourself! Stamp it again on a scrap of cardstock and cut it out with a Punch or Die that is bigger than the size of the messy spot. Place the cutout on the card with a couple of Dimensionals and Presto! Nobody will know that under the perfect image is one that’s not so great. It will be our secret - OK?!
|
|
|
|
|