Supplies
Dies: Deckled Circles (162286), Stylish Shapes (159183), Alphabet A la Mode (160750)
Inks: Misty Moonlight (153118), Cajun Craze (147085), Flirty Flamingo (147052)
Paper: Basic White (159276), Misty Moonlight (153081), Real Red (102485), Pumpkin Pie (105117), Basic Black
(121045), Gold Foil Sheets (132622)
Other: Stampin’ Cut & Emboss Machine (149653), Watercolor Pencils Assortment 1 (161700), Take Your Pick Tool (144107), Blending Brushes (153611), Adhesive Backed Star Trinkets (162010), Adhesive Backed Sequins Trio (161206), Real Red & Garden Green 3/8” Ribbon Combo Pack Ribbon (159577), Black & Very Vanilla 3/8” Large Check Ribbon
(161982), Paper Snips Scissors (103579), Multipurpose Liquid Glue (110755), Adhesive Sheets (152334), Stampin 'Dimensionals (104430), Mini Glue Dots (103683), Bone Folder (102300) Other: purchased bag with handles (this one is 5 ½” x 3 ¼” x 8 3/8” but any bag or color will work), gold alligator clip (a wooden clothespin would work great too), red tissue paper
Measurements
• Basic White: large scrap (about 5 ¾” x 5 ¾”), piece for card 1 ½” x 8 ¼”
• Misty Moonlight: 3” x 8 ½”, scored at 1
3/8”
• Real Red: ¼” x 8 ½”
• Pumpkin Pie: 7/8” x 2 ½”
• Basic Black: large scrap
• Gold Foil: scrap
• Vanilla & Black Check Ribbon: about 14”
• Red Ribbon: about 14"
Instructions
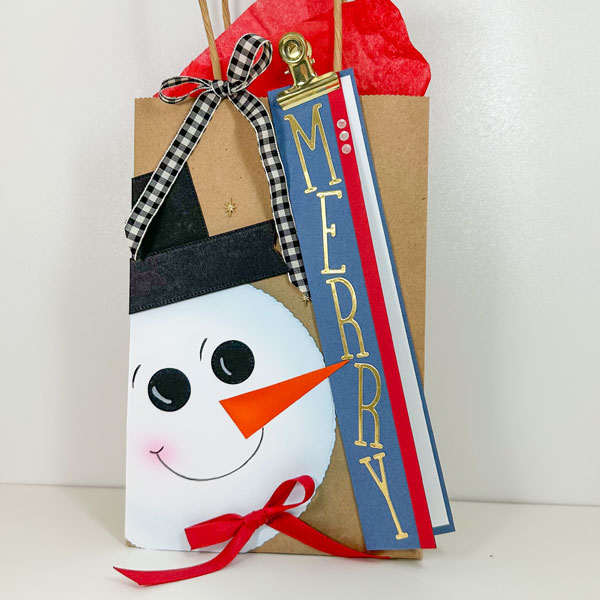
Snowman Bag
1. Cut the following with the
Stampin’ Cut & Emboss Machine: a). the 2nd largest Deckled Circle from the Basic White b). two of the smallest Stylish Shapes circles from Basic Black c). one of the large, flagged banner from Stylish Shapes from Basic Black d). one of the 3rd largest Stylish Shapes square from Basic Black
2. Attach an Adhesive Sheet to the back of the Gold
Foil Paper and die cut the word “MERRY” with the Alphabet ala Mode dies.
3. Cut the piece of Pumpkin Pie with the Paper Snips into a carrot shape. TIP: cut from one short edge on a diagonal to the opposite short edge corner.
4. Ink up blending brush and apply: a). Misty Moonlight: lightly color the edge of the large deckled circle b). Flirty Flamingo: add a small circle of color to the left cheek c). Cajun Craze: along the edges of the carrot nose d). OPTIONAL: add a bit of Misty Moonlight also to the bag itself around where the snowman’s face will be.
5. Using the white colored pencil, draw on two slightly curved lines in the small black circles (see photo). Using the Pumpkin Pie coloured pencil, draw a few lines across the “carrot” (this is very subtle).
6. Glue the Deckled Circle to the bottom left of the bag with liquid glue. You want about 1/3” of the circle to
overhang the edge of the bag (which will be trimmed off later). Glue on the eyes and the nose also with liquid glue.
7. Figure out placement for the hat: place the Basic Black square on the bag about ½” above the white circle. Position the flagged banner on top so it extends to the right. If happy with placement, remove then adhere the square with
liquid glue and the banner with dimensionals also being sure they overhang the bag to the left.
8. Turn the bag over and trim off all the pieces overhanging the edge.
9. Draw on a mouth with the
Basic Black coloured pencil so it comes from beneath the nose over to the Flirty Flamingo cheek. (See photo). 10. Make a bow with the Real Red ribbon. Attach it to the bottom of the snowman with a glue dot.
11. Add three Adhesive Backed Start Trinkets around the top of the snowman.
12. Tie a bow around the left handle with the Black & Vanilla Checked ribbon.
13. Insert tissue paper.
Merry Tag
1. Fold the Misty Moonlight along the scored line and crisp up with the Bone Folder. Glue the strip of Real Red along the front right side with liquid glue. Glue the piece of Basic White to the inside. (Note there is a little more
of the back showing on the tag so you can see the white.)
2. Remove the backing from the gold foil letters and adhere to the tag in a haphazard manner.
3. Add 3 white sequins to the top on the Real
Red.
4. Attach to the bag with an alligator clip or a clothespin