Supplies
Stamp Sets: Beary Cute* (162016)
Inks: Night of Navy (147110), Old Olive (147090), Memento Ink Tuxedo Black (1132708), Versamark® Ink (102283)
Paper: Basic White
(159276), Basic White Thick (159229), Old Olive (100702), Real Red (102482), Soft Succulent (155776), Beary Christmas 12” x 12” Designer Series Paper (162015)
Other: Beary Cute Punch* (162022), Tailored Made Tags Dies (155563), Real Red & Burlap Ribbon Combo Pack (160386), Smoky Slate Stampin’ Blends Combo Pack (154904), Color Lifter Stampin’
Blend (144608), Stampin’ Seal Adhesive (152813), Stampin’ Dimensionals (104430), Paper Snips Scissors (103579), Heat Tool (129053), Stampin’ Emboss Powders Basics (155554), Mini Stampin’ Cut & Emboss Machine (150673), *Bundle and Save 10% – Beary Cute Stamp Set and Beary Cute Punch (162023)
Measurements
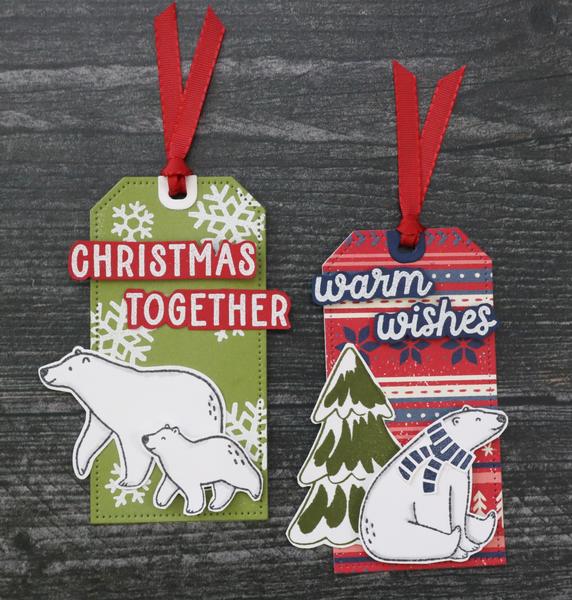
Old Olive Cardstock (Tag): ~4 ½” x 2 ½’
• Beary Christmas Designer Series Paper (Tag): ~4 ½” x 2
½’
• Basic White Thick Cardstock (Tag and reinforcement): 2 @ ~4 ½” x 2 ½ and scrap
• Basic White (stamping): scrap
• Night of Navy (Sentiment and tag reinforcement): scrap • Real Red (Sentiment): Scrap
• Ribbon: ~4 ½” for each tag
Instructions
1. Die cut tags and tag reinforcements using the largest tag from the Tailor-Made Tags Dies and coordinating reinforcements. Using your preferred adhesive, adhere the tag reinforcements to the
front of the tag and to the back of the White tags.
2. Stamp one of each bear on Basic White cardstock using Tuxedo Black ink. Stamp tree using Old Olive. Stamp scarf in Night of Navy. a. TIP: to add shadow to the white bears, use Smoky Slate and Color Lifter Stampin’ Blends. After you color with Smoky Slate, go over it with the Color Lifter to
lighten color.
3. Fussy cut tree and two bears and punch the coordinating bear using the Beary Cute Punch.
4. Stamp each sentiment with Versamark® and apply white embossing powder, then heat set.
Once cool, fussy cut each word separately.
5. Stamp a few snowflakes using Versamark® on the Old Olive tag, then apply white embossing powder and heat set.
6. Fasten the tags together using the Real
Red Ribbon. The Basic White tag will go in the back and can be used to write a personal greeting.
7. Assemble the two tags: a. Tag one: Use Stampin’ Dimensionals to pop up the word “Christmas” and the little bear and the larger bear and word “Together” will be adhered using Stampin’ Seal. b. Tag two: Adhere the scarf to the bear and adhere the
tree to the tag using Stampin’ Seal. Using Stampin’ Dimensionals, pop up the bear and the sentiment.