Trouble reading today's article? Click
here: Issue
#233 - Sunday, October 7, 2016
Dear Fellow Grower,
In today's issue... - Learn how to avoid 7 common flowering stage problems! This is a throwback from newsletter issue #24 from September 2012, but I think it's still relevant today!
- Check out 12 neat growing tools you might not know about!
- Check out our new growing forum! We started a growing community last week where growers can anonymously ask questions and share their experience with other growers, and we'd love to have you!
- This week's trophy pic features three outdoor cannabis plants you can barely see
because they're camouflaged so well!
Nebula Haze & Sirius Fourside (founders of GrowWeedEasy.com) "A smart man makes a mistake, learns from it, and never makes that mistake again. But a wise man finds a smart man and learns from him how to avoid the mistake altogether."
~Roy H. Williams
7 Flowering Stage Problems by Nebula Haze |
This article is an oldie but a goody! It's from newsletter issue #24 from September 2012! I thought the info was just as relevant today so I thought I'd do a
reboot!
|
During the flowering stage, your marijuana is focusing completely on making buds during the flowering
stage.
During this stage, plants often need a little extra TLC as they are not putting as much effort into keeping themselves healthy.
Unfortunately, this happens to be the exact time that most beginning indoor growers tend to get comfortable and start forgetting about their
plants.
As an indoor marijuana gardener, your actions during the flowering stage have a huge impact on your yields and the final potency of your buds!
Here are 7 simple yet effective things to pay attention to so your Flowering Stage goes great and your plants produce a huge, picture-perfect harvest every
time!
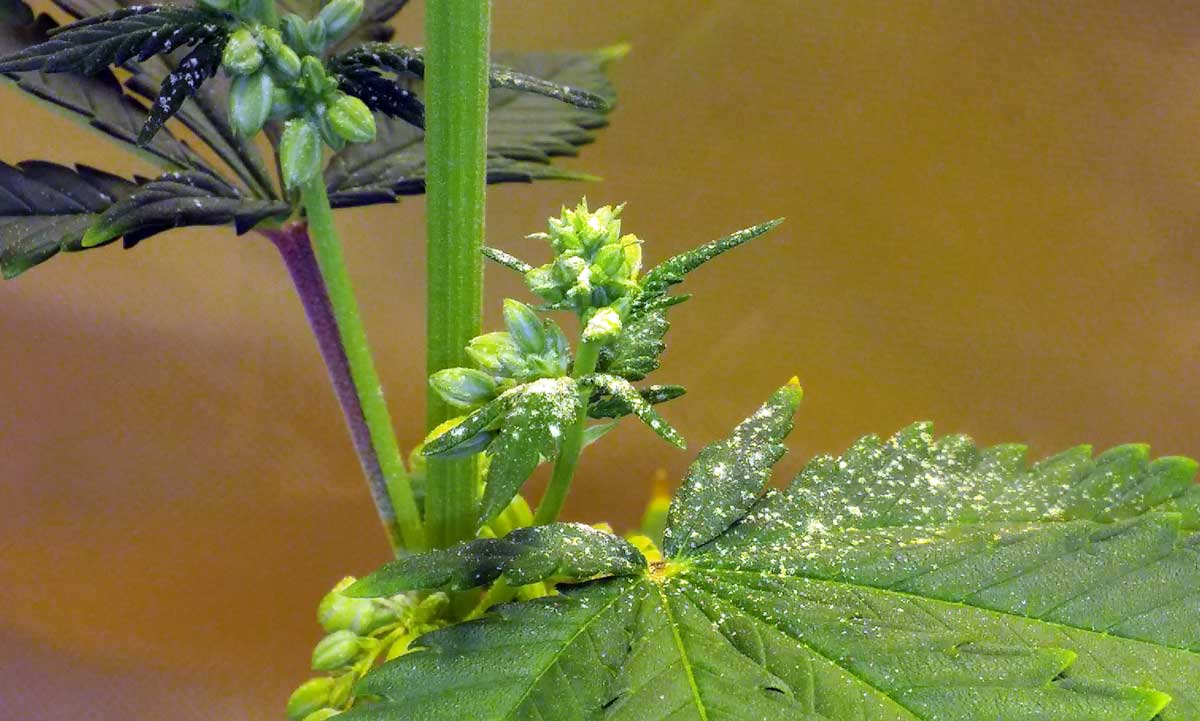
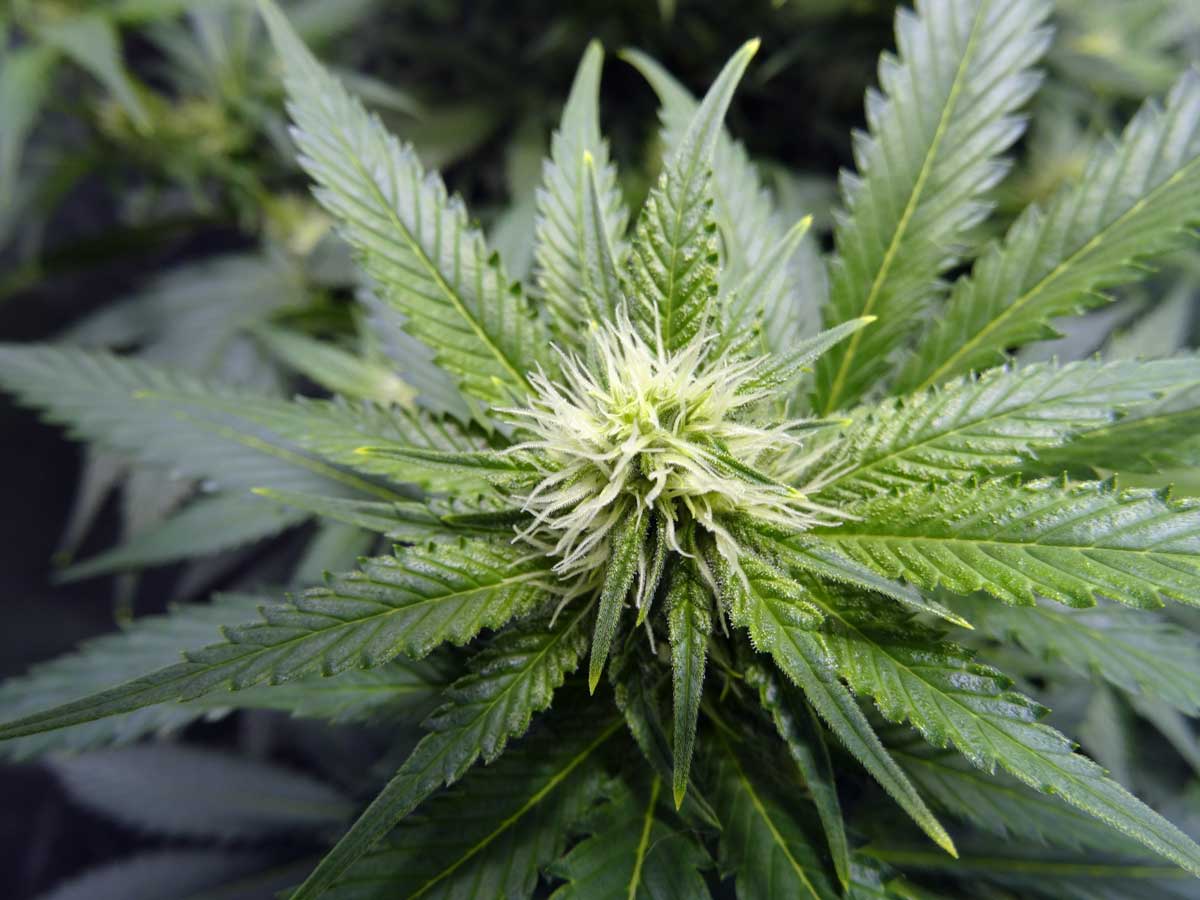
1.) Watch out for male plants pollinating your female plants
Keep an eye out for unexpected male plants or hermies (hermaphrodites;
girls that grow "male" parts).
Hermies generally come in two forms. Either it looks like you're growing male pollen sacs among your flowers, or you'll see the signature hermie "yellow banana."
Basically look for balls/pollen sacs or little yellow bananas growing among all your beautiful buds and white hairs. Definitely remove them on sight to prevent uncontrolled pollination, and consider removing the whole
plant if possible to prevent seedy buds!
Male cannabis plants grow pollen sacs instead of buds, which open and spill pollen. Pollen can pollinate your buds and cause them to grow
seedsAfter going through a lot of stress in the flowering period, some female plants will turn "hermie" and grow male pollen sacs, which can also pollinate your
buds Here are hermie "bananas" growing among the beautiful buds as a result of long-term heat stress :( In botanical terms, a banana is a "stamen". These produce pollen and are normally found inside a pollen sac. A hermie is a female plant growing male parts, and you can get
anything from fully formed pollen sacks down to a single stamen like the one below. Even a single pollen sac or banana can ruin your whole crop by spreading pollen and "seeding" all the
females.
All pollinated female buds may stop fattening up and instead focus on making seeds. As a result, you get seedy buds and low yields.
Some
growers purposely induce plants to turn into hermaphrodites as part of the process of producing feminized seeds (seeds which grow only female plants). Pollen gathered from a hermaphrodite female plant produces all-female (feminized) seeds when used to pollinate buds, though if you do it the wrong way your seeds are more likely to be hermaphrodites themselves. Learn more about feminized seeds.
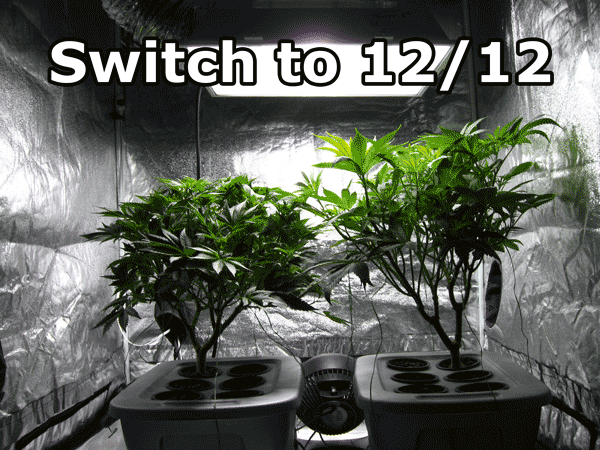
2.) Make sure indoor grow lights don't get too hot/too close
During the first month of the flowering stage, many cannabis plants go through a dramatic upward growth known as "the stretch". However, for some strains, the plants may continue to grow taller for much of its flowering period, even after the initial flowering stretch.
Example of the flowering stretch in action - your plant may double in size after the switch to 12/12! Some strains stretch more than others, but breeders should be able to tell you what to expect so you can plan for it. This is why it can be helpful to know what strain you're growing!
Indoors, it's common for plants to be inching closer and closer towards grow lights without the grower realizing it. Always keep a barrier of space between your plants and your lights, and make sure you switch your plants to the flowering stage before they're half the final desired size!
3.) Monitor pH of Your Root
Zone
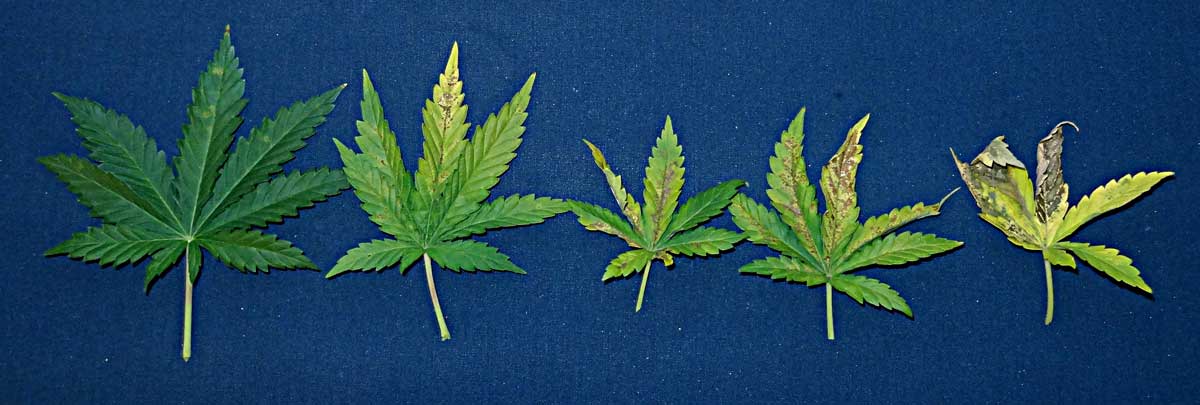
More than half of the marijuana plant problems submitted to GrowWeedEasy.com end up being the result of too high or too low pH in the root zone.
In hydroponics, pH management is absolutely crucial to your success. Even when growing in soil, pH has a big effect. Some growers get may lucky, but if you're having unexplainable problems, I highly recommend at least checking the pH and eliminating that as a possible cause.
PH problems can cause wrinkly leaves, curling, and what appears to be a wide variety of nutrient deficiencies. Plants can't absorb nutrients when the pH is off at the roots, so symptoms can look like almost anything!
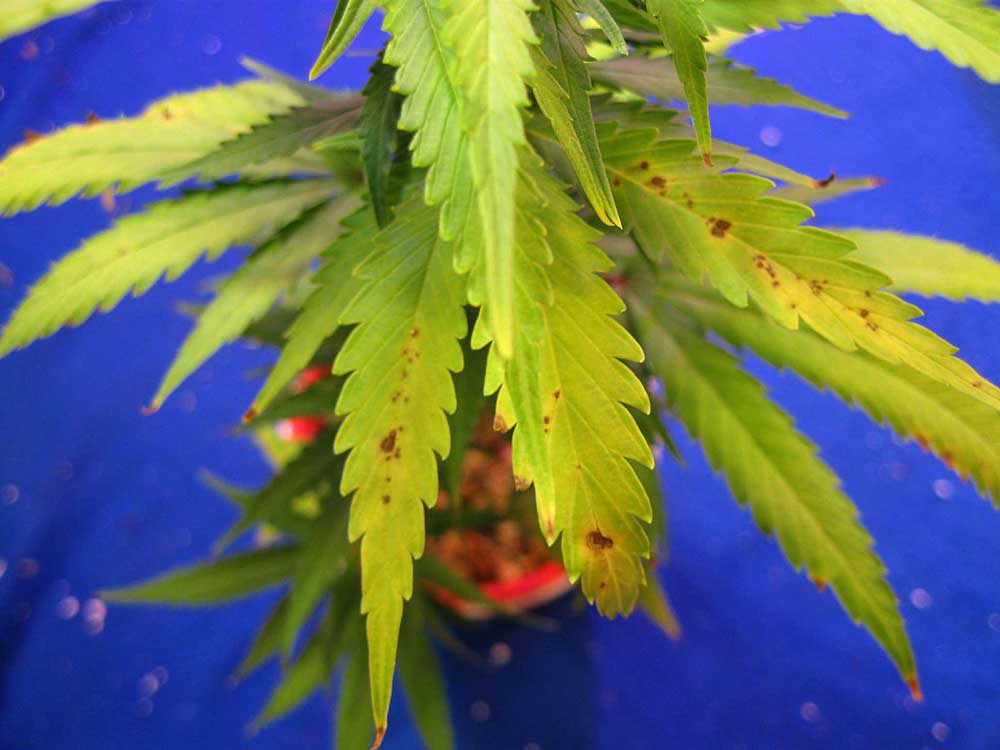
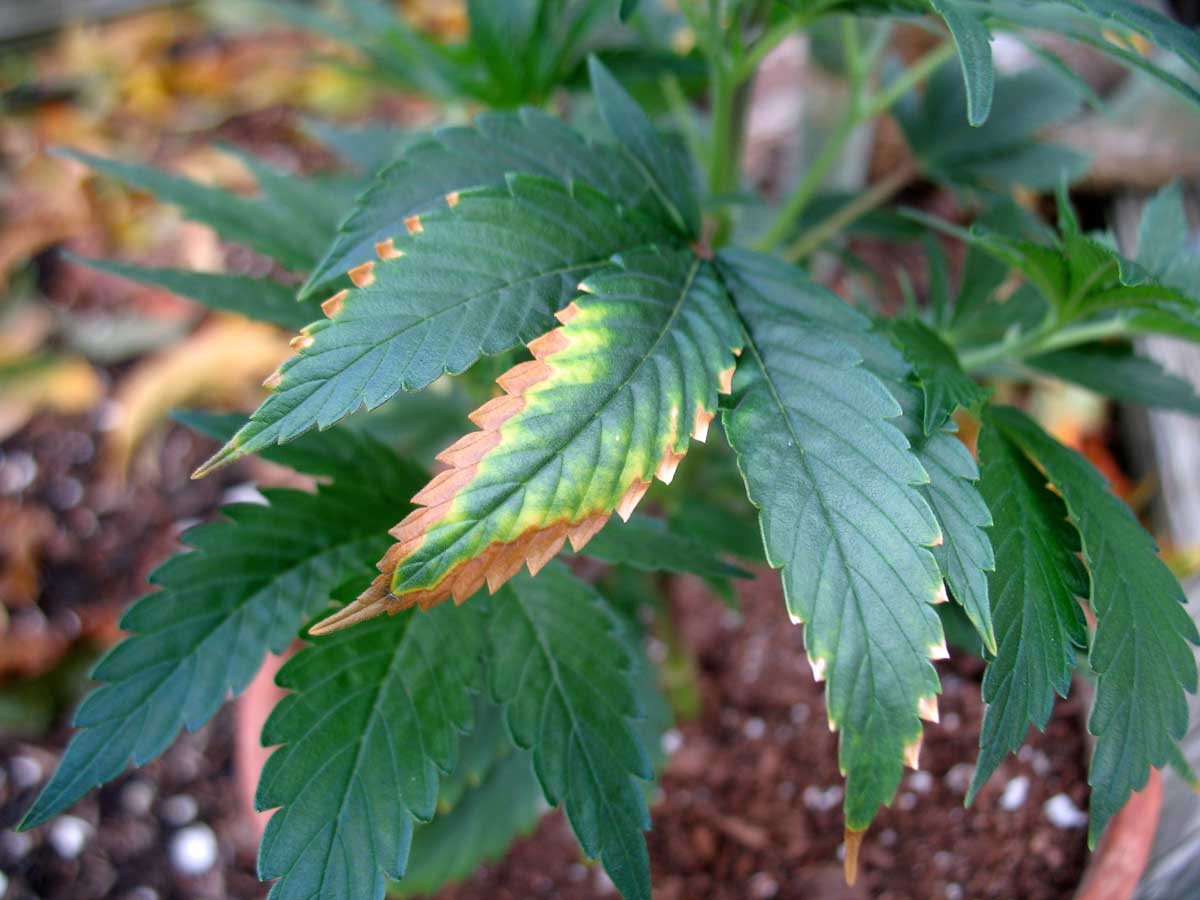
Problems from pH manifest in a variety of ways, often looking like nutrient
deficiencies Although the symptoms can look different, many deficiencies can be traced back to incorrect pH Spots on leaves are another common symptom for pH problems! Many growers see burnt edges or tips and instantly think nutrient burn, but it could actually be a deficiency caused by pH imbalance. If more than just the tips are burnt it's likely a sign of pH problems. Optimum pH varies a bit from strain to strain, and between different growing mediums, but a good rule of thumb is maintain a rootzone pH of 5.5-6.5 in hydroponics, and 6.0-7.0 when growing marijuana in
soil.
If you've been monitoring pH from the beginning, continue to monitor pH. Don't get too comfortable and get lax when you're in the most important phase of your plants life!
If you haven't been monitoring pH and suddenly get a bunch of unexpected problems, check this before you take any other drastic
measures!
When I first got a pH kit, I was amazed at how much
stronger and resistant to problems my plants were once they started getting the optimum pH at their roots. This allows plants to easily absorb all the nutrients they need, so they can focus on making buds.
As a result, you may need lower nutrient levels overall, which often results in smoother, tastier buds.
Learn what you need to know about pH right here (it's simpler than you probably think!):
4.) Don't overdose plant with nutrients
Going overboard on nutrients (even organic nutrients if they're highly concentrated enough) can ruin your yields and makes buds smell or taste bad! This is
terrible to do late in the flowering stage!
Never raise nutrient levels unless you've ruled out a pH problem and then do so slowly. It's normal for your oldest, lower leaves to start yellowing and falling as harvest approaches, this doesn't mean add more
nutrients.
Plants need less and less nutrients as they approach harvest and it's natural for leaves to start yellowing, especially older leaves towards the bottom of the plant.
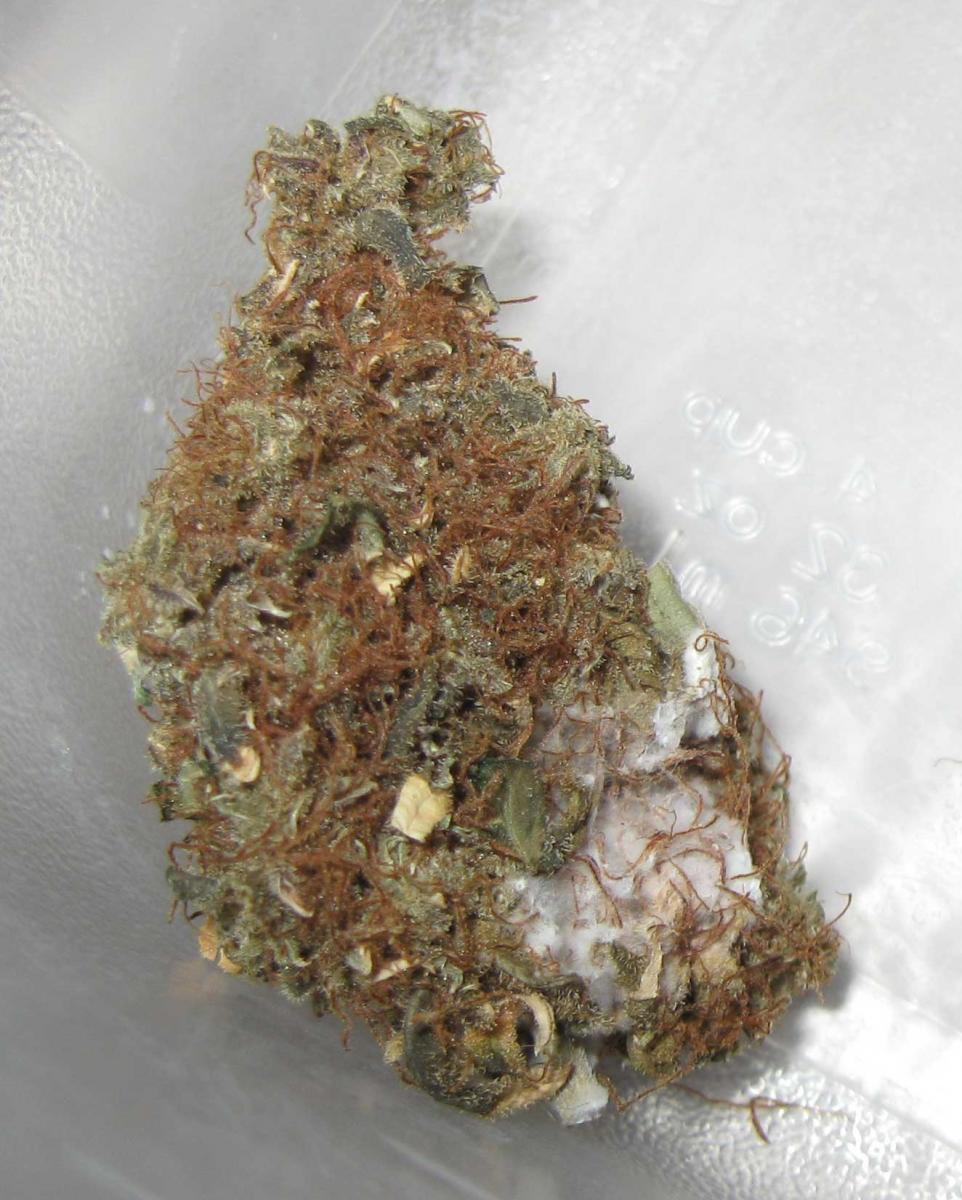
5.) Keep Humidity Below 50% to Prevent Mold
In the flowering stage, humidity should be kept below 50% to prevent mold.
When humidity gets too high in a grow room, the plant pulls excess water in through the leaves which increases your chances for mold, especially in fat buds.
Sometimes you may think your buds are totally fine, only to find a gross moldy mess in the middle, like the bud pictured to the left.
Never smoke moldy
buds!
Some growers will dramatically drop the humidity of the grow room during the last few weeks of flowering using a dehumidifier.
This
actually stresses your plant in just the right way, and may increase resin production.
Learn how to use humidity to make your plant grow better:
6.) Flush your plants right before harvest with plain pH'ed water (no nutrients)
I recommend flushing plants with plain, pH'ed water for the last 1-2 weeks before harvest to leach out any extra nutrients.
A
plain-water flush may improve the overall taste and smell of your buds, especially if you've gone a bit overboard with nutrients.
Hint: A secret grower tip is to add a bit of regular blackstrap molasses (a teaspoon or two per gallon) to your water during the last week or two of flowering as a cheap yet effective
alternative to those expensive supplements that improve bud flavor. This works for soil and coco coir, but not hydroponic setups.
How long does the Flowering Stage last? When do I harvest?
The time spent in flowering depends heavily on your strain, as well as the effects you'd like to produce. View a complete marijuana timeline.
This bud is in week 3 of the flowering stage Most strains need 2-3 months in the flowering stage before they're ready to harvest, though some strains are a bit faster and
some strains, such as some sativa and hazes, can need as long as 4 months of flowering before they're ready (though there are tricks to get them to mature faster).
Some growers prefer to harvest on the earlier side for more of a "buzzy" high while other growers harvest later for more of a "couchlock"
high.
- Harvesting too early causes low yields, less-potent buds and a 'racing' high
- Harvesting very late produces buds that tend to cause
sleepiness
When you harvest at the right time, you get the best yields. Plus you get the effects you want!
The best thing to remember with harvesting is to be patient. A lot of people get too eager to harvest buds, and
they end up taking their plants down too early. Wait for a few signs before you take the leap:
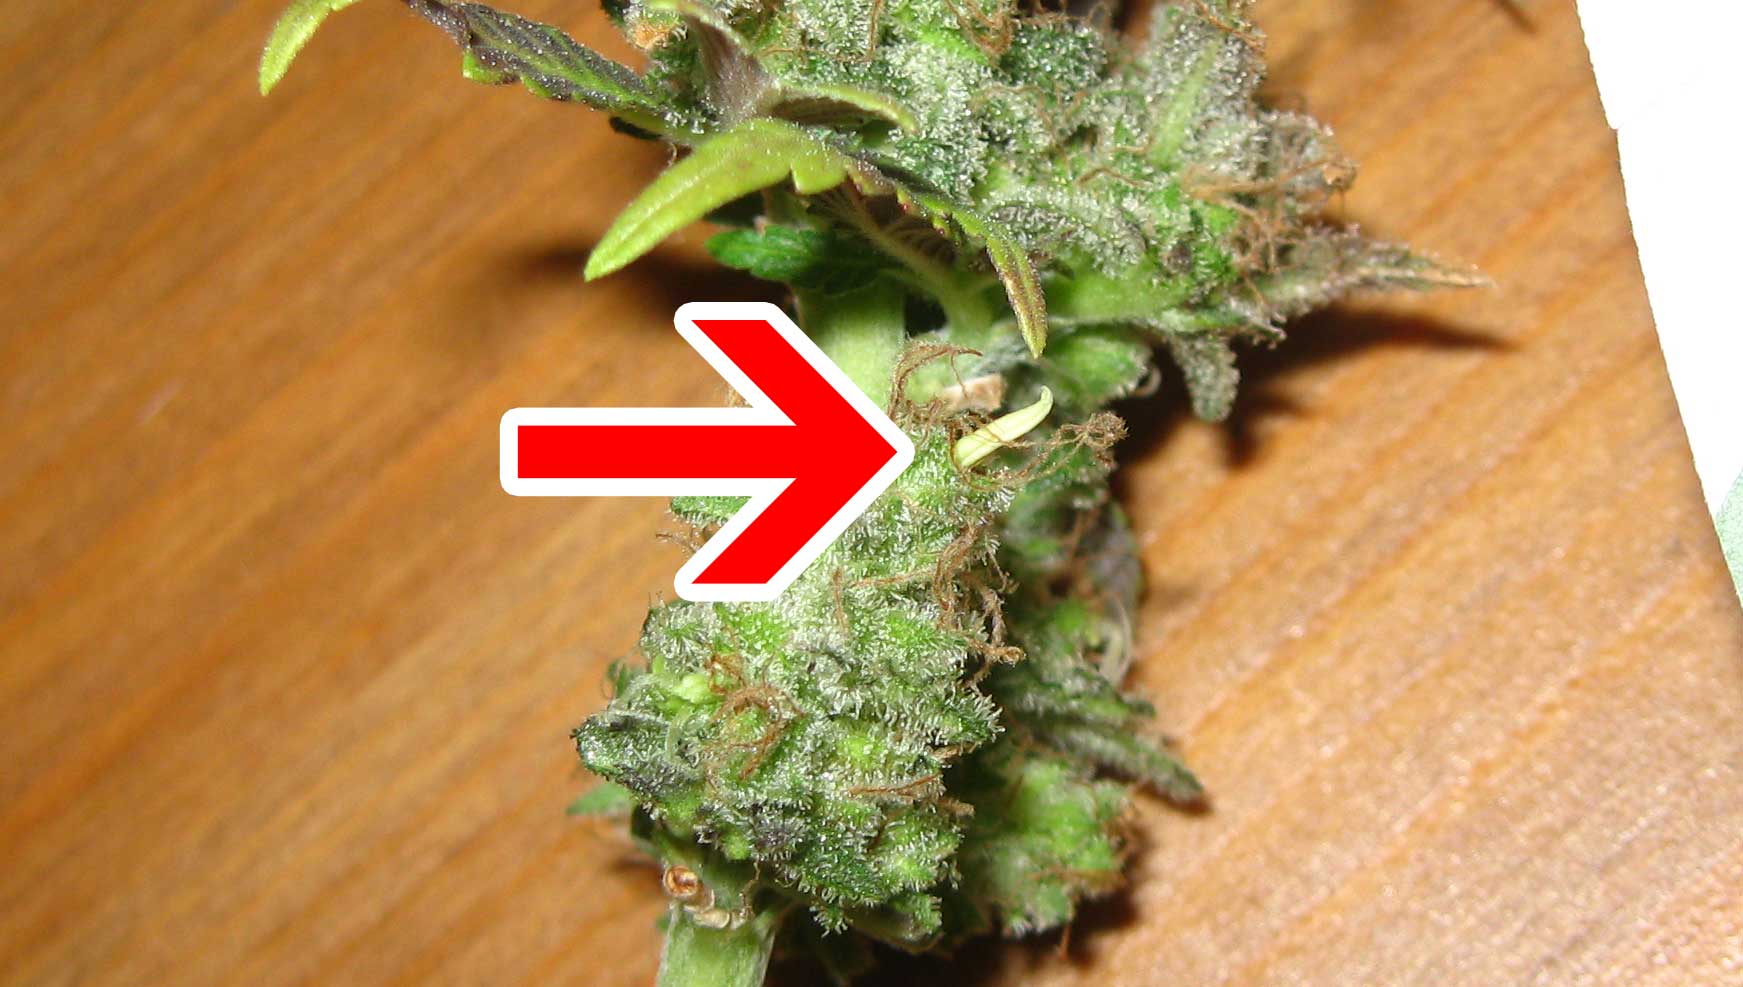
- At least 50-70% of the hairs (pistils) on the buds should have darkened and started curling in
- Use a magnifier like a jeweler's loupe, or (my personal favorite) a USB microscope to look at your buds. You know you're ready for harvest when most of the clear, glassy trichomes (little mushroom looking growths) have turned milky white colored (looks like plastic to me), with a few amber/yellow trichomes. When they're ready, they'll also start to lean over from
the weight of the bulbs on top.
For the geeks like me... here's an article explaining the
science behind picking the right harvest time to achieve optimum cannabinoid levels:
7.) Trimming & Curing Your Newly Harvested Buds
Once the plants are cut down, you can trim the leaves off of them and hang them up to dry. Although it may seem like everything is over, the next few days are actually incredibly important to your bud quality. Avoiding common problems in this
phase will yield you big dividends!
DID YOU KNOW? You can cut all the buds off a plant and put it back under 24/0 light to get her to revert back to the vegetative
stage. One reason you might do this is if the plant has been a huge producer and you want to take clones. After a month or two, the plant will have fully recovered and started growing vegetatively. At this point, clones can be taken. You can even put a re-vegetative (commonly called 're-vegged') plant back into the flowering stage and harvest again though this is usually inefficient compared to just starting a new plant from seed.
It is possible to take clones during the flowering stage, but these clones are tougher to get to take root, and for some reason clones taken from flowering plants tend to display odd growth at first. Some growers take clones from the flowering stage on purpose, with a technique known as "monster cropping", to take advantage of this odd growth to produce bushy monsters.
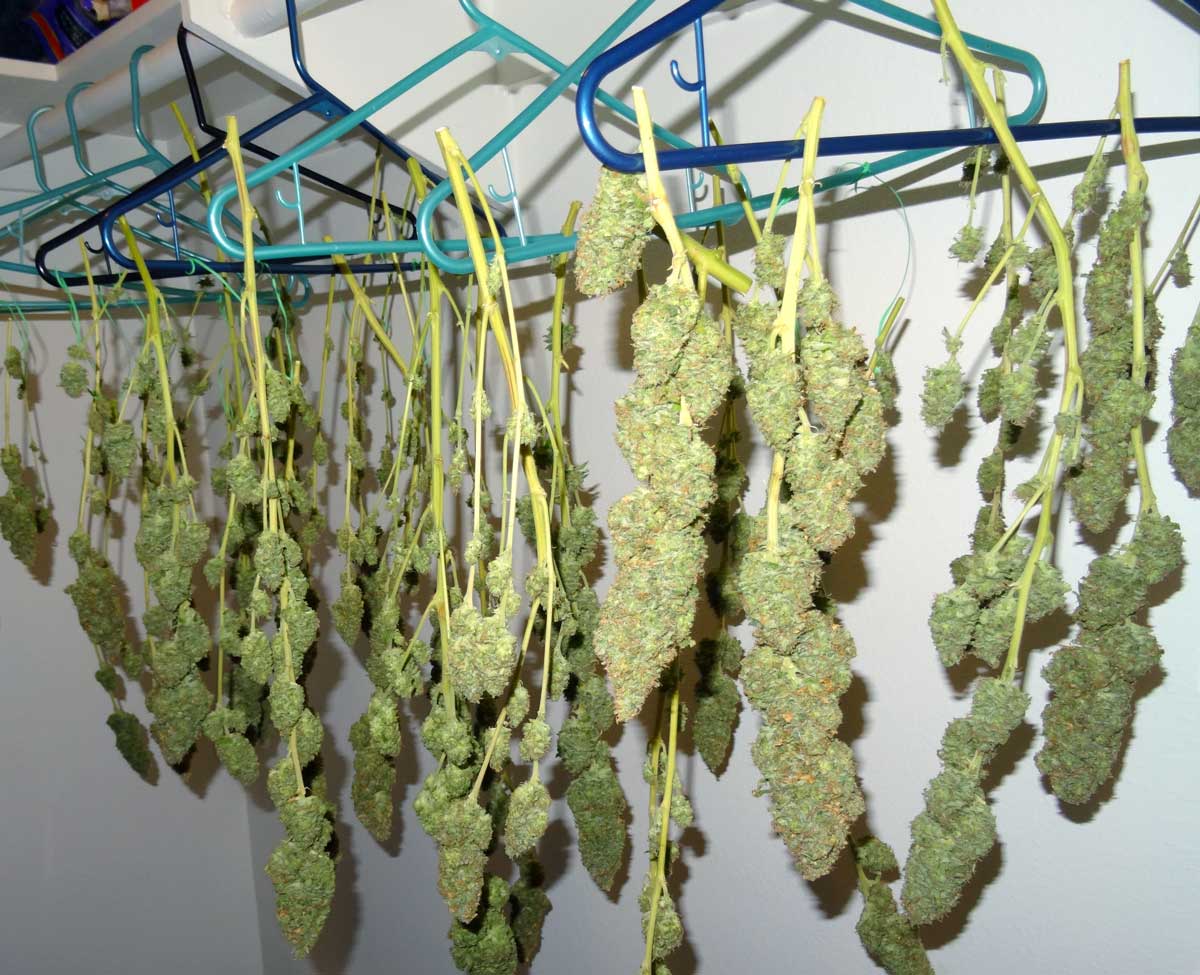
There are many ways to dry your
buds, such as hanging them from a string, leaving them spread out on netting, or even just laying them out on cardboard. Curing Your Buds
Once your buds are dry, leave them in an airtight jar, and place the jar in a dark place.
You can open the jar every so often and jostle the buds a bit; this is also a good time to make sure you don't
see/smell mold and buds still feel dry. It's a good idea to do this more often at first (once a day in the beginning) and slowly do it less (once every 3-5 days). After about 2-3 weeks of this process, you'll have great herb! Cure even longer, up to 6 months, for continued improvement in flavor/smell.
I hope you enjoyed this article, I wish I had known this stuff when I first started
growing!
12 Neat Growing Tools You Might Now Know About |
Some tools for growing are less known, but make the growing experience much easier than if you went without. Over the years we've learned about a few great growing tools that we regularly use in the grow room, and we wanted to share
them with you!
Reply to this email and let us know if we've missed a tool you use, but no one knows about!
|
Check Out Our New Grow Forum! |
We opened a new growing forum last week so growers can ask questions and talk with each other anonymously!
If you want to participate, click here to sign
up! Once you sign up, we'll do a quick check to make sure you're not a robot and you'll get an email saying you're in! Ask questions, get help with problems, share your pictures, or discuss anything else to do with growing!
|
|
I want to thank and compliment you on a incredible web site, the detailed and in depth subject material is not only super helpful but also impressive!! Your site/ info made my first grow easier and successful. I cant imagine how many people
world wide you have helped. Thanks. Greg |
|
I grow in my garden. Great results, I use plant trying to keep them low and produce multi large colas per plant. Mix many veggies and flowering plants to hide plants from public.
~Cyndy
|
We encourage you to forward this email to a friend in need!
Who Runs This
Newsletter? |
Nebula Haze:
I'll be honest with you, when I first started growing, I struggled. Now, it is my mission to make it easier for new growers to
get started as well as help advanced growers get bigger, better yields with less time and money. We are updating and adding articles every single week and our goal is to eventually build a comprehensive growing resource so anyone and everyone can grow if they want to! If we all share the knowledge there's more buds in the world for everyone :) |
|
Learn which seed sources are personally recommended by Nebula Haze |
Sirius Fourside:
Sirius Fourside is a hobbyist grower who has gained the bulk of his experience growing in water as a medium (deep water culture,
bubbleponics).
"Growing cannabis is a relaxing hobby in and of itself, but it also saves you money and keeps you from having to deal with shady characters. Cannabis is much
easier to grow than people give it credit for, and growing in water doesn't increase the difficulty much, if any. But whether you want to grow in water, coco, or a different medium, we'll show you how easy it can be!"
Get Your Seeds Delivered
Safely! |
|
GrowWeedEasy.com has put together a hand-picked list of all the available seed banks including what type of payment they accept and where they ship in the
world!
List of trusted seed sources:
http://www.growweedeasy.com/seeds Get Seeds!
|
Copyright (c) 2016 GrowWeedEasy.com
Disclaimer: Grow Weed Easy only recommends products that we've either personally checked out ourselves, or that come from people we know
and trust. For doing so, we may receive a commission. Nothing in this e-mail should be considered personalized Financial, Legal, or Medical Advice. The contributors to this magazine grow legally under their local laws but are not lawyers or medical professionals. Any decision to grow marijuana should only
be made after consulting with an experienced lawyer or other legal adviser. Any medical decisions should only be made after speaking with a doctor or other medical professional. Be safe!
How Did I Sign Up For This Newsletter?
Our records indicate that requested to be added to the GrowWeedEasy.com weekly newsletter at
.
Date:
To unsubscribe: |
|


