Issue #20 -
Sunday, September 2, 2012
Dear Fellow Grower,
In today's issue you'll discover...
- The quickest path from absolutely nothing, to harvesting your own brain-bending buds with your... Quick Start Grow Guide!
- We're showcasing the incredible harvest from one of the strongest, most efficient LED lights on the market today!
- Learn how you can give back to the marijuana growing community
- Our opinion on a popular cannabis growing myth: Is Miracle-Gro as good as specialized cannabis nutrients?
We hope you enjoy this issue of Grow Weed Easy!
Happy Growing!
Nebula Haze and Sirius Fourside (founders of GrowWeedEasy.com)
"Everything that slows us down and forces patience, everything
that sets us back into the slow circles of nature, is a help.
Gardening is an instrument of grace."
-May Sarton
The Quick Start Grow Guide
By Nebula Haze
Your Indoor Weed Growing Information Kit - Everything you need to know to start growing marijuana today!
Ready to start growing your own weed?
Maybe something is holding you back...
Growing weed can seem so complicated, but many things seem that way when you aren't given the right information.
This article will help you discover the best way to grow marijuana, for your unique situation.
Growing weed is actually pretty easy, and anyone with a few extra minutes a day and a spare closet or sunny patio can grow their own buds.
As a regular smoker, I started growing weed in my closet in 2004, and over the last few years I have saved myself a ridiculous amount of money!
So... what do you need to grow weed?
In order to thrive and grow, your weed needs...
- Light (has the biggest effect on yields)
- Air (a well-ventilated area with a slight breeze is best)
- A Grow Medium (the stuff your plants grow in; soil isn't your only choice)
- The Right Temperature (room temperature or a little warmer is perfect during the day, cannot stand freezing at night)
- Nutrients (usually half as much as what's recommended on the package)
- Water (maintain pH with a simple pH kit for best results, 6.0-7.0 for soil and 5.5-6.5 for hydroponics)
When growing weed indoors or outdoors, you will need to ensure that it gets the proper amount of all 6 of these resources.
One of the most common mistakes made by new weed growers is conducting spur-of-the-moment experiments and possibly kill their plants. Always take a second to google your idea before you try it. Luckily for us, the chances are that someone has tried it already!
Another common problem new growers have is the tendency to skip crucial steps like maintaining proper pH levels or getting the right kind of nutrients. While you can get lucky and succeed at growing weed without taking these steps, you are a lot more likely to end up with plants that are sickly or die.
10-Step Beginner's Guide to Growing Weed
Step 1: Choose: Indoors or Outdoors
 Indoors is much more private and gives you more control over your grow. A marijuana closet grow can be easy to get started and relatively cheap, especially if just growing 1-2 plants. Indoors is much more private and gives you more control over your grow. A marijuana closet grow can be easy to get started and relatively cheap, especially if just growing 1-2 plants.
Dankest buds usually come from indoor grows (though not always!). However, because you are basically god to your plants, if you don't provide everything they need, they will die.
Indoors, you can grow weed most anywhere with airflow, in a spare room, a closet, a grow tent, even the inside of a computer case!
Outdoors is cheaper to get started since you probably don't have to get grow lights though you will have to worry about privacy, people possibly stealing your trees, bugs, and other unexpected worries.
If you pick the right strain and live in a good environment, it may possibly be less work to grow outdoors, since you don't have to provide everything.
Step 2: Choose Your Growing Medium
 These are the most common grow mediums:
-
Soil
-
Soilless Mix (coco coir, perlite, vermiculite, etc)
-
Directly in Water / Hydroponics
-
Some even grow with plant roots in misted air
If you're having a tough time deciding on a grow medium, I would start with plain coco coir. Download the growing weed with coco coir cheat sheet!
Growing with coco coir is often the easiest for beginners because it's cheap, holds water well, and doesn't have as many of the problems associated with soil (bugs, root problems, etc).
Step 3: Choose Your Grow Light - What kind of light to grow weed?
There's lots of different growing lights for weed, including:
- Sun
-
High Pressure Sodium (HPS)
-
Metal Halide (MH)
-
Compact Fluorescent Light bulbs (CFLs)
-
Other Fluorescent Lighting (T5 / T8)
-
LED grow lights

HPS/MH lights (like the combination light pictured to the right) are the standard lights for growing weed, but they run hot and will leave a mark on your electricity bill.
Beginners starting small indoor grows might want to start with CFL bulbs, though they lack the power of other lights.
LEDs are more powerful, but also much more expensive. (Learn more about a new, ultra-powerful LED grow light in the Check It Out section below!)
Step 4: Choose Your Nutrients
If you're growing in soil, you will want to get nutrients made for soil.
If you are growing in any medium besides soil, like coco coir, or a soilless mix, you will want to get nutrients specifically made for hydroponics. Some nutrients are even more specific, like Canna Coco is formulated to work best growing weed in Coco Coir.
One nutrient system to rule them all...
 Looking for a suggestion? One of the best nutrient systems for beginning growers is Dyna-Gro ( Grow, Bloom)
Dyna-Gro can be used at half-strength in soil, water, coco coir, or any growing medium and works amazing well for growing weed.
Just use " Grow" during the Vegetative stage and " Bloom" during the Flowering stage. It's super simple.
Like all nutrient systems, don't use it at full strength or it will burn your plants!
Step 4B: Nutrients, continued: The Importance of Root pH
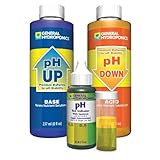
It's important to maintain the pH of your root environment to prevent nutrient problems.
The easiest way to do that is to test the pH of your water before you water your plants.
Some growers get lucky and successfully grow weed without testing the pH of their water, but most people who don't test for pH will start seeing signs of nutrient deficiencies and other nutrient problems.
 This is because even if the right amounts of nutrients are present, your weed simply cannot absorb them if the pH isn't in the correct range. This is because even if the right amounts of nutrients are present, your weed simply cannot absorb them if the pH isn't in the correct range.
It's actually really easy, quick, and cheap to learn how to check and adjust the pH of your water, and there are "pH test kits" specifically made for this purpose.
After you get the hang of it, checking and adjusting the pH and will take you less than 5 minutes each time you water your plants. And your results (monster yields with huge buds and healthy plants) speak for themselves.
Soil: Maintain 6.0 - 7.0 pH
Hydroponics: Maintain 5.5 - 6.5 pH
Getting the pH exactly right isn't nearly as important as checking regularly and making sure it stays within these ranges.
Step 5: Get Baby Weed Plants - Seeds OR Clones
Seeds: Get more info on where to get seeds here
Clones: Get more info on taking clones from a "Mother" plant
If you have an already rooted clone, then you can actually skip right to Step 7
Step 6: How to Germinate Weed Seeds (skip this step if you started with clones)
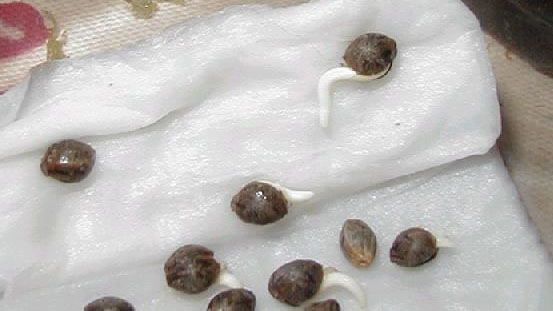 There are many methods for cannabis seed germination. I personally think the simplest way to germinate seeds is the paper towel method. There are many methods for cannabis seed germination. I personally think the simplest way to germinate seeds is the paper towel method.
Paper Towel Method:
You will need:
-
Seeds
-
2 plates
-
Paper towels
-
Water
-
A place to plant sprouted seeds
 NOTE: If seedlings seem to be "stretching" upwards or growing very tall, usually it's because they want more light.
Step 7: Vegetative Stage - Grow Your Plant Big and Strong
Once your plant grows the first "regular" set of leaves, it's pretty much officially in the vegetative stage.
In this stage, your plant will focus ONLY on getting big and strong, like a kid before hitting puberty. Buds and flowers are not part of the plant's vocabulary yet.
In fact, you can't even tell if a plant is a boy or a girl yet.
Give plants 18-24 hours/light a day in the vegetative stage if growing indoors.
If growing outdoors, try to make sure you plant gets strong light for most of the day.
The size your plant gets in this stage will have a huge impact on the final size of your plant.
Step 8: Flowering Stage - Change to 12-12 Light Schedule, Identify Gender of Marijuana Plants and Get Rid of Males
We're getting to the exciting part.
Most strains of marijuana begin this stage once they're getting at least 12 hours of uninterrupted darkness a night.
Indoors, you must change your light schedule to 12-12 to get your weed to start flowering.
Outdoors, your weed will naturally start flowering when the days get short enough.
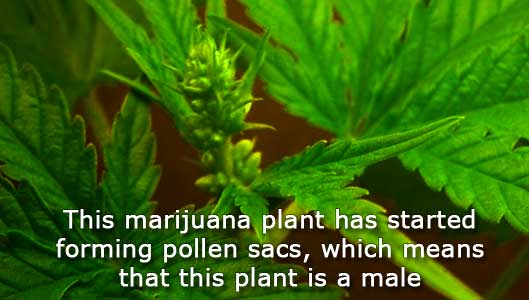
This is where your plant goes through "puberty" and basically reveals whether they are a boy or a girl.
Unfortunately, for regular seeds, half your plants will end up female and half will end up male. For most tree farmers, we're only looking for females.
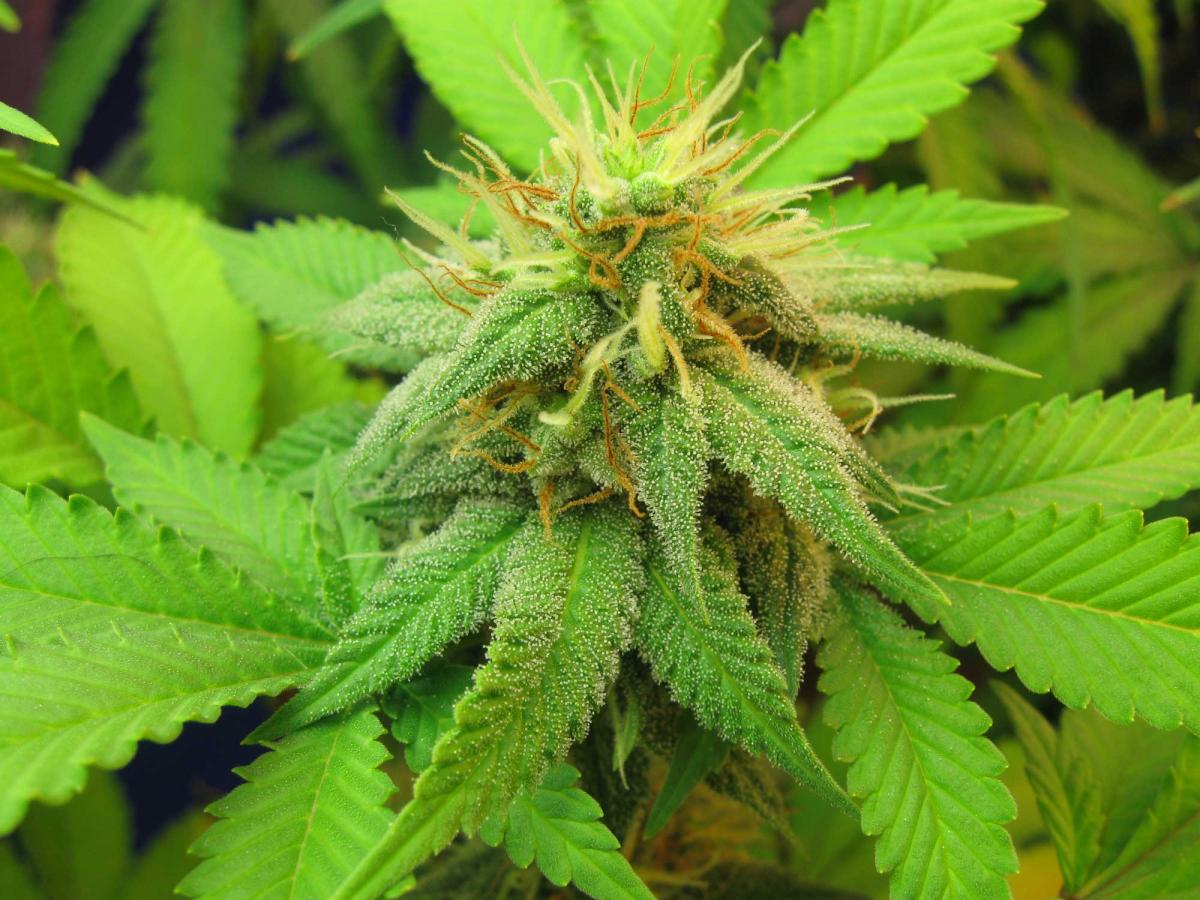
Female plants start growing wispy white hairs at the tops of branch joints. These are the pistols of her flowers. This is good, that means she will eventually grow beautiful weed with buds/flowers/ganja that you can smoke.

Male plants start growing balls/pollen sacs. Unfortunately, most male plants do not develop psychoactive properties like girls do in their flowers. Plus, male plants can "impregnate" your female plants and cause them to make less buds and more seeds. Therefore many marijuana growers choose to remove and dispose of male plants as soon as they show their balls.
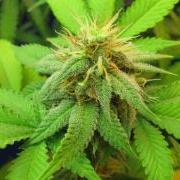
Ok, so you've gotten rid of your male plants. Your female plants will be growing more and more white hairs and before you know it, actual buds/flowers/trees are forming.
Woo hoo!
It's important to pay very close attention to your weed during the Flowering stage. This is because in this stage your plant is much more likely to suffer from nutrient problems, as they're focusing all their energy on growing buds.
Step 9: Harvest Your Weed
When to Harvest Weed? Is She Ready For Harvest?
 1.) Wait until your buds stop growing new, white hairs. By this point your buds should be fragrant (the whole grow room or area will likely smell strongly as cannabis), plump and 'filled out'. 1.) Wait until your buds stop growing new, white hairs. By this point your buds should be fragrant (the whole grow room or area will likely smell strongly as cannabis), plump and 'filled out'.
2.) Wait until at least 40% of the white hairs have changed color (darkened) and are curling in. This marks the beginning of the harvest window. Buds harvested now will have more of a speedy effect and are not at full potency.
3.) Harvest when 50-70% of the hairs have darkened for highest THC levels
4.) Harvest when 80-90% of the hairs have darkened for more a couchlock, anti-anxiety effect (some of the THC has turned into the more relaxing CBN)
The hardest part of growing weed for many new growers is waiting for the right time to harvest.
There are additional marijuana harvest methods - such as using trichomes to know when to harvest weed.
I sometimes get asked how to harvest weed... (i.e. cut it down from the plant)
Just get a sturdy pair of scissors and cut the plant down in the most convenient way possible. Seriously...that's it!
Step 10: Dry and Cure Your Newly Harvested Buds
After you have cut off and trimmed all of your glittery, beautiful fat buds, you will want to hang them upside down in a cool, dark place with plenty of ventilation so that they can dry out.
Dry buds slowly for best results, and check often for mold or overdrying. You've worked way too hard to lose your crop now.
After your weed has dried, it's time to cure them so they're smooth, taste good, smell good, and have the best effects.
 To cure your buds, put them in a tightly-closed jar in a cool dark place. You may want to open the jars once a day for a couple of seconds to get fresh air in your jars and release any moisture. To cure your buds, put them in a tightly-closed jar in a cool dark place. You may want to open the jars once a day for a couple of seconds to get fresh air in your jars and release any moisture.
After your weed has been curing for 1-2 weeks, you can start opening the lid once a week instead of once a day.
Some people only cure their bud for 1-2 weeks total while other cure their bud for 30 days or more. Because you need to open the jar regularly, you can always sample some as it's curing to get a feel for whether it's done or not.
I personally think that cannabis tends to be more potent if you cure it for at least a month.
Curing for longer than 6 months doesn't do anything, and weed become less potent over time as THC turns to CBN. Keep your harvest in a cool, dry, airtight space for long-term storage.
That's it! 10 Simple Steps And You've Got Your Very First Marijuana Harvest!
About the Author: Nebula Haze
In response to the need for more tutorials aimed at new growers, Nebula co-founded GrowWeedEasy.com in 2008 with fellow grower Sirius Fourside.
Since
then, Nebula has published dozens of growing articles in print and
online, stars in several online video lessons, and continues to dedicate
herself to serving the needs of the medical marijuana growing
community.
"My
mission is to show other medical marijuana patients how easy and fun it
can be to grow pounds of killer weed out of your closet."
Join Nebula Haze on Twitter
Join GrowWeedEasy.com on Facebook
Check It Out!
FOR SERIOUS GROWERS ONLY
Are you interested in... LED Grow Lights?
So you've probably heard the incredible benefits... low electricity usage and even lower heat
output.
But do they actually work to grow marijuana?
Some LED grow lights work pretty good but...
The Pro Grow X5 Grows Bigger Buds Than Any LED Grow Light I've Ever Seen!
And I've used dozens of different models...
The Pro Grow X5 is make just for plants like marijuana, and it grows HUGE buds in all our tests so far.
As far as I know, the Pro Gro X5 is the first 5W chipset LED grow
light from a tried-and-tested company that has actually has been used
for growing marijuana.
He's about to harvest next week, and just click the picture below to watch his latest update and see for yourself his awesome grow room with dozens of fat buds!
You don't normally see yields like this with an LED grow light; his results are much closer to the what you'd expect to get from an HPS or MH/HPS combo.
See for yourself!
We Need Your Help!
Ever wondered how you could help overgrow the world?
Interested in getting exposure while showing off your growing skills
and helping other growers around the world produce bigger, more
potent buds?
Do you have experiences, pictures, or lessons learned that you believe will be helpful for other growers?
If so, we want to hear from you!
Nebula
Haze and Sirius Fourside, founders of GrowWeedEasy.com, have dedicated
their lives to building the most comprehensive, easy-to-follow marijuana
growing resource in the world.
We
know that the best way to get medicine into the hands of those in
needs is to provide people with information that makes it easy for
anyone to grow it themselves....
From a fellow grower who frequents GrowWeedEasy.com:
"Hey Nebula,
I just wanted to share this photo with you[see picture below]. This is the direct results of using your web site, with visits almost daily. I'm a 58 year old woman with chronic pain. This was only my second grow! I'm so proud of this and I owe it all to you and the wonderful words of wisdom from www.growweedeasy.com"
Wow...just wow. This is easily one of the most moving testimonials we've ever received for the website. I'm so glad we could help you grow such an awesome looking flower!
Nebula
Question: Hey growweedeasy guys! I been thinking about starting a grow and I read the basics on your site. The thing is my friend says that Miracle-Gro works just as good or better for growing bud as the expensive nutrients like on your site. What do you think?
Answer: That's definitely some bad information you got there. I've heard tales of people successfully using Miracle-Gro to grow cannabis, but in my experience, it's nothing but trouble. Do yourself a favor, spend the extra $30 on nutrients that are made for cannabis. The real answer is that Miracle-Gro isn't made specifically for cannabis type plants, so - especially in flowering - you can end up with plants that show nutrient deficiencies and nutrient burn at the same time!
Sirius
From Sirius: I'd love to see pictures from a grower who's successfully growing cannabis using only Miracle-Gro for nutrients.
Remember, sharing is caring!
Forward this email to a friend in need!
Copyright © 2012 GrowWeedEasy.com
NOTE:
If URLs do not appear as live links in your e-mail program, please cut
and paste the full URL into the location or address field of
your browser.
Disclaimer: Grow Weed Easy
only recommends products that we've either personally checked out
ourselves, or that come from people we know and trust. For doing so, we
may receive a commission.
Nothing
in this e-mail should be considered personalized Financial, Legal, or
any other kind of Advice. The contributors to this magazine grow legally
under their local laws. If you cannot legally grow where you live, we
DO NOT recommend that you start growing marijuana, as you can be
arrested, put in prison, or worse!
Any decision to grow marijuana should only be made after consulting with an experienced lawyer or other legal adviser. Although
our employees may answer your general customer service questions, they
are not licensed under securities laws to address your particular
investment or legal situation. No communication by our employees to you
should be deemed as personalized Financial or Legal Advice. Any
investments and steps recommended in this letter should be made only
after consulting with your lawyer or other legal or investment adviser.
Nothing
in this e-mail should be considered personalized Health Care Advice.
Although our employees may answer your general customer service
questions, they are not licensed health care professionals. No
communication by our employees to you should be deemed as personalized
Health Care Advice. Any Health Care recommended in this letter should be
made only after consulting with your Doctor and licensed Health Care
Advisor.
|